The Top Mitsubishi Galant VR-4 Resource

Join the best E39A 1991-1992 Mitsubishi Galant VR-4 community and document your GVR4 journey.

  • Software Upgraded - Reset Your Password to Login
    In order to log in after the forum software change, you need to reset your password. If you don't have access to the email address you used to register your GVR4.org account, you won't be able to reset your password. In that case, follow the instructions here to regain access to the forum.

The never ending build of 1062.

Quoting Terrance362:
lookin good. what is your power goal?? What are you doing with the car drag????


Probably going to be a tube frame autocross car. /ubbthreads/images/graemlins/dunno.gif


/ubbthreads/images/graemlins/rofl.gif
 

Hksvr4

Well-known member
Joined
Sep 22, 2004
Messages
3,023
Location
NYC
WOW. It's amazing to see one can put something like this together. The first front half-ed gvr4 I've even seen. With that said, how do you make everything fit so nicely? The shocks, motor mounts, the tranny, motor, and everything in front end. I mean it's just amazing. I know it's for drag, but are you going for personal best or compete?
 

Galantvr41062

Well-known member
Joined
Aug 20, 2007
Messages
410
Location
plymouth, MN
Thanks, well in a few pics you will notice the front lower cross member is still factory mounted, and there is a weird looking metal frame deal that was fabricated to locate the strut tower mounts. This is in the rule book for NHRA for the class I plan to run, that you need to retain the factor strut mount location up front, but they do not say you need to retain the factor structure to do so. And I built a solid rear motor mount that would locate the motor from side to side and front and back in the chassis. Before I started cutting I took a lot of time to level out the chassis on jack stands. Then with a few drawings and tape measure I located vital parts like the frame rails, tranny mount, front motor mount to name a few. Then I did not move the car, and check a few time to make sure it did not move as I was fabricating the new frame pieces. Then after the motor and tranny were back in the right spot it was onto the hard part, the removable front end. In this case I retained the factor mounts for the fenders off the fire wall/a pillar, then with the metal front trim piece above the bumper cover and some measuring to get the fenders square off the body. Then I made the frame to hold the fenders together and slide onto the chassis, then mounted the front bumber cover and the hood pins.

~John
 

Galantvr41062

Well-known member
Joined
Aug 20, 2007
Messages
410
Location
plymouth, MN
The car runs, it would have fired right up but I forgot to mark which coil was what, so after 10min of poking it starts and cams at 1400rpm on E-85 with an old map I had converted to 550cc primary injectors and E-85.

Now for the bad news, to make a long story short I was trying to get the car on the dyno and up to the MAP shoot out this weekend. But the Evo 3 3rd and 4th gears I bought for the home made Stage 4 tranny are on national back order and I will not have them for a few weeks.

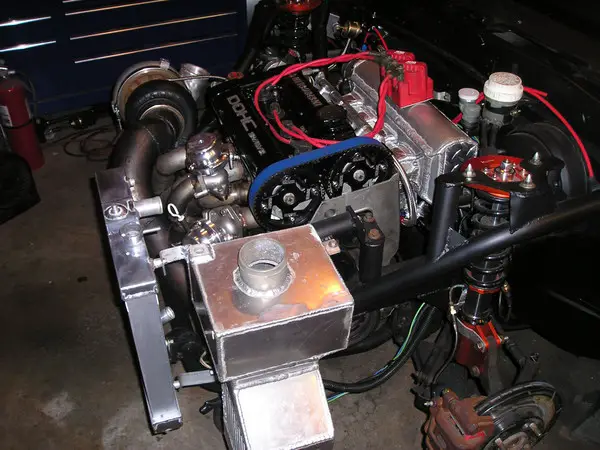
I would ask to buy or borrow a tranny or just the gears from a tranny but I think I can wait a little longer for my parts to show up. So for now here is a small look at what we have been up to for the past 2 months.

Picture_20049.jpg

Picture_20048.jpg

Picture_20051.jpg

Picture_20056.jpg

Picture_20055.jpg

Picture_20059.jpg

Picture_20054.jpg

Picture_20052.jpg

Picture_20050.jpg


Here is a run down of the new shinny parts:

- Tranny, everything to make a stage 4 tranny: evo 3 1st gear, cut double syncro 2nd, evo 3 3rd and 4th gear conversion, new bearings threw out, welded center diff, welded parts on the front diff you help keep it in 1 piece, new shift forks, new magnetic drain plugs, new throw out fork and throw out bearing, etc

- Quarter master twin disk clutch

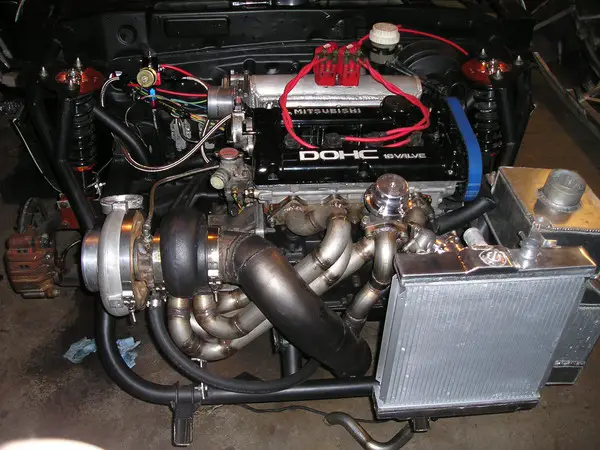
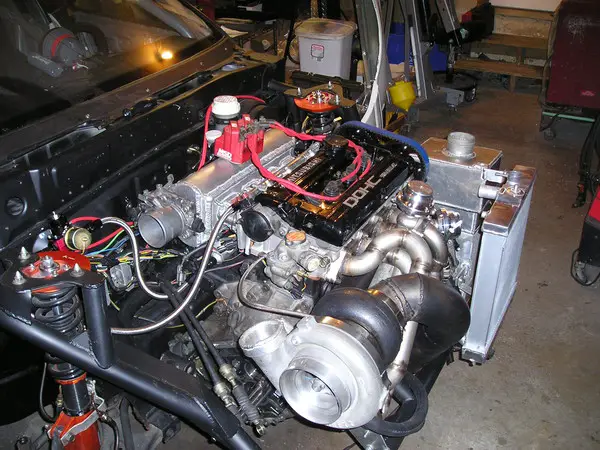
- Tial 38mm WG with 1.6bar springs x2

-Tial 50mm bov

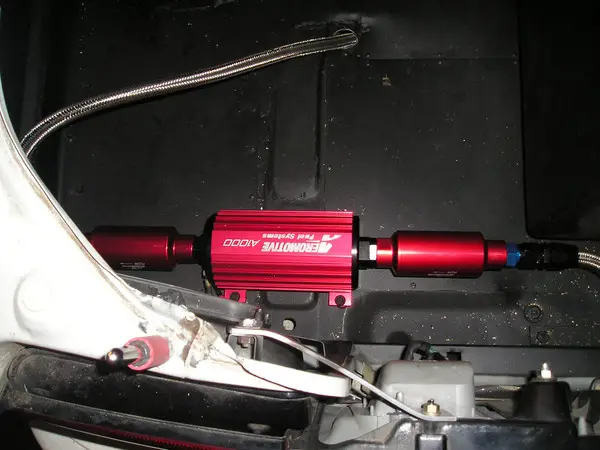
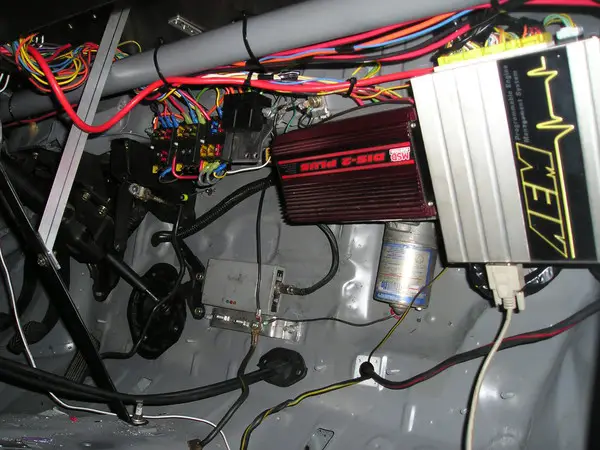
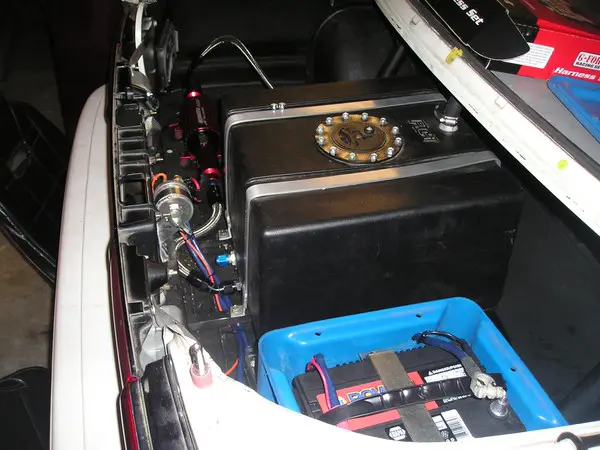
-A1000 fuel pump, filters, and FPR

-PTE 550s primary and ford 1600cc secondary injectors

-civic 1/2 sized radiator

-17" wide Kirkey race seat and 5 point harness for the passanger side

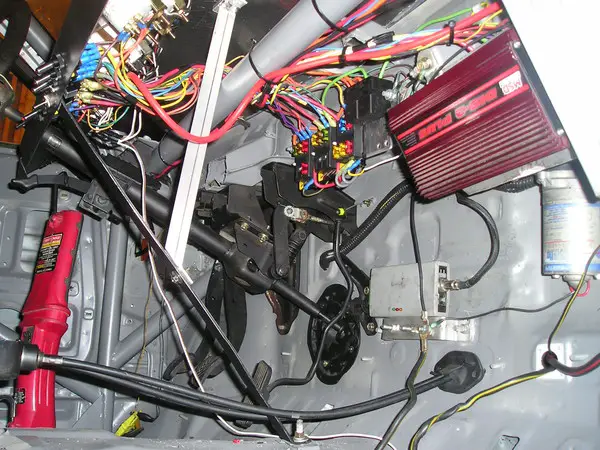
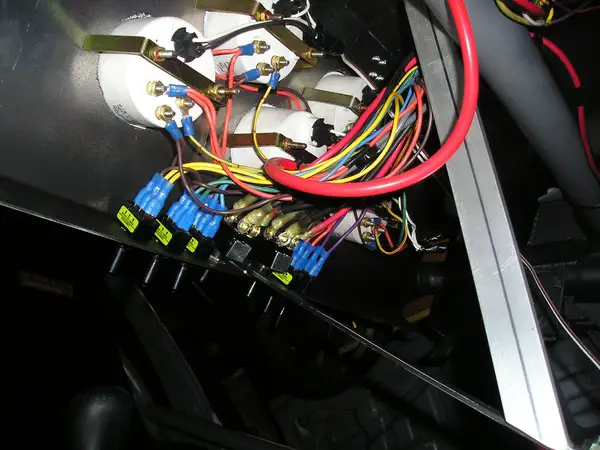
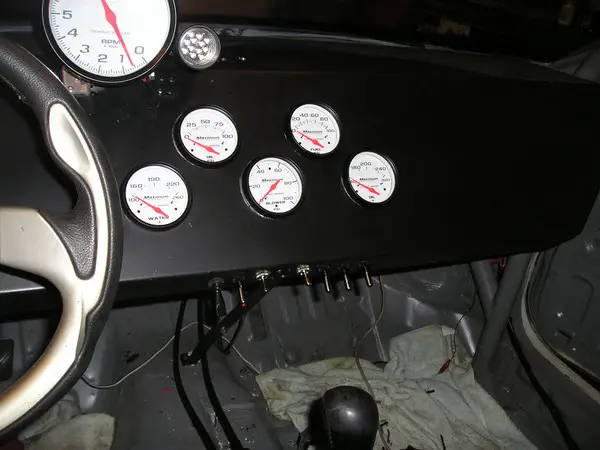
-A ton of electrical stuff to make everything work

-BF goodrich T/A drag radials 225 50 15's this should give me a 9.2" contact patch at all 4 corners

-etc

So I hope to get it down the track this season yet, but as the title goes on the galantvr4.org post, the never ending project.

~John
 

turbowop

Well-known member
Joined
Apr 29, 2001
Messages
11,972
Location
Yakima, WA
/ubbthreads/images/graemlins/rock.gif /ubbthreads/images/graemlins/rock.gif /ubbthreads/images/graemlins/rock.gif /ubbthreads/images/graemlins/rock.gif /ubbthreads/images/graemlins/rock.gif
 

TylerAdamson

Well-known member
Joined
Dec 26, 2007
Messages
1,034
Location
Iowa City, Iowa
Do you have any more detailed pictures of your trunk? I'm thinking about ditching the stock rusted tank and putting my fuel cell in their but haven't really seen any others to inspire me.
 

Galantvr41062

Well-known member
Joined
Aug 20, 2007
Messages
410
Location
plymouth, MN
I will post some more pics in the next few days, and a few more up close in the trunk area.
 
Last edited:

bazeng

Well-known member
Joined
Feb 6, 2003
Messages
2,520
Location
Melbourne, Australia
The car looks fantastic??

How many guys do you have working on it? or is it all yourself???
I know how much work it is to do something like that.. amazing stuff!!
 

CarRacer

Well-known member
Joined
Jun 28, 2007
Messages
4,371
Location
Shakopee, MN
It's crazy. I think it's mostly just him working on it. He's doing it in his home's two car garage too. I NEED to see this thing run.
 

Galantvr41062

Well-known member
Joined
Aug 20, 2007
Messages
410
Location
plymouth, MN
Thanks guys. For the last 10 months or how ever long this build thread is, it has been 2 other guys and I on and off working on the car. They are my good friends Kyle and Ryan. So it has been the 3 of use most of the time, min there are 2 people working on the car. It has been about 20 hours a week over this build, more on some weeks, less on others. Over the last 2 weeks in trying to get it ready for the MAP shoot out we have put in over 100 hours. The car is really close now, I will be waiting on the gears and dyno time.

~John
 
Last edited:

Galantvr41062

Well-known member
Joined
Aug 20, 2007
Messages
410
Location
plymouth, MN
I plan to race the car in the NHRA hot rod class or bracket race if I go to the track for a "normal" day. I have some pics of the trunk area on pages 1 and 2 of this thread and a few more on mitsu style. Here a few more of the finished trunk area:


I will post some more pics when it is closer to running down the track.

~John
 

bazeng

Well-known member
Joined
Feb 6, 2003
Messages
2,520
Location
Melbourne, Australia
Quoting GalantVR41062:
Thanks guys. For the last 10 months or how ever long this build thread is, it has been 2 other guys and I on and off working on the car. They are my good friends Kyle and Ryan. So it has been the 3 of use most of the time, min there are 2 people working on the car. It has been about 20 hours a week over this build, more on some weeks, less on others. Over the last 2 weeks in trying to get it ready for the MAP shoot out we have put in over 100 hours. The car is really close now, I will be waiting on the gears and dyno time.

~John


That is sorta a relief! I was saying to myself "man I must be slow!!!" I've been building mine alone and it has taken a total of 6 years!! LOL..
I've gone through about 4 builds though.. hahaha

So how do you go about trusting your friends with working on the car? They must all know what they are doing. I wish I had some friends to help!
 

Galantvr41062

Well-known member
Joined
Aug 20, 2007
Messages
410
Location
plymouth, MN
I used to Co-own a performance shop with Ryan and Kyle has worked for me in the past on cars. There are certain parts of the car I do all the work on, just like anybody who works on there car with other people. When we are working on the car we have a big check list that we come up with on what needs to be done, then we go over every thing on the list to come up with the best solution and who ever is best suited or feels confident they can complete the task it gets done and crossed off the list. So its like we are all building the car but I do have a big say in what goes on, and I normally help here and there on just about every part of the build. In reality this is the only way a car like this could be built in a reasonable time frame, you just have to trust in the people you have working for you.

~John
 

TylerAdamson

Well-known member
Joined
Dec 26, 2007
Messages
1,034
Location
Iowa City, Iowa
John, thanks for more pictures of the trunk area. I guess my only question is, did you cut the spare tire well out and tin the trunk or is it still in tact and just modified slightly to bolt the cell down?
 

Galantvr41062

Well-known member
Joined
Aug 20, 2007
Messages
410
Location
plymouth, MN


I cut most of the trunk area off the car. I left the 2 "frame" rails that go to the back and the rear wheel wells/shock mounts alone. The fuel cell is mounted to a aluminum frame that is bolted to the chassis. I also cut all the factory sheet metal from the rear deck lid and fabricated my own fire wall for the trunk. I also cut the side pockets out of the trunk area and made that flat and made new mounts for the rear bumper cover.

~John
 

curtis

Well-known member
Joined
May 4, 2003
Messages
11,892
Location
Clarksville TN
Its just sick and twisted. /ubbthreads/images/graemlins/devil.gif

Video's please.
 
Support Vendors who Support the GVR-4 Community
Boosted Fabrication ECM Tuning ExtremePSI Fuel Injector Clinic Jacks Transmissions JNZ Tuning Kiggly Racing Morrison Fabrications RixRacing RockAuto RTM Racing STM Tuned
Top