- Software Upgraded - Reset Your Password to Login
In order to log in after the forum software change, you need to reset your password. If you don't have access to the email address you used to register your GVR4.org account, you won't be able to reset your password. In that case, follow the instructions here to regain access to the forum.
You are using an out of date browser. It may not display this or other websites correctly.
You should upgrade or use an alternative browser.
You should upgrade or use an alternative browser.
Fuel Pump Tips?
- Thread starterBpuVR4
- Start date
BE CAREFUL if those are steel nuts/screws/lines, as in don't cut them with a dremel: Sparks and gas fumes don't mix! I realize this is outside the tank, but any little leak will produce fumes and those are what's so explosive.
when I did mine, I pulled the entire assembly out, cleaned it up real good and then proceeded to work on it...you don't want to mess with gasoline is all I'm saying.
Sounds like you got it out? But if not, then keep trying with manual tools.
when I did mine, I pulled the entire assembly out, cleaned it up real good and then proceeded to work on it...you don't want to mess with gasoline is all I'm saying.
Sounds like you got it out? But if not, then keep trying with manual tools.
Last edited:
JNR, i took a break. I think i can save the studs if i do this right. HOWEVER...as much time as I took in trying to figure out which pump is the right one to get, I of course end up getting the pump with ports on opposite sides. I guess i got fooled when the ad said specifically for a GVR4. Great.
Ah, gotcha...hmm, is there enough room to get from 'a' to 'b' with the supplied hose or is it too tight (kinking rubber lines)? If not, is there enough room to put a hardline piece in that area long enough to get it from 'a' to 'b', so to speak, then go with the rubber part. Been awhile since I've looked under there, but have a feeling there isn't a lot of room to play with. a hard 90 to a hard 90 if its super tight but doubt it's that bad (or a 45 to a 45 rotated better with the room available) on a tube piece may work though, but can't tell without seeing; Rather than fiddling with tubing, perhaps get some npt brass fittings and nipples, street elbows, etc. and come up with something...just try to keep it in such a way of the bends not being so drastic, but since it's under the pressure it is, not so sure it would be *that* bad using npt/compression type fittings...
Last edited:
turbowop
Well-known member
If he wants to mount it like stock, it won't work since the "hood" the outlet seats in with the o-ring is on the wrong side. And even if the hood is cut off, there isn't much room for a hose to be used without kinking it. Both my cars use a hose there, but it's a straight shot with the correct pump.
Really the only thing is that the bottom will now have the sock filter 180 degrees the other way. I'm not sure if it will work that way or not, or if it won't line up with the bottom bracket like that. Since it seems like you have the time to wait, I would send it back and get the correct one. But in a pinch, that one can probably be rigged to work.
Really the only thing is that the bottom will now have the sock filter 180 degrees the other way. I'm not sure if it will work that way or not, or if it won't line up with the bottom bracket like that. Since it seems like you have the time to wait, I would send it back and get the correct one. But in a pinch, that one can probably be rigged to work.
Last edited:
im pretty upset because i spent a good chunk of time reading through the forums to make sure i was choosing the right one. But i guess in that time i was also trying to decide between the 190 or 255, but chose the 190 because I didnt want to deal with a afpr right now in case it needed it, and that skewed my thinking. Also shouldn't have made a purchase at 4am. I'll wait til the pump is out of the car first to see what's been done to it already.
I guess not too many have adapted the wrong pump in? ie the gss341 255lph onto our assembly? Wondering if it really can be as simple as chopping that hood off, and running a fuel line?
I guess not too many have adapted the wrong pump in? ie the gss341 255lph onto our assembly? Wondering if it really can be as simple as chopping that hood off, and running a fuel line?
Last edited by a moderator:
GSTwithPSI
Well-known member
Hey man,
I actually just adapted a wrong Walbro 255 to my stock VR4 fuel pump hanger. I honestly didn't know there was a different correct Walbro pump that could be purchased for the VR4. I just assumed everyone adapted the wrong DSM Walbro pumps to work. Apparently, my lack of overall VR4 knowledge and the ever present subconcious thought that the VR4 is just another DSM has yet again ruined my life. That being said, the process is definitely not hard. I dont have any pictures of what I did, but I could pull the fuel pump assembly tonight and snap some pics for you. Until then, I can basically describe what I did.
You need:
-Some round metal hollow spacers or washers (about 1" in thickness)
-2 long Bolts to fit inside the spacers (& nuts and washers to secure them)
-A piece of flat metal about the length of the fuel pump body
-A piece of fuel line cut down the side to use as a cushion between the fuel pump body and meatl bracket you will make.
-A hose clamp that is large enough to surround the pump and hanger.
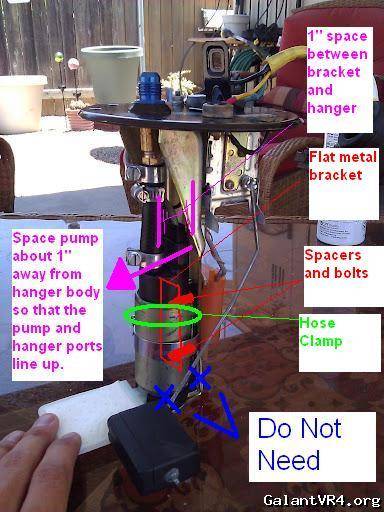
Basically you just make a flat metal bracket that extends the pump body out from the pump hangar. Use the washers to space the bracket out far enough that the outgoing port on the 255, lines up with the incoming port on the fuel pump hanger. Below is a rough diagram of what im talking about. After you build the bracket that spaces the pump away from the pump hanger, use the hose clamp to go around the entire pump and hanger to secure the pump. You will no longer need the sock rubber cushion or lower holding bracket that hold the factory pump in.
The crappy drawing is all I have right now. Keep in mind the pump shown in the pic is a stock pump. The top of the 255 pump you have will be exactly opposite of the one in the picture. If you took the top of the pump in the picture off, and turned it 180 degrees (the pickup filter points the same way on both pumps), that is exactly what your pump will loolk like. Like I said, I'll try and pull my pump sometime soon and take some real pictures for you. The job I did on mine turned out great, and looks and functions like stock. Overall, It's really easy and nothing you should worry about. Hope this helps.
Last edited:
GST you are the man. thats why i love this forum, plenty of generous sharp thinking here. I'm hoping to pull the pump out tonight, so I guess I'll see exactly what Im working with. Now if only i can borrow that San Diego weather...
So the stock inlet and outlet are on the same sides of the pump.
I have been comtemplating getting one of these...
fuel pump
Looks like this would work.
I tried a Walbro last year (don't remember which number), but it would contact the bottom of the tank and I could not get the gasket to seal. Drove me crazy for a week until I just replaced it with my old stock one from my other car. I think it may have had the opposite side setup and could have been part of the problem. I was using the stock pickup hood.
GSTwithPSI
Well-known member
Yeah, I definitely think that AEM pump would work just fine.
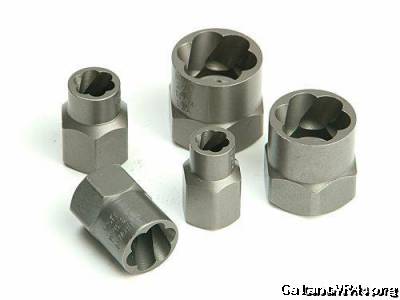
the project is finished gentlemen. I used Irwin Nut Removal sockets on the nuts that were stripped- they worked unbelievably great. I definitely suggest a go at these next time you have a stripped head or nut.

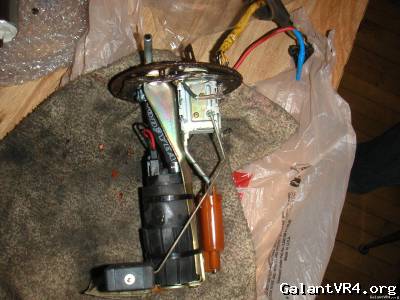
old pump setup

I had a hunch the previous owner couldve put in the "wrong" one....or at least hoped he did, based on his track record of doing repairs. Lo and behold, yes he did- had a TRE 341 in there, leaving me with less work. I got the new 190 in, and she runs great now. No leaks on a short test run, wiring is tight- I'm happy.
old pump setup
I had a hunch the previous owner couldve put in the "wrong" one....or at least hoped he did, based on his track record of doing repairs. Lo and behold, yes he did- had a TRE 341 in there, leaving me with less work. I got the new 190 in, and she runs great now. No leaks on a short test run, wiring is tight- I'm happy.
turbowop
Well-known member
Well hell, I guess you can run a piece of hose there without kinking it. I didn't think there was enough room. But I left as much of the hard tube as possible in an attempt to fend off any issues with possibly blowing the hose off due to fuel system pressure.
Excellent work!
Excellent work!
Ah, there is more room then I had remembered, so guess it did work out...I'd like to use hard line as well, although imagine there is *some* vibration/movement involved using an electric pump (cycles, pressure changes, etc.), so it's good to have some buffer and probably why they use rubber. Either way, glad you got it worked out.
thanks you guys for the help. my car is running the 2g mas/560cc/evo 3 16G combo on a SAFC...previously tuned i suppose w this 255 that was in there. now that I have a 190, does it make big enough difference where I need to get it tuned again? I am definitely looking to get a chip for this setup in the near future, but it's running pretty good as is right now. Looks to be stock fuel pressure regulator as well.
and yes..I know ecmlink is the end all, but do not have right now haha.
and yes..I know ecmlink is the end all, but do not have right now haha.
Last edited by a moderator:
turbowop
Well-known member
You shouldn't need a retune, as your new pump shouldn't change fuel pressure anywhere other than maybe at idle if the old 255 was overrunning the stock FPR. You may just need to adjust the SAFC at idle RPM.


