The Top Mitsubishi Galant VR-4 Resource

Join the best E39A 1991-1992 Mitsubishi Galant VR-4 community and document your GVR4 journey.

  • Software Upgraded - Reset Your Password to Login
    In order to log in after the forum software change, you need to reset your password. If you don't have access to the email address you used to register your GVR4.org account, you won't be able to reset your password. In that case, follow the instructions here to regain access to the forum.

unibody section replacement

misterfixit

Well-known member
Joined
Aug 4, 2004
Messages
1,596
Location
Midlands, UK
yeah.. once you've butt wede the rails, and done some dollying on the top of the inner wings and welded up the crossmember mounts it'll fly back together!
keep going..

watching with baited breath

Rich
 

DR1665

Well-known member
Joined
Oct 19, 2005
Messages
4,642
Location
Iowa City, IA
Okay, fellas. I'm thinking I could use some input to make sure I don't fumble the last plays of the game. If you could offer some suggestions on the following, I would REALLY appreciate it. As I see it, this is what I've got left to do on 195:

* Finish straightening out fender wings.
--- Rich mentioned "dollys" above. Not sure what that means. I suspect it has something to do with a way to bring an entire section over at once. I've got a couple ratchet straps and a come-along. I will be using the trailer hitch on the Amigo as my anchor. Without a dolly, you think I should try using two straps at once and slipping them over a small piece of 2x4 on the backside of the fender wing so that the tension is more evenly applied when I pull it back? Any better ideas?

* Final alignment of new core support.
--- For this, I plan on borrowing a heavy duty grinder to get the cuts on the sidemembers closer to parallel. I'm also going to see about cutting the boxes off the old crossmember mounting points with the Sawzall, then fit them between the front crossmember and new core support prior to getting them welded in place or another, mo betta solution.

* Test fit front end components prior to final installation.
--- Once things are ready for welding, I'm going to use some nuts and bolts to sort of fixture the new core in place so that I can make sure the hood, fenders, lights, grille, trim, bumper and cover will install correctly. I would hate to get it all welded and find out the lights bind up at installation or something.

* Conversation with AMMfab regarding quote for welding projects - core installation, FMIC mounting, IC piping.
--- Finally tracked down my fab buddy. We're going to talk tonight about how much it's going to cost me to have things welded up for posterity. Mig/Tig/Matter? I'm also going to see about having him help figure out the front crossmember situation - whether welding in the boxes from the old core is a good an idea as something else - as well as mounting points for the SRT4 FMIC and piping.

* 4WS - Block off open lines, ensure conventional PS still works.
--- I was just doing some research into this over my lunch break. Right now, I've got the two hoses (low-pressure?) from the reservoir capped off just fine. The 4WS hardlines that come up from the passenger side under the car and cross under the core support were broken in the impact, so I'm constantly losing fluid through all this. I know there are more locations than this and a full 4WS delete is definitely in the works, but for now, I would like to know if I can get away with draining the rest of the fluid in the lines under the car and capping the high-pressure lines on the front rack with the oil pan drain bolts. Perhaps I can just cut, fold, and have my buddy Mike weld them shut or something? Looking for the "rally fix" here - doesn't have to be pretty, just has to preserve power steering while preventing leaks from these damaged lines until I can perform a proper removal.

* Replace battery ground strap.
--- Easy money.

* Paint. (Wheels too?)
--- This is what I'm going to be doing tonight after work since it will be too late/dark to be using a Sawzall on the car in the neighborhood, imo. The whole car is going to be flat black. I'm starting with the A- and C-pillars and roof and we'll see how far I get tonight. Maybe trunk/wing too.

Appreciate the time, fellas.
 

toybreaker

iconoclast
Joined
Apr 30, 2006
Messages
3,581
I was concerned that the front structure was going to be different. /ubbthreads/images/graemlins/banghead.gif

It's a bit of a debacle trying to measure some of the lengths. There's aways something in the way when trying to use a measuring tape.

A home made trammel bar might make things go quicker, and would be easy to make.

Take a broom handle, and drill a hole thru it.

Sharpen a 1/8 inch diameter ~4" long bolt down to a point, stick it thru the hole and tighten it down so it can't move.

Weld a sharpened bolt to a a piece of tubing that slides over the broom handle.

Cut a slit in the tubing lengthwise with a cut off tool.

Slide your new end piece on the handle with some hose clamps around the tubing so you can lock it down.

Now, just pick a point on the unibody map, set your length, bolt tip to bolt tip, tighten the clamps, and measure away. You can put some tape down (on a clean surface), and mark the lengths you need. Then it's quick and easy to set the tips down on the marks, and readjust the bar to that length.

You can measure to a datum hole, a sheetmetal ridge, whatever, and just make the two sides match.

Make sure to verify everything diagonally. That will keep everything symetrical

The "tool" ( /ubbthreads/images/graemlins/tongue.gif ) makes it nice because you can eyeball a dimension quickly, while you're pulling things around with a port-a-power, and not have to fumble around with a measuring tape.

Some judicious hammer/dolly work while everything is under tension will allow the metal to relax into the new dimension, and you won't have to pull so hard.

Go easy on the heat, around the box sections, you'll kill the seam sealer.

A little heat will sure help where it's folded, or really bent, but too much will kill the temper of the metal.


It might be helpfull to drill some extra ~1/4 holes in between the original spot welds on your replacement piece. After it's together, you can rossette weld them up, and gain a little stiffness.

Tack it together in a bunch of places before beginning to weld the bulk of it up. The heat from welding will shrink the metal, and pull it everywhich way but straight.

Do not weld a continuopus bead all the way around the edges of your new panels! That will crack, sure as sh*t. Do short stitches of ~1/2 to 3/4's, and then leave a space of 1/2 to 3/4's, and weld alternate sides, keeping an eye on your measurements.

I usually try to work the same seam/area on each side to try and keep the heat load/dimension change symetrical.

A wet rag will pull a lot of heat out of the panel, but don't get it too close to the worked area, as a quick quench will make the weld brittle and prone to cracking.

I recommend having copious quantities of beer on hand to keep things cool. /ubbthreads/images/graemlins/idea.gif

Having another gvr4 on hand would make things easier, as you could just cheat the measurememnts off it's front clip.

Good luck, and take a lot of pics! /ubbthreads/images/graemlins/cool.gif
 

CarRacer

Well-known member
Joined
Jun 28, 2007
Messages
4,371
Location
Shakopee, MN
^ Sage advice that is.

To clarify, a dolly is a shaped chunk of metal weighing ~1lb, that body workers use with body hammers to shape panels.

Continued luck.
 

boostedinaz

Well-known member
Joined
Apr 20, 2006
Messages
4,085
Location
Scottsdale, AZ
A dolly is either one of these, but I kinda doubt that her chesticles will straighten out your car.


DR1665

Well-known member
Joined
Oct 19, 2005
Messages
4,642
Location
Iowa City, IA
Haha. Nice. Dolly would if she could, I'm sure.

Since I didn't have the Amigo at the house last night to use the come-along or otherwise try pulling things the rest of the way, and it was too late to break out the Sawzall or a grinder, I opted to wash and paint. Of course, despite the car firing up and moving in and out of the garage under it's own power for the last seven months, I hook the battery up last night lower the sunroof only to find the windshield wipers won't shut off and there isn't enough juice to close the sunroof. My first thought was to hook up the jumper cables with either the Volvo or Talon, but they were in the Amigo, which wasn't there. (I'm amazed at how much I rely on an Isuzu SUV to get my Mitsu back together.) Popped the access panel and took an allen wrench to the bolt behind the lights to try to manually close the glass, but I guess that only works front to back.

f*** it. I washed it with the sunroof cracked open. The interior isn't the best anyway.

When I pushed it back into the garage (it was wanting to rain, of all things) to give the roof a final wipe down and first coats of flat black, I noticed the Mitsu Clear Coat Peel® would show through the new paint, possibly resulting in poor adhesion, which would make things look just as bad. So I decided to sand things down. Of course, the sunroof was still popped.

f*** it. I sanded the roof and pillars with the sunroof cracked open. The interior isn't the best anyway.

The roof and pillars look pretty good right now, sanded down smooth with 80 grit. Tonight I'll see about getting that sunroof blown out really good and closed before following up with some finer grits before hosing it off again and possibly painting it.

I talked with Mike from AMMfab last night and the bummer is, he's moving the weekend after next, so he's all tied up until the last weekend before Prescott. He's going to come over this Saturday morning for a few minutes to give me a better idea of how much he would like for the work as well as what sort of prep he needs on things prior to welding. Assuming things go to plan, now, I'll get the car welded and then have just 4 days to get the thing together, inspected, smogged, and tagged before leaving for the rally. Whew!

And what's that, you say? If I have another GVR4 nearby to use as a cheat sheet for dimensions, it will be easier? Hmmm... I wonder who I know with a GVR4? I suppose, when I return the Sawzall to borrow the heavy duty angle grinder, I could ask my buddy Keith if he wouldn't mind letting me borrow the rally car for an afternoon. :p

Here's to the home stretch!
 

ScreaminE

Well-known member
Joined
Sep 4, 2008
Messages
646
Location
Pittsburgh South Hills
Good work brother!

I seriously congratulate you on your work thus far. I would have been tempted to say screw it and scrap that bitch.

So are you going to be able to build her back stronger? Didn't insurance hook you up with a little extra or is all that going into repairs?
 

DR1665

Well-known member
Joined
Oct 19, 2005
Messages
4,642
Location
Iowa City, IA
Quoting ScreaminE:
Good work brother!

I seriously congratulate you on your work thus far. I would have been tempted to say screw it and scrap that bitch.

So are you going to be able to build her back stronger? Didn't insurance hook you up with a little extra or is all that going into repairs?


Thanks. Appreciate that.

Making it stronger isn't really an issue. Having spent time trying to take apart things not necessarily designed to be taken apart, let me assure you that these cars are built like brick shithouses. It's just that, at 30mph, 3400lbs of Mitsubishi steel takes an instantaneous impact of more than 50,000 tons.

I'll be installing an SRT4 FMIC and some hard IC piping, and repainting the entire car flat black, but otherwise, I'm just going to be content to get the car back on the road this month. It's been down too long.

Sprayed the wing last night. I guess you can still see some of the sanding marks through the paint, but I don't know that I really want to pick up some glaze and resand the car all over again. From 3ft, you can't even tell. This car should be coated in a nice dust/dirt patina most of the time anyway.

Tomorrow morning I resume the metal work. I've been giving some thought to dollying up the fender wings and think I've got a good bead on how to do that. Gonna print out the measurements page Rich shared and have it handy to make sure things are straight and then it's time to do some test fitting imo. Would be awesome to have a picture up Sunday night of the car looking complete, if not welded. :p


H05TYL

Well-known member
Joined
Jun 9, 2007
Messages
752
Location
Wgtn, NZ
Quoting DR1665:

* 4WS - Block off open lines, ensure conventional PS still works.
--- I was just doing some research into this over my lunch break. Right now, I've got the two hoses (low-pressure?) from the reservoir capped off just fine. The 4WS hardlines that come up from the passenger side under the car and cross under the core support were broken in the impact, so I'm constantly losing fluid through all this. I know there are more locations than this and a full 4WS delete is definitely in the works, but for now, I would like to know if I can get away with draining the rest of the fluid in the lines under the car and capping the high-pressure lines on the front rack with the oil pan drain bolts. Perhaps I can just cut, fold, and have my buddy Mike weld them shut or something? Looking for the "rally fix" here - doesn't have to be pretty, just has to preserve power steering while preventing leaks from these damaged lines until I can perform a proper removal.


Yes, you've already blocked off the 2 low pressure lines, so once you've blocked off the 2 high-pressure lines from the rack, your sorted.
Having the lines cut, folded and welded should work - I think they might be aluminium though, I couldn't get a suitable tool onto the fittings to remove the lines from the rack without unbolting it, so I cut the rubber part of the lines, screwed a bolt into the ends and hose clamped them as a temporary fix.
 

DR1665

Well-known member
Joined
Oct 19, 2005
Messages
4,642
Location
Iowa City, IA
Quoting H05TYL:
Yes, you've already blocked off the 2 low pressure lines, so once you've blocked off the 2 high-pressure lines from the rack, your sorted.
Having the lines cut, folded and welded should work - I think they might be aluminium though, I couldn't get a suitable tool onto the fittings to remove the lines from the rack without unbolting it, so I cut the rubber part of the lines, screwed a bolt into the ends and hose clamped them as a temporary fix.


Excellent! Bolts and hose clamps it is (for the time being)! Thank you!

Made some more progress today. The day started early, with Mike from AMMfab stopping by to peep the car and give me a quote on the welding work. We've pretty much decided to weld on the sidemembers and use RTV and rivets to keep the upper ends of the core support in place. (RTV between the pieces to eliminate vibration noises. I don't want the radiator fans to make the front of the car sound like there's a subwoofer installed under the hood.)

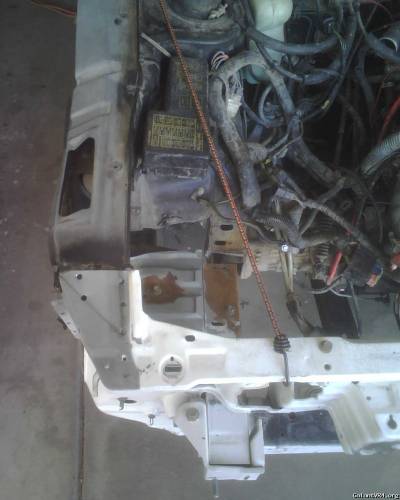
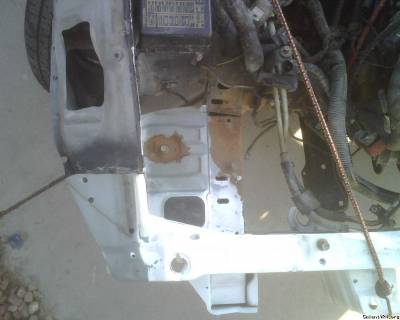
Here's some alignment shots from this morning before I got to work. Notice how the janky fender wing is pulling the entire core to the left in this first picture. Despite the upper corner of the new core lining up decently, it's still all out of whack.


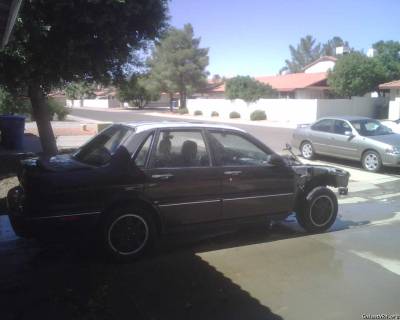
Vanessa had to run out for a while, so I didn't have access to the truck for pulling things straight, so I rolled the car out into the sunshine, washed it, and hit it with the rattle can. Remember, this isn't a concours build, so I didn't need to mask things off all fabulous like. Rest assured, things look pretty darn nice in person, despite being able to see some streaks in the paint and sanding lines under it. I think it's perfect for a future rally car.


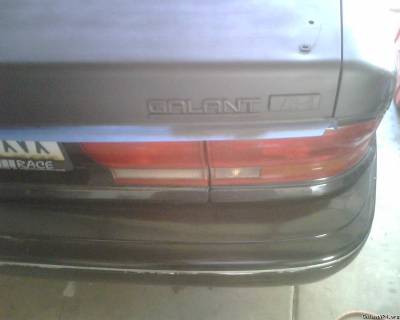
Didn't debadge it either. Sinister.


Once Vanessa got home, I broke out the straps and a couple wood blocks I used as dollies.


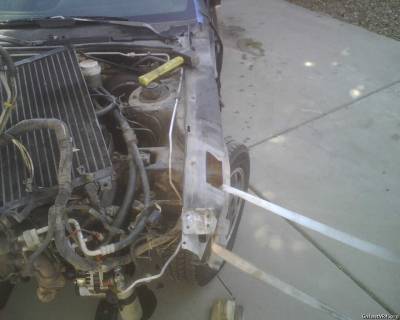
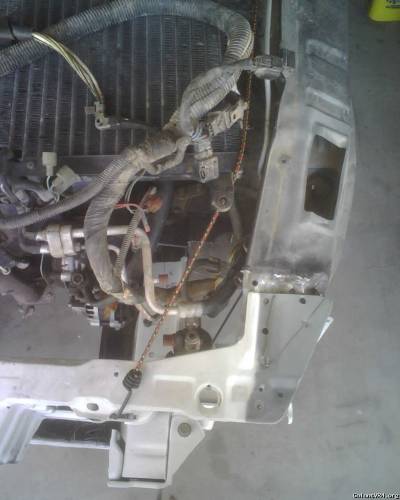
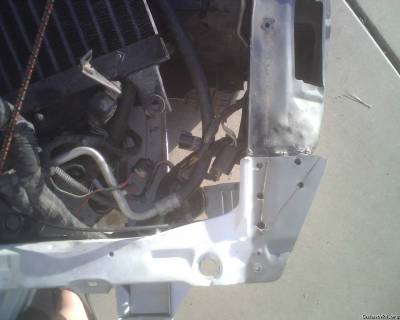
Check out the alignment now. These first two pictures show the front-most bolt holes for the "new," unmolested fenders. That's pretty damn close. At this point, I was just getting ready to call it a day, figuring I hadn't been as productive as I should have been. That trick about putting things under tension with the straps and then using the dollies was f***ing brilliant. It didn't seem like I was actually doing anything, but if good fenders line up like this, well...!


Looks like the cuts we made last weekend weren't as accurate as we hoped, but it's still salvageable. I'm going to brace the sidemembers up with that square tubing. I'll insert two pieces per side (upper outside and lower inside), then drill four holes for each (two at each end). The one hole on each end will be for the carriage bolt that I'll use to lock the insert to the sidemember with a nut and the other hole will be a nice, fat, plug weld. Might even weld the carriage bolts in place and grind the heads off too. Haven't thought that far through it yet, but I'm pretty much sure on the internal supports. To clean things up appearance-wise, I figure I'll snag some of the scrap I cut of the old core and hammer that into a nice plate to go across the seams to hide any lingering ugliness.


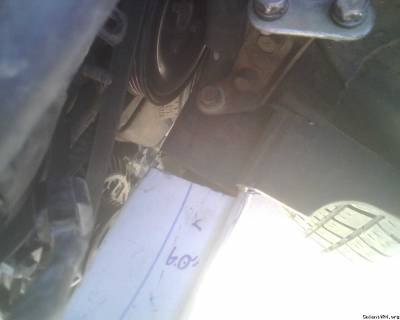
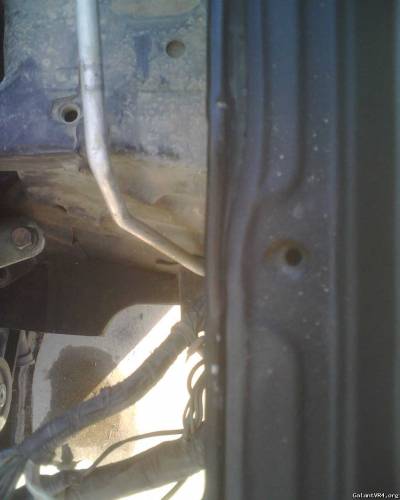
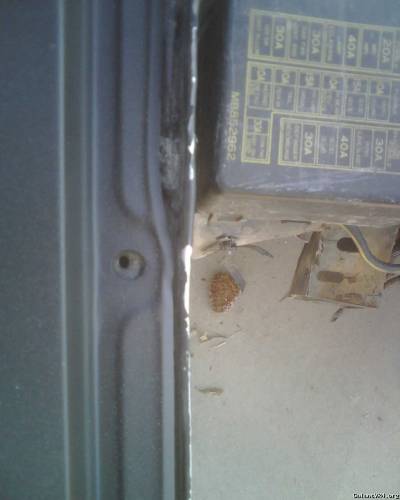
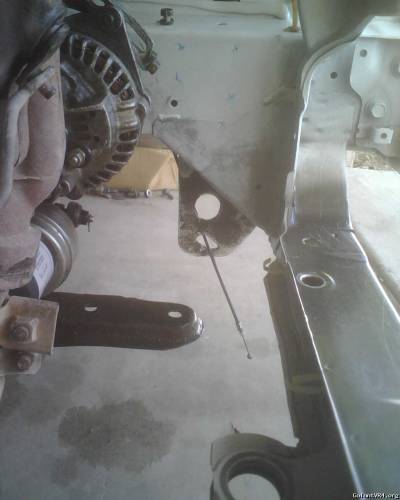
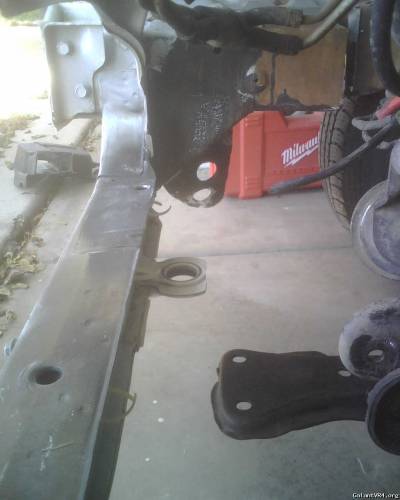
Otherwise, it seems like the last big project is going to be figuring out the lower mounting points for that front crossmember. These pictures show what I'm working with, here.


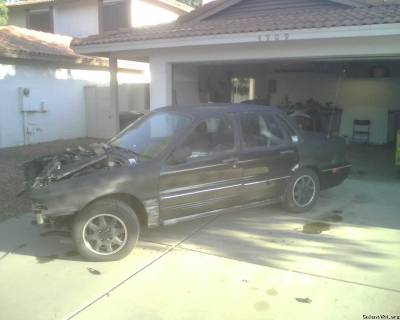
With things lined up pretty damn nice (imo), I figure it's a good opportunity to post up a picture of the car with the new, flat black I got done today. I still need to put another coat or two here and there, but I'm really liking the way this is turning out. Kinda sucked to spray over those areas where the factory paint was still really nice, but you know what they say about making omelettes...


Tomorrow, I'm going to pick up a good unibit to do the larger holes in the sidemembers for the plug welds, as well as my square pipe and carriage bolts. I'll see what they have in the way of rivets while I'm there too. I'll probably do that while I'm waiting for the paint on the doors to dry and whatnot. Once I have the new core hanging on the car without the bungee cords, I've got to finish putting a headlight together so I can bolt them to this things and check tolerances on the exterior stuff.

After that, gentlemen, I can leisurely address the high pressure lines off that steering rack while I wait for Mike to make it over and do his thang. Booyah.
 

Polish

Well-known member
Joined
Jan 10, 2005
Messages
8,936
Location
NE, IN
Getting closer. /ubbthreads/images/graemlins/cool.gif
 

DR1665

Well-known member
Joined
Oct 19, 2005
Messages
4,642
Location
Iowa City, IA
Well, two steps forward, two steps back. I found the longest lunch light in all of Phoenix today when I had to make two different trips to Home Depot to get the braces for inside those sidemembers. I sat through it four f***ing times. Home Depot had the square tubing, but only in aluminum. I'd rather have steel inserts, especially since the sidemembers themselves are steel, so I passed on the square tubing and got a 3ft piece of steel angle iron. It's basically a long, 90* angle.

I got it home, cut it down (barely, the Sawzall blades are getting dull) into four pieces and went to test fit it. Turns out there isn't much room to insert this stuff in those sidemembers. Within an inch or so of the cut, things begin to curve and whatnot. FAIL. Went back and got the aluminum square tube. I think it looks ghetto as hell, but it's all going to be sealed up inside things when all is said and done, so that's what's letting me sleep tonight. The pictures below show the ugliness inherent with this procedure, but you'll notice I've got other fish to fry as well. I'm going to have to rethink this joint.


Once I get things lined up the way I want them to stay, I'm going to punch holes through the sidemembers on the new core, all the way through, and then run longer carriage bolts right through these inserts. Then I'll see about having them ground flush and welded or something. The problem is that the cuts made were too aggressive, so now a butt weld isn't going to work, since the two sidemember sections don't mate flush with each other. I can't grind one or the other down or the new core will be too short. (I was afraid something like this might happen.) I guess I'll see what I can do about grinding them down a little bit, but I highly doubt this will be the final solution.

My new idea is to just plate over the joint and have the plate welded down. Combined with the inserts, I feel this could be a nice, solid repair that doesn't look like ass. Considering this sort of half-assery and the new look of the car during a phone call to my friend Kris Marciniak yesterday afternoon, I might just get the car tagged "CHAR" for "Captain Half Ass Rally." Considering the car actually looks charred now, it might be a cool idea.

Getting back to progress... Seeing my f***ing brilliant idea go up in smoke, I was getting a bit depressed. I really wanted to be test fitting the exterior bits before sunset tonight and, considering all I really had to do today was stuff some tubing into gaping holes in the unibody and bolt them down, I should have been able to do so. With things still not lining up as well as they should, the realization that I'm going to have to do more pulling and playing with dollies kinda bummed me out. I took a break and got a haircut, deciding while waiting for my turn in the chair to come back and test fit the fenders and hood just for shits and giggles. If nothing else, this gives me a better idea of everywhere things need adjusted.

Good news. Resting, unbolted, on the inserts, it takes just two zip ties to hold the entire core support on the car now. Here are some pictures of the gaps - some terrible, some really f***ing sweet - as the car sits tonight.

Driver's Side:


Passenger Side:


Ironic that the passenger side fender wing is actually pulled back too far. The fender actually reaches over the hood at the leading edge. Back up at the hinge, there is a larger gap between fender and hood. On either side, the gaps between fender, a-pillar, and door are fantastic. Both doors open flawlessly. At the same time, both fenders take a bit of effort to get into place right now. I don't expect things to be perfect, set them in place and finger tighten the bolts easy, but I'd really like to avoid having them under tension while I tighten those bolts with a wrench. That's not good, imo. So it's a bit more tweaking to unfuck the front end next weekend.

These pictures get me f***ing stoked, though...


DR1665

Well-known member
Joined
Oct 19, 2005
Messages
4,642
Location
Iowa City, IA
Quoting Polish:
I’m gonna twist off your head and spike it onto the horns of a nightmare you can’t even imagine!


But will you dance with me inside the six-sided ring of fire? /ubbthreads/images/graemlins/devil.gif

(Among the finest comedy scenes evar.)
 

Polish

Well-known member
Joined
Jan 10, 2005
Messages
8,936
Location
NE, IN
/ubbthreads/images/graemlins/rofl.gif Someone finally gets it, success!!!

Keep up the good work with the car btw. /ubbthreads/images/graemlins/cool.gif
 

CarRacer

Well-known member
Joined
Jun 28, 2007
Messages
4,371
Location
Shakopee, MN
Starting to look like a car again.

Instead of putting a plate on top of the gap, how about grinding/cutting a piece to fit in the gap?

Also, with that flat black paint job I vote for the name to be Stealth Bomber. The sleeper that bombs down the rally course.
 

DR1665

Well-known member
Joined
Oct 19, 2005
Messages
4,642
Location
Iowa City, IA
Quoting Polish:
/ubbthreads/images/graemlins/rofl.gif Someone finally gets it, success!!!


I also know where to find white mud. /ubbthreads/images/graemlins/wink.gif (Seriously. I actually do.)

Thanks for the support. Don't think I'll be grinding down filler sections, as that requires my cutting slivers off the scraps I've got, having Mike weld them to one half and then leaving while I grind them down and double check all my clearances. It's a decent idea, imo, but with the inserts, things are in place pretty good. Plates should be alright. (Even so, I'll take another look at the scrap I've got lying around tonight to be sure.
 

DR1665

Well-known member
Joined
Oct 19, 2005
Messages
4,642
Location
Iowa City, IA
It's getting closer. Fenders are almost there (despite my leaving the hood pull cable dangling when we moved the car yesterday, which resulted in my rolling over it and pulling the driver's side fender wing down towards the tire about six inches), things are lining up pretty damn good. Later today, I'll be trying to get the bumper support installed (maybe - it's heavy enough that it could pull the un-welded core support out of alignment) and cleaning up the lightly mangled bumper cover.

Final adjustments before welding, gentlemen!


DR1665

Well-known member
Joined
Oct 19, 2005
Messages
4,642
Location
Iowa City, IA
Quoting PreskitVR4:
Looking good!!! Gonna make it back up here for the Rally?


I never miss Prescott, sir. I'm working as crew for the rallynotes.com P-Stock Neon. Unless they've changed anything this year, I should be at the service area in Chino Valley Friday night and all day Saturday. Assuming Mike can get over here and weld this old girl between now and then, I just have to smog and tag her between now and then. (Well, that, and cap off the high pressure lines on the front steering rack.)

Now, on back to the progress report, I'd say I've got a Galant VR4 again.

I'm going to get in touch with Mike to schedule the welding this week some time. Wo0t!


PreskitVR4

Well-known member
Joined
Jun 28, 2008
Messages
272
Location
Prescott, Northern AZ
when you cap the ports, the dorman p/n from napa works, but i had issues with their plastic washer so i used an o-ring as well as the washer to getit to seal. Just trying to save you one more lil headache.
 
Support Vendors who Support the GVR-4 Community
Boosted Fabrication ECM Tuning ExtremePSI Fuel Injector Clinic Jacks Transmissions JNZ Tuning Kiggly Racing Morrison Fabrications RixRacing RockAuto RTM Racing STM Tuned
Top