The Top Mitsubishi Galant VR-4 Resource

Join the best E39A 1991-1992 Mitsubishi Galant VR-4 community and document your GVR4 journey.

  • Software Upgraded - Reset Your Password to Login
    In order to log in after the forum software change, you need to reset your password. If you don't have access to the email address you used to register your GVR4.org account, you won't be able to reset your password. In that case, follow the instructions here to regain access to the forum.

unibody section replacement

DR1665

Well-known member
Joined
Oct 19, 2005
Messages
4,642
Location
Iowa City, IA
Well, tomorrow is my last day off before starting the new job. As much as I would love to report it's finished, it's monsoon season here in Arizona, so it's muggy and just too damn hot to do much. I have managed to get my Talon ready for it's first emissions test since moving here some seven years ago, though.

Anyways, I just spent some time out in the garage pulling odds and ends off the new core support. I also marked a number of spot welds that will need drilled so that I can separate things. I found a new concern. Check these pictures of the new piece in progress..


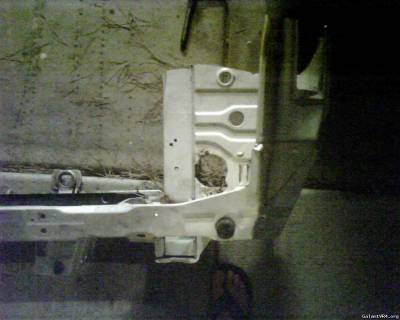
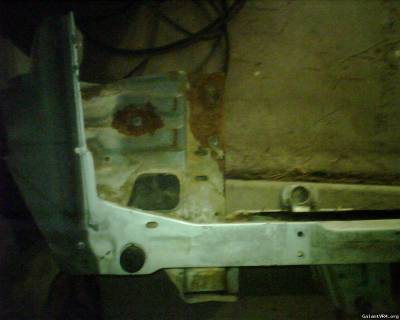
Sorry for the graininess of these pics. Typical camera phone action after dark. Flash is a worthless LED on this thing. Everything here looks pretty promising. It's pretty much straight and true and everything a non-fubared front clip should be. There is a little surface rust, but it's workable. The whole thing will get a fresh coat of black prior to installation anyway.

My concern now is the two sidemembers that extend from the bumper mounting "towers" back along either side of the engine bay. It was too dark to get decent pictures tonight, but here's a drawing of what's going on in 195 just behind the core support on both sides.


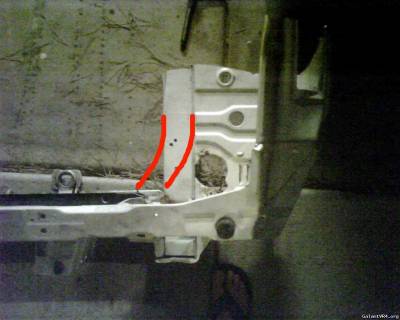
The bulk of the support will be simple. I'll just thread a handful of bolts through the holes I drill (or zipties) to hold it in place while it's getting tacked to the car. It's all sort of cosmetic. These two sidemembers however, are fairly structural and make me a bit apprehensive.

What do you guys think about this idea: Straightening the existing sidemembers as best I can, then carefully cutting the ends off (measure twice, maybe three times, cut once) to match the lengths on the new piece. We could insert a length of pipe into the members on the car and tack them in place so as to provide something for the new member extensions to rest on and be tacked to. Finally, a couple simple gussets would be welded across the seam on the top side to provide additional rigidity.

I see this connection as being something like trying to fit two female spade connectors together. Make sense? Any other ideas? Will continue to update this thread as I make progress. It would be schweet to have her back together before the Shootout, but I think that will be a stretch!

Thanks for the read!
 
Last edited:

curtis

Well-known member
Joined
May 4, 2003
Messages
11,892
Location
Clarksville TN
Old school aircraft guy has solution........

clecos at eastwood

cleco images

Theres different sizes and also the edge clamps. I use to have a tube full of them but they walked off. /ubbthreads/images/graemlins/banghead.gif

cheap on ebay.

Make sure you get a set of pliers Theres serious amount of force on the springs
 

curtis

Well-known member
Joined
May 4, 2003
Messages
11,892
Location
Clarksville TN
Best way to use all of the above is put a few edge clamps in place and support every thing with a jack etc. Then shim up the sides to get the angle and heights correct from side to side. Triple check then drill a few 1/8 inch holes through the car and the piece your adding and install the clecos. The more the better. Then line up the old spot welds and weld. then after the places are welded you can remove a cleco at a time and weld or install some steel/titanium rivits. Then go back and grind clean up and seam weld the monster while your at it, clean up welds and lay the seam sealer to it and paint. done and no one will ever be able to tell.
 

DR1665

Well-known member
Joined
Oct 19, 2005
Messages
4,642
Location
Iowa City, IA
Dude! Thank you! I've seen pictures of wings with those things all stuck to it before, but never knew what it was! I'll definitely see about getting some Clecos here pretty quick. That's awesome stuff, right there.
 

DR1665

Well-known member
Joined
Oct 19, 2005
Messages
4,642
Location
Iowa City, IA
(Small) Update:

I found out my cheap-o cordless drill isn't up to the task of drilling out all those spot welds, so I borrowed an old school drill from my FIL and ran a couple through tonight. Then I used a ginormous screwdriver to get in between the bits and start to separate things. I started a bit too late in the evening to make much progress, but it was nice to at least make some progress...


Probably won't get much more done before the Shootout, but it's still coming along. It's crazy just how many little welds there are on this thing. And the "glue." So much glue...
 

BoostedAWD91

Well-known member
Joined
Mar 1, 2007
Messages
2,937
Location
Danville,Pa
ur lucky man, the junkyard around here that i go to, u arent allowed to bring in any power tools, torches or jacks. just hand tools
 

DR1665

Well-known member
Joined
Oct 19, 2005
Messages
4,642
Location
Iowa City, IA
Totally lucky. Completely random that the son of the guy who owns this particular yard owns a GVR4 and is a member of this site. I about shat myself when I saw such a clean GVR4 roll into the yard while we were stripping the front clip of that LS.
 

DR1665

Well-known member
Joined
Oct 19, 2005
Messages
4,642
Location
Iowa City, IA
PROGRESS!

New core support is cleaned up and ready for paint. Probably spray it one night during the week. It's so hot here during the day, I suspect the rattle can might dry before it hits the metal. Eff that. Spent about seven hours on 195 this weekend. (Shootout helped with motivation.) Now that the new core is ready for paint, all I have to do is carefully remove the damaged support on the car.

It was easy to drill out the spot welds on the salvaged core, since it wasn't damaged. On 195, not so much. Some of the welds have been folded under other sections. I'm sure my neighbors have just loved the sound of my 5lb mini sledge and the combination of Slayer, Dimmu Borgir, Cavalera Conspiracy, and Behemoth this weekend. /ubbthreads/images/graemlins/smile.gif

Some pics...

Before


After


Haha. Where do the headlights go now?


So I'll see about painting the new core during this week, but nothing major will happen until after Labor Day. Going to Lake Havasu to do some drinking and Jet Skiing (not at the same time, of course.) Time is of the essence, as I've been sort of nominated to be fast sweep at the Prescott Rally, which is the first weekend in October. That's some serious motivation.
 

PreskitVR4

Well-known member
Joined
Jun 28, 2008
Messages
272
Location
Prescott, Northern AZ
You, got lucky! My Dad's guys got the LS mixed up with another car and it got crushed before I could get the brake lines off of her. still rollin with ABS, for now. Keep us posted and P.M. me when you are in my neck of the woods for the Rally. Maybe do an AZ All-Call for VR-4's and soulute 195's return from the dead!!
 

DR1665

Well-known member
Joined
Oct 19, 2005
Messages
4,642
Location
Iowa City, IA
After taking a break to spend Labor Day weekend at Lake Havasu drinking heavily and getting a wonderful sunburn, it's back to work this weekend on 195. Got the rest of the old core support off. Wasn't as hard with a fat Milwaukee Sawzall. Didn't even have to turn that bad boy up beyond "1" on the dial. Nice.

Looking for some input on the next steps. You can see in the pics below that the sidemembers got tweaked off to the one side pretty good. I tried slipping the 3ft breaker bar into them to pull them straight, but no dice. The front motor mount looks like it felt some pain as well. The main crossmember going from side to side at the very front of the car does not look tweaked, but it had to move with the sidemembers, as they are bolted to it. I wonder if I shouldn't try lashing this assembly to the Amigo and letting the SUV work it's magic to pull it all together.

Otherwise, it looks like it's going to be a very artistic next step with carefully measuring and trimming the old and new to match up perfectly when it's all back together. Here's a selection of pics from today, but all pictures are in my gallery at DR1665.com

This is where I started this afternoon (I don't know why I insist on doing this during the hottest hours of the day...)


Above, you can see just how tweaked the driver's side sidemember is. The outer lip of the power steering pulley was self-clearancing on it when the engine was running. Now it's all magentized and sh*t. Kinda cool in a damn-this-really-sucks sort of way.


Above, think I should check out anything in particular on the turbo/WG assembly? Looks like there's no cotter pin on the WG arm (the SPAL fan was crushed/melted to the turbo in the collision), so there might be a chance it got bent in some way? Assuming it got bent in towards the engine, how would that affect boost levels? I figure that would affect the throw of the arm in some way.

Below, detail of the front motor mount. Isn't it supposed to be round? This makes me a little nervous. Like one of those seemingly innocent things that means all the driveline components are out of alignment now and will disintegrate within 100 miles of my getting this thing back on the road.


Michael (boostedinaz) might be stopping by tomorrow to help me do the critical measuring and final alignment before attempting reassembly, so I figured I'd use some time this afternoon to get the fenders ready for installation when the time comes. I don't want to get ahead of myself posting pictures where the car looks like it's further along than it really is, but I figure I could reward myself with a bit of motivation of just how f***ing sweet it's going to be to have this beast back on the road again. /ubbthreads/images/graemlins/smile.gif


Ready to get this thing done!
 

4orced4door

Moderator
Joined
Jul 19, 2002
Messages
9,846
Location
Raleigh, NC
I just read through the thread, it's nice to see you making progress and tackling this yourself. It's a big job!
 

DR1665

Well-known member
Joined
Oct 19, 2005
Messages
4,642
Location
Iowa City, IA
Quoting 4orced4door:
I just read through the thread, it's nice to see you making progress and tackling this yourself. It's a big job!


Thanks, Paul. Really appreciate it! This has been one hell of a project. I hope that someone out there finds this thread one day and decides to take the road less traveled and fix a GVR4 rather than part it out. Once they're gone... they're gone.

Today was a big day. While doing some drinking last night with my buddy Ron, who does gas plumbing and stuff like that, we got to wondering if we couldn't use an acetylene torch to heat up those side members enough to be able to straighten them back out. Had to drop the front crossmember with the obviously jacked front motor mount in order to allow the sidemembers to potentially move independently. (After all, those crossmembers are designed to tie the front end all together for rigidity.) Ron busted out his trusty "32" torch and we got to it.


Unfortunately, despite getting the whole thing almost glowing hot and trying both my 3ft pry bar and the heavy duty "Mr. Pipe," my beefy breaker bar (a 2ft section of 1.5" pipe), the sidemember wouldn't budge. I was a bit frustrated at this point, because what was I gonna do? I didn't want to cut too far back and risk not having enough core support to replace it with.

The measurements and fitment of the new core are a fairly precise job, and I was really in need of a second set of experienced eyes to make sure I didn't do anything stupid, so Michael (aka: boostedinaz) was kind enough to drive all the way up from Mesa to lend a hand late this afternoon. For those who don't live in a sprawling metropolis like Phoenix, Michael lives something like 40+ miles away, so his taking time away from the family to drive all that way to help me meant a lot. He's a good guy for sure.

Anyway, Michael and I got to talking about measurements here and there, comparing bolt holes and spot welds on the new core to the now shortened sidemembers. We decided to make them shorter. Nothing like the sound of a Sawzall on a peaceful, Sunday evening in the neighborhood.


After that, we figured we could start trying to rough align the new core to the chassis. After a couple attempts where we measured here, cut there, and generally made a helluva lotta noise for a Sunday evening, we got things closer than they've been in a long time.


Yes, I know the sidemember cuts don't line up perfectly, but I figure I can take a die grinder to them or something if I want them to look perfect. There's also the issue of the fender supports (whatever you call the deals you bolt the fenders to) still needing pulled back into proper alignment. Once those are straight, the entire core support should line up pretty damn nice. You might notice just how close we got by seeing how the new core matches up with the existing sheet metal at the front of those fenders. It's pretty damn close.

One caveat to my diabolical plan to not just part this one (and I think this was mentioned earlier by the friendly chap in the UK who provided the scans of the FSM showing all the spot welds), the LS models do NOT have the same front crossmembers. Michael and I figure this can be worked around easily enough, but it's something to keep in the back of your head if you're in my shoes one day. Check this picture out. I'd never actually turned the thing completely upside-down before, so this was a surprise tonight. GVR4 sidemember end is in the background.


195 will be sporting a custom crossmember, I guess. Oops! Even so, crossmember is going to be easy compared to the sh*t we've been through so far. It felt really good tonight to push the car back into the garage looking like it does in the pictures below. (Couldn't start and drive it back under power as I've disconnected a lot of electrical to get it clear of the blade.) New core is looking really nice and is held in place by just two bungee cords tonight. It's looking more and more like a GVR4 every day. God, I want to have this car on the road by the end of the month...


Last edited:

GVR4_1057

Well-known member
Joined
Sep 3, 2008
Messages
676
Location
Brucetown VA
I am glad to see one repaired and not scrapped. /ubbthreads/images/graemlins/applause.gif
 

CarRacer

Well-known member
Joined
Jun 28, 2007
Messages
4,371
Location
Shakopee, MN
Awesome work.

I was going to suggest a shop with a frame rack to get things into place. It appears that won't be needed. I'm suprised these cars have a different crossmember. Mitsu must have lost their ass producing these cars. I guess that puts another tick in the column of what makes these cars special.
 

Polish

Well-known member
Joined
Jan 10, 2005
Messages
8,936
Location
NE, IN
Amazing dedication, keep up the good work. /ubbthreads/images/graemlins/applause.gif /ubbthreads/images/graemlins/cool.gif
 

4orced4door

Moderator
Joined
Jul 19, 2002
Messages
9,846
Location
Raleigh, NC
Are you worried about the car not tracking straight after you're done with all this work? Or is the damage superficial enough that it's not an issue?
 
Last edited:

DR1665

Well-known member
Joined
Oct 19, 2005
Messages
4,642
Location
Iowa City, IA
Thanks, fellas. I do have a small concern about the car tracking straight once it's all back together, but it seems that the bulk of the damage was ahead of the strut towers. Placing a straight edge along the top of the fender area (that little "fin" that sticks up along the length) shows that things are pretty much straight up until about where we ended up cutting the sidemembers. I know it doesn't take much for a degree here or there to add up to wheels that don't track straight, but I would hope that any abnormalities could be corrected via toe adjustments. It doesn't *look* bad back there, but how often can you align the car by sight? The damage to the front motor mount gives me some concern that the engine alignment might be off, which could lead to driveline issues down the road? Dunno.

Only way to find out will be to get it back on the road and drive it. Long term, this one will be seeing a lot of unpaved roads and spending as much time sideways as I can legally get. It's going to end up being a rally car, albeit not one as pretty as Larry's. Most of the suspension components will be replaced with nice, beefy, adjustable equipment.

Appreciate the read! Will keep updating this thread through to completion. (Hopefully by the end of the month...)
 

misterfixit

Well-known member
Joined
Aug 4, 2004
Messages
1,596
Location
Midlands, UK
on the old cross member you are throwing away, cut the crossmember brackets off. cut the rail apart then then gring the remains of the rail off the crossmember supports. you should then be able to mount them like tey were new on the bottom of the other side rails. you may have to gring the 2wd tow brackets off the cross memeber you just welded. but the 4wd ones should weld up straight.

now the front is welded on it should be a whole bunch more stable.

Lookin good so far!

Rich
 

misterfixit

Well-known member
Joined
Aug 4, 2004
Messages
1,596
Location
Midlands, UK
just one other thought. did i post the frame measurements and measuremrt points from the body manual?

Rich
 

DR1665

Well-known member
Joined
Oct 19, 2005
Messages
4,642
Location
Iowa City, IA
Rich, you did post the measurements for sure. I've got them saved on my laptop at home. Those have already come in VERY handy when trying to figure out why things wouldn't come apart after I had drilled out some spot welds. It's easier to see them when they're black and white on paper than a small, same-colored, slightly recessed spot on a chunk of steel.

Really appreciate the help on this project so far fellas. Think I'll get it on the road by the end of the month?
 
Support Vendors who Support the GVR-4 Community
Boosted Fabrication ECM Tuning ExtremePSI Fuel Injector Clinic Jacks Transmissions JNZ Tuning Kiggly Racing Morrison Fabrications RixRacing RockAuto RTM Racing STM Tuned
Top