The Top Mitsubishi Galant VR-4 Resource

Join the best E39A 1991-1992 Mitsubishi Galant VR-4 community and document your GVR4 journey.

  • Software Upgraded - Reset Your Password to Login
    In order to log in after the forum software change, you need to reset your password. If you don't have access to the email address you used to register your GVR4.org account, you won't be able to reset your password. In that case, follow the instructions here to regain access to the forum.

New Owner of 1837/2000

Brett Adams' Galant VR-4

turbowop

Well-known member
Joined
Apr 29, 2001
Messages
11,972
Location
Yakima, WA
I wonder if you could call Mueller to source some. Or RRE.

The newer JIC's use setscrew locking collars, which I'm not a fan of. But I'm sure those would probably work as well.
 

ApexHunter

Well-known member
Joined
Apr 25, 2007
Messages
1,992
Location
Marysville, WA
^ Great idea. They don't do as much JIC as they used to, but i think that is probably your best bet. They still service them right? Wouldn't surprise me if they have a number of these as i imagine this is somewhat common.

Not surprised JIC USA is not very helpful. I went up there a few months ago and chatted with the owner for quite a while. Here's my take. I don't believe they are actually or have ever been an official part of JIC Japan. From what i can tell they have always been a distributor, and now they are even less affiliated than ever. They have been liquidating everything they have left be it suspension, exhaust, brake pads etc to make room for their own product, and at least as far as coilovers are concerned, they aren't selling JIC Japan's product at all.

If you want OEM JIC replacement parts, maybe send a hail mary off to Japan. Otherwise i would ditto most of the above advice. I bet you can find a replacement ring, but it's going to be a bitch determining which kit has the compatible part. So many coilovers, including some of the big Japanese names, all have a lot of very VERY similar design cues. /ubbthreads/images/graemlins/hsugh.gif I suspect many outsource to the same place in Taiwan. So if the Mueller thing doesn't work out, maybe just dig around. I would be surprised if you couldn't find one that works.
 

GSTwithPSI

Well-known member
Joined
Jan 1, 2012
Messages
3,461
Location
SoCal
Hey guys, thanks for all the suggestions. I emailed Mueller, and inquired about a new set. Keeping my fingers crossed! The thing is, the ones I have on the dampers now are fine, I'm just really worried I'm going to destroy them trying to get them apart. I read a few places that the rings get frozen, and can't be removed at all. The aluminum is so damn soft. Every time I try and apply any torque at all with my spanner wrench, the tab just looks like it's ready to crumble. After I get them apart, I'm planning to remove all the corrosion and reassemble them all nice and clean. Also, I'm going to use something to protect them from the elements this time so I'm not doing the BS in another 6 months. You guys using anything like this? click
 
Last edited:

turbowop

Well-known member
Joined
Apr 29, 2001
Messages
11,972
Location
Yakima, WA
I had one that was a bugger to loosen up as well. I used a BFH and a flat blade screwdriver to hammer it off. If a few nice, sharp blows don't move it, yer gonna have cut it off probably.
 

coyotes

Well-known member
Joined
Nov 15, 2013
Messages
1,544
Location
Seattle, WA
Probably while still installed.

I assume you've soaked the he'll out of it in pb blaster or similar? A hammer should bust it loose. If not it may be time for some new coilovers.
 

ApexHunter

Well-known member
Joined
Apr 25, 2007
Messages
1,992
Location
Marysville, WA
I don't think i'd let these go. I seem to remember this was essentially the best VR4 specific kit short of the Hotbits. Versus the Teins, these are length adjustable and monotube. Regardless, it is a good kit that can be made into an excellent kit after Mueller gets a hold of them. It would be really awesome to send this kit off to him for a thorough refresh. I understand the financial commitment though. I had the BC's and they are OK for the low entry cost, but i've experienced box stock FLT-A2's on a WRX and the dampening was better. Less rebound oscillation and better dampening at the very top of the stroke!

He mentioned he used penetrating oil a few posts up, and that the soft aluminum collars do not tolerate much force, and to remove them intact will require kids gloves. A hammer may do the trick but will definitely need some finesse on the collar.
 

GSTwithPSI

Well-known member
Joined
Jan 1, 2012
Messages
3,461
Location
SoCal
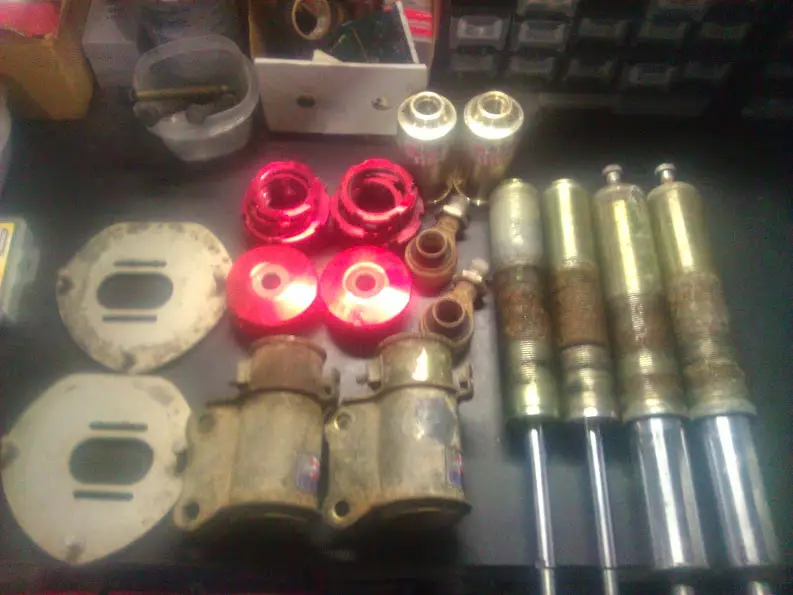
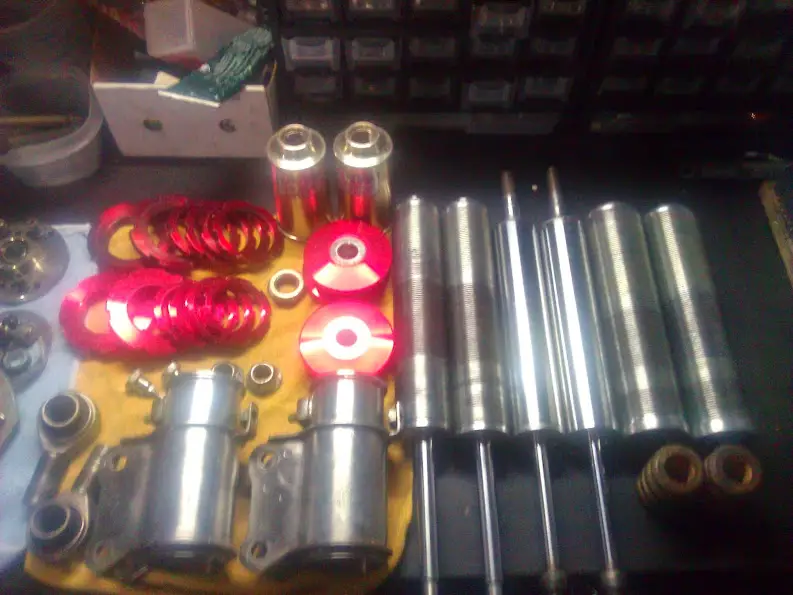
So I took Mark's advice, got a BFH and a square piece of aluminum stock and gave one of the collars a good smack. It popped loose right away! I guess I was just being too much of a bitch before, all scared of screwing up the rings. Subsequently, I repeated the process on the others and they followed suit popping lose one after another. I got them all apart without breaking anything, which is awesome. Now, I have to figure out the best way to recondition these. The dampers and components look pretty rough overall, but ironically the locking rings look pretty good. You guys have any advice on how to clean the following:

1. There is corrosion and a bit of surface rust on all of the dampers. I hit a spot briefly with a brass wire wheel, and it seemed to clean up good. The thing is, I think there is a coating on the damper, and the wire wheel seems to remove it. How should I deal with these?

2. All the other parts like the lowers, camber plates and rear eyelets look like complete sh*t. I wish I had a tumbler large enough to put these in, but I don't. No access to a sand blaster either. Ideas on how to get them looking new?

3. Lastly, once I remove all the crap, what should I refinish these with? Paint? Powder coating?
WP_001009.jpg

WP_001011.jpg

WP_001012.jpg

WP_001013.jpg

WP_001014.jpg

WP_001019.jpg

WP_001020.jpg


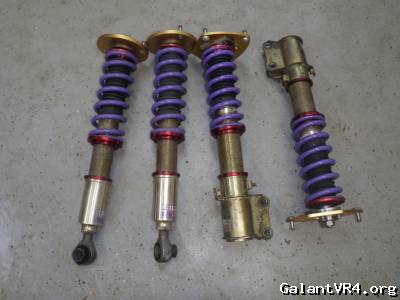
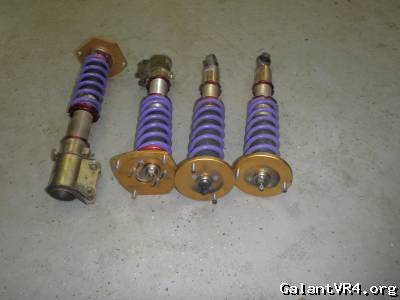
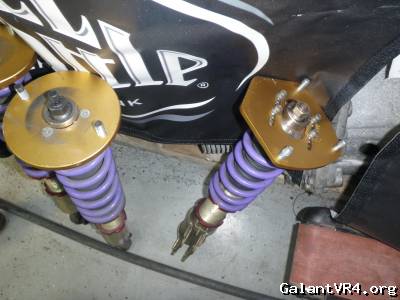
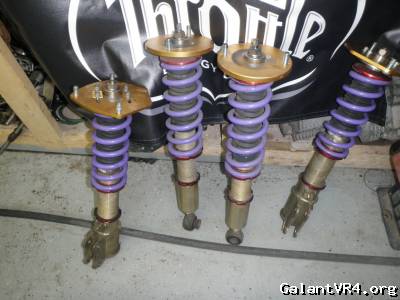
So, this is how they looked when Anthony picked them up: click

Quoting Blown1:
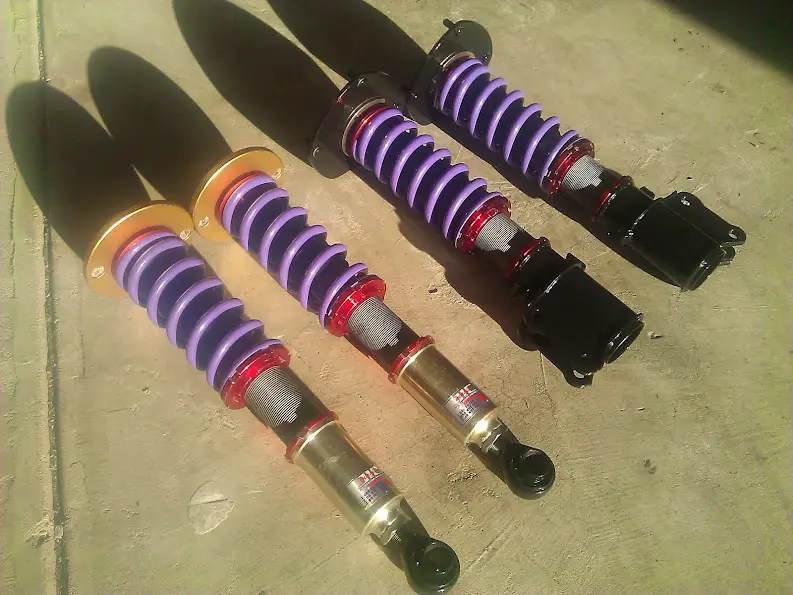
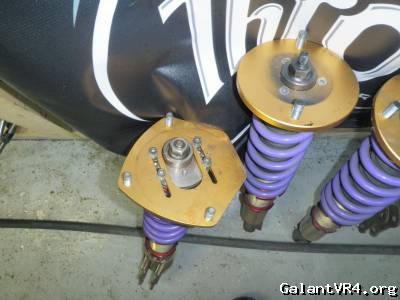
Up for sale is a mint set of E39a specific JIC-Magic FLTA2. They have about 500 miles on them but they look almost brand new over 2k brand new. Spring rates are 8k/6k or if you prefer 450lbs/in and 335lb/in."The JIC FLT-A2 is the flagship coilover system. All FLT-A2 coilovers are designed on US-spec vehicles for US streets, fitment and performance is unmatched. Included in the kits are pillow ball upper mounts with adjustable camber plates(front only). For flexibility, the dampers have 15-way compression and rebound adjustability. The spring rates are of the linear-rate type with independent ride height adjustable lower brackets. This allows adjustment without compromising damper compression or rebound travel. Based off of racing technology, the FLT-A2 is a street performance suspension, customizable for full time track use" These are the real deal not some ebay junk copies so please no low ballers or I can get this coilover for that price thanks in advance and enjoy. I am asking 1K obo plus paypal and shipping unless you want to come pick them up for the 1k obo? Thanks for looking and please pm if you have any other questions....Thanks
Dunstan.....


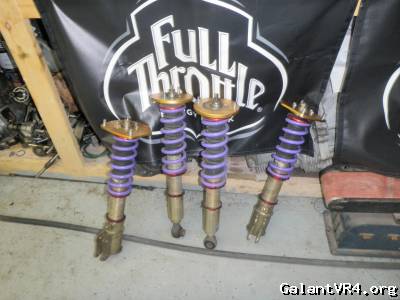
The ad says the spring rates are 8k/6k or 450lbs/in and 335lb/in. But the springs say 8k and 7k??? Did the PO just not know what he had? Can someone talk to me about what the typical off the shelf spring rates were? Thanks in advance, guys.
WP_001016.jpg

WP_001018.jpg
 

turbowop

Well-known member
Joined
Apr 29, 2001
Messages
11,972
Location
Yakima, WA
Wow, those are haggard. I'm glad my method worked though. I ran a long ratchet extension through a lower eyelet to keep it from spinning on my garage floor and gave the collar a whack. It wasn't exactly the proper way, but it worked without f***ing anything up. I kept cardboard between the floor and damper so as not to scratch them up. /ubbthreads/images/graemlins/rofl.gif

I lightly used a wire brush to clean mine up, but they had zero corrosion. I would do the same to your threaded bodies, but would go at it harder on the lower brackets and eyelets and them paint them black. I'm actually planning to paint my front lower brackets black because Mueller elongated the upper strut mount holes inward to add negative camber and then welded washers on to keep everything solid once bolted up. He had to grind off the cad plating in those spots to weld so I'm just going to paint the whole bracket. It had some paint on there when I received them, but it looked hokey with just the ground off spots lightly sprayed.

Did you see my thread where I took mine all apart? I suggest also removing the front dampers from their threaded bodies to clean and relube them.
 

coyotes

Well-known member
Joined
Nov 15, 2013
Messages
1,544
Location
Seattle, WA
Glad you got it apart dude. I'd hit it all with a wire wheel. The threaded bodies you can hit with some WD40 or similar to keep the corrosion away and keep them from seizing up again. On my daily driven 240sx with KTS coils I'd mist the threaded portion with WD40 once or twice a year, seemed to do the trick. The lower mount and other components I'd clean up and paint or powdercoat.

are you just going to put them on or send the dampers in for rebuild?
 

GSTwithPSI

Well-known member
Joined
Jan 1, 2012
Messages
3,461
Location
SoCal
Yeah, Mark, they are pretty rough, which is why I decided to pull them and give them a makeover. I did take a peek at your old thread. How did you remove the adjustment knob? I don't see a clear way to take them off. I see the large nut securing the threaded body, and then a smaller nut at the base of the knob. The knob itself is keyed on top for an allen wrench. How do you get it apart?

The cad plating is the coating I was referring to. I guess at this point, worrying about removing it is moot. I'll just hit all the parts I can with a wire brush, and finish them with some paint. What kind of grease did you use on the dampers?

Thomas, I'm not going to send them out for a rebuild. For one, I don't want to drop the cash, and two, they are functioning just fine. They just need a little TLC. If I just left them on the car as is they'd probably rot apart in a year or two. Kinda the story of my life. Once I really started to dig into the car, I found there were a lot of things that bothered me and that I felt needed to be addressed. Luckily I have the time to go through everything, and give each issue the attention it needs. In the end, it will be nice to have piece of mind, and know everything on the car is in good working order. That being said, 1837 still isn't half the ass pain 1813 was. I'm not sure anyone should buy a 20 year old car and expect not to have to do anything to it. It's all good practice in the end. /ubbthreads/images/graemlins/wink.gif
 

coyotes

Well-known member
Joined
Nov 15, 2013
Messages
1,544
Location
Seattle, WA
Yeah Brett good luck with everything. You seem to be a champ so I don't think it will be a problem for you. Sometimes I dislike looking at everyone else's cars because the list of stuff to do to mine is so long, and a lot of people's cars are so well sorted. Makes me think about the cars I had in the mid 2000s and how well set up they would be by now if I stuck with em.

But then again I'd be scared to drive my car anywhere if it looked like mark's.
 

GSTwithPSI

Well-known member
Joined
Jan 1, 2012
Messages
3,461
Location
SoCal
I made a bit of progress on the car today. I got my Paulo fiberglass dual gauge pod installed, with Greddy boost and EGT gauges filling the holes. Typically, I like the gauges to match the cluster. Surprisingly though, the white face gauges look pretty good on a white car IMO. At night, they match the green glow perfectly.
WP_001024.jpg

WP_001025.jpg

WP_001029.jpg


I spent the rest of the day (5 hours) trying to get my JICs all cleaned up. It took forever, but they look 100% better than they did. I think it may be time to invest in a sand blasting cabinet. Now that they are all clean, I just need to finish them up with some paint. I was thinking about powder coating, but the turnaround time is a dealbreaker.
WP_001030.jpg

WP_001031.jpg

WP_001032.jpg

WP_001033.jpg


So how do you guys adjust your ride height initially? I have always just set the coils to where I think they should be, and then made guess and check adjustments from there. I measure the coilover length from side to side, and measure the ride height from front to back to get the car level. I always hated adjusting the coils, because it takes forever jacking the car up and down a million times. Anyone got the secrets to success for me, or is it a pain in the ass process no matter how you do it?
 

coyotes

Well-known member
Joined
Nov 15, 2013
Messages
1,544
Location
Seattle, WA
unlock the collars and rotate the shock body in the lower mount housing with both hands to adjust height, you don't have to remove the coilover fully at the bottom in order to adjust. When on the ground, measure the height of the vehicle from the top of the inside of the fender lip to the ground. Adjust to your liking. That's pretty much the easiest way to do it, and yes it takes forever, but once it's right you won't have to screw with it again. On my S13 I would mark the shock body with a sharpie for my summer and winter heights, that way I wouldn't have to remeasure everything again and fiddle with it for days.

The lower collar on your coilover locks the body to the lower mount housing, the upper collar you can use to set spring preload. Which, if you don't know what it is you might as well leave it alone. I would always add in a little bit to start (hand snug the upper locking collar to the bottom of the spring, then about half to one rotation of the locking collar. and adjust from there. I'd talk to some guys who track their VR4s to see what they are doing and if that matches to what you want out of your car.
 

ApexHunter

Well-known member
Joined
Apr 25, 2007
Messages
1,992
Location
Marysville, WA
Nice work on those, big improvement! /ubbthreads/images/graemlins/cool.gif I had a black faced Greddy boost gauge on the A pillar in 1951. Same green illumination. I was quite pleased with how close of a match it was.

Good base settings for preload and overall length would save some time. I bet that the JIC manual came with these specs...in Japanese, and i'd be hugely surprised if you had it. I found this manual from JIC USA but it's pretty generic. Maybe hit up Mueller? I don't expect him to divulge proprietary info, but maybe they could just hook you up with some good starting measurements. On a length adjustable damper, you will want to be able to measure preload and total length.

Preload i'd probably measure from the hat to the spring perch (note: the perch, as in not the smaller collar that sits under the perch acting as a lock). Then measure total length of the unit. I imagine there are several ways to measure preload and overall length so be sure and get on the same page with whoever gives you specs.

edit: I doubt Mueller has set a lot of these up on gvr4s, so if they hooked you up with info you might need to take your best guess on compensation for gvr4.
 
Last edited:

GSTwithPSI

Well-known member
Joined
Jan 1, 2012
Messages
3,461
Location
SoCal
Yeah, I'm no suspension genius, and I doubt I'm going to get any free help from Mueller. I never even got a response about getting some replacement parts from them. JIC says there's no need to preload the spring, so I'll just settle for the straight 8k in front and 7k in the rear. The car isn't really going to see much that would require performance handling aside from an autocross event or something anyways. I've been doing a lot of reading in the realm of suspension setups in regard to spring preload and such. There's so much difference of opinion on the subject that the information is almost conflicting. The one thing that seems to be a constant is the guess and check methodology. Guys will try something and see if it worked, and then learn and adjust further from there. I think I'll play around a bit and see what I like best. I'm looking for streetability above all else, and don't want the car to ride like a fuckin log wagon at the expense of being able to corner a bit better.
 

GSTwithPSI

Well-known member
Joined
Jan 1, 2012
Messages
3,461
Location
SoCal
I've been debating how to tackle the 3G master cylinder port mismatch issue. Despite others having good luck simply threading the double flare fitting into the bubble flare port, I just wasn't comfortable doing it. I decided to swap in some -3AN stainless braided brake lines rather than use the stock hardlines. This allowed me to use mismatched fittings on each end of the line to adapt to the double and bubble flares on opposite ends. It ended up working really well, and I'm pretty happy with how it looks also. Hands down, the 3G master and ABS delete do wonders to tidy up the engine bay. I still have to bleed everything, but the brakes are pretty much good to go. Here are the parts required for the swap:

-3AN x 10mm x 1.0 to bubble flare
-3AN x 10mm x 1.0 to inverted flare
20" -3AN Straight to 90°
14" -3AN Straight to Straight

WP_001035.jpg

WP_001037.jpg

WP_001041.jpg

WP_001043.jpg

WP_001051.jpg

WP_001052.jpg

WP_001053.jpg

WP_001058.jpg


At this point, I'm just trying to work out a solution for an intercooler setup. I should have my coilovers reassembled and reinstalled this weekend. It's getting down to the little things, which is a good feeling.
 

GSTwithPSI

Well-known member
Joined
Jan 1, 2012
Messages
3,461
Location
SoCal
Got the JICs back together. Pretty happy with how they turned out.
WP_001073.jpg

WP_001076.jpg


Scrubbed down the rear wheel wells and sealed them up with Rust Bullet and BlackShell. I wanted to get everything all cleaned before I reinstalled the coilovers. Sorry for the crappy cell phone pics.
WP_001077.jpg

WP_001085.jpg

WP_001088.jpg

WP_001089.jpg

WP_001090.jpg

WP_001112.jpg

WP_001109.jpg


Decided to install the EGT probe in the O2 housing.
WP_001118.jpg

WP_001119.jpg


I also finished the rewire up front for the battery relocation.
WP_001099.jpg


Got the quick release Injector plugs wired in. Thanks Chris!
WP_001102.jpg


I also tucked most of the wiring harness and got it routed and connected up. My intercooler is on the way, so I'm hoping to get this finished up soon.
WP_001092.jpg

WP_001095.jpg
 
Last edited:

strokin4dr

Well-known member
Joined
Aug 30, 2005
Messages
2,770
Location
Savannah, GA
Looks great! Thanks for posting a the pics. I'm terrible at remembering to take pics while working on the car. /ubbthreads/images/graemlins/banghead.gif
 
Support Vendors who Support the GVR-4 Community
Boosted Fabrication ECM Tuning ExtremePSI Fuel Injector Clinic Jacks Transmissions JNZ Tuning Kiggly Racing Morrison Fabrications RixRacing RockAuto RTM Racing STM Tuned

Recent Forum Posts

Top