The Top Mitsubishi Galant VR-4 Resource

Join the best E39A 1991-1992 Mitsubishi Galant VR-4 community and document your GVR4 journey.

  • Software Upgraded - Reset Your Password to Login
    In order to log in after the forum software change, you need to reset your password. If you don't have access to the email address you used to register your GVR4.org account, you won't be able to reset your password. In that case, follow the instructions here to regain access to the forum.

New Owner of 1837/2000

Brett Adams' Galant VR-4

GSTwithPSI

Well-known member
Joined
Jan 1, 2012
Messages
3,461
Location
SoCal
Quoting Pot:
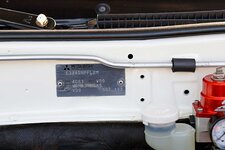
I don't understand why Mitsu opted to only seal/prime the sheet metal under the battery tray. When I relocated the battery last week I was amazed at how bad the battery acid ate away at the frame rail. Either way, your project is coming along quite nicely. I look forward to more pictures and motivations Devil Dog.


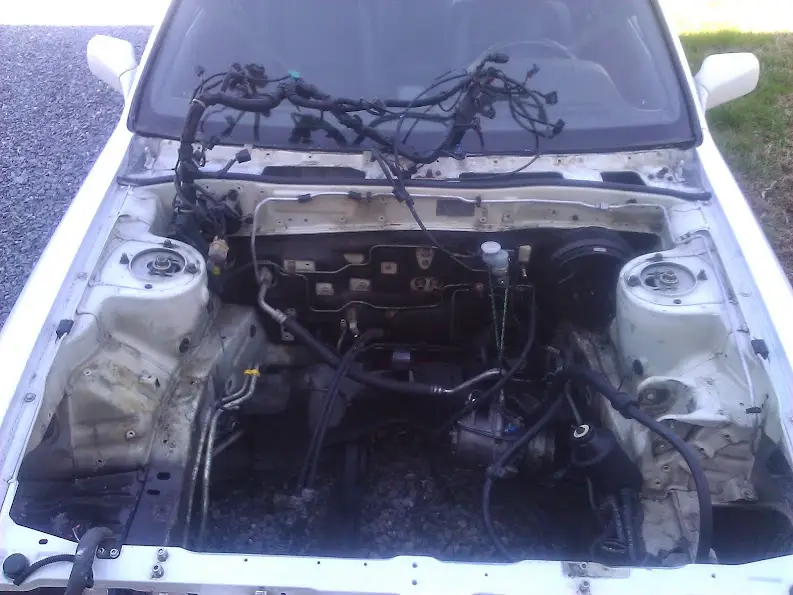
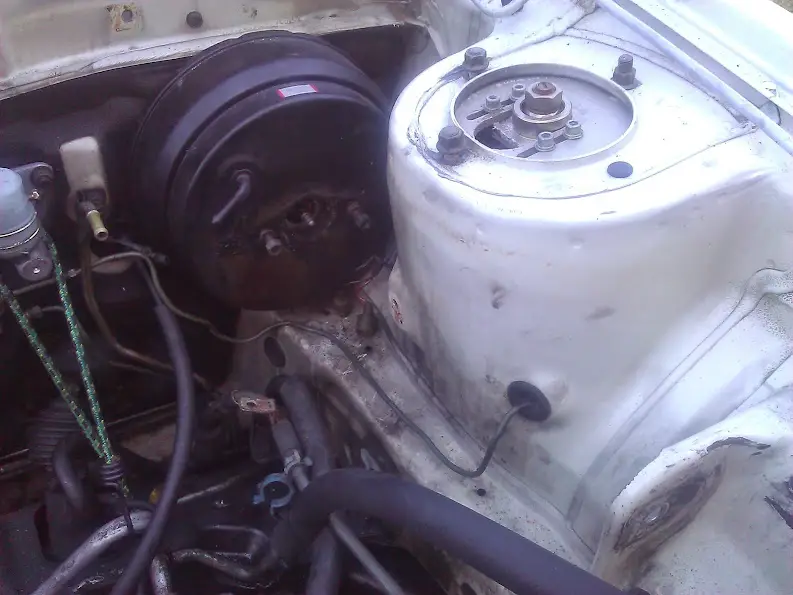
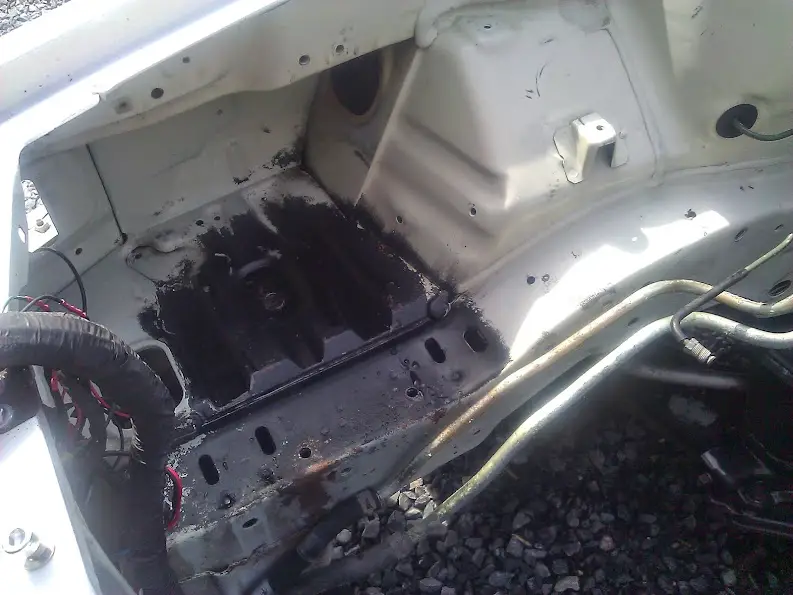
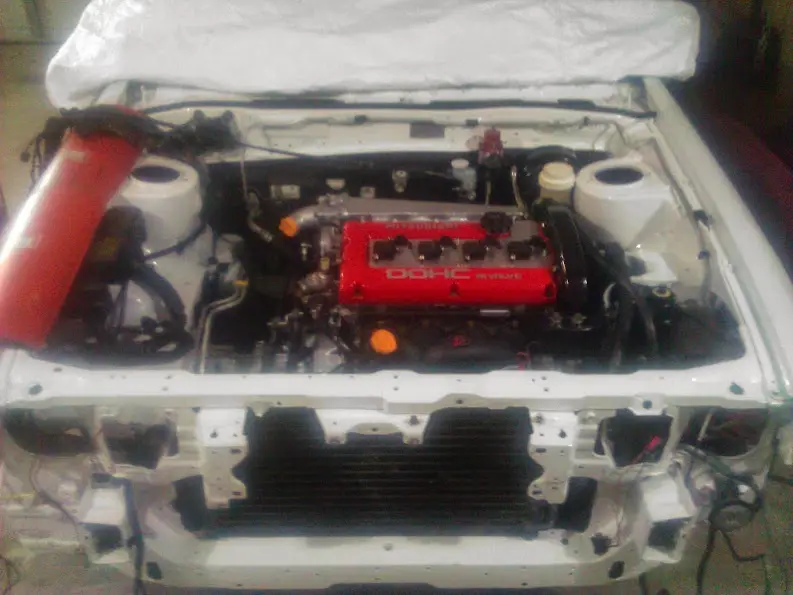
Hey, Pot. Thanks for the kind words. Yeah, under the hood cleaned up well, except for the battery region. The battery truly does destroy the body in that area. As you can see, someone sprayed the area with a quick coat of paint as a preventive measure to try and stop the damage. I'll take that particular area down to the metal, and seal it properly with the RustBullet.
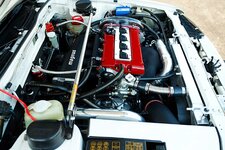
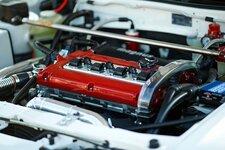

Quoting coyotes:
Are you going to a bigger turbo later? I plan to run that but it seems you have really gone the distance with your motor for a 16g. My engine is somewhat similar, all OEM rebuild plus BSE and ARP head studs. I don't plan to make more than what a 16g will put out.


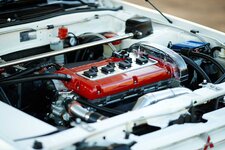
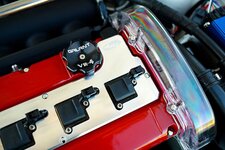
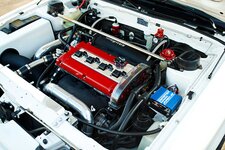
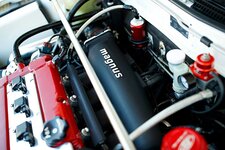
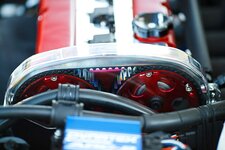
I will eventually upgrade later. I already had most of the parts from my previous build to put this motor together. While I was in Pensacola, I met up with Dale, who offered to do the machine work on the block for a price I couldn't pass up. So, I had this motor built simply because I could. At the time I didn't have any real plan or upgrade path in mind since I wasn't planning to use the setup anytime soon. Since the original motor in 1837 ate the balance shaft bearings, that all changed. I thought it would be better to drop in my spare built motor until I really had time to tear the other one down, and go through everything.

The setup I have now will be ready for whatever upgrades I decide to throw in later. The Ross pistons are still hung on 1G rods, so the motor isn't exactly bullet proof. I'm looking at FP 68HTA, a 20G, or maybe even a FP 3052 in the future. I'm on a pretty tight budget for now, so the big 16G will do in the mean time.


Quoting EHmotorsports :
It's coming along nicely! Really like how clean it is:)


Thanks, Evan!
 
Last edited:

GSTwithPSI

Well-known member
Joined
Jan 1, 2012
Messages
3,461
Location
SoCal
Quoting turbowop:

I'm curious if you're going to run a larger turbo as well. It seems installing a Magnus intake manifold is overkill for the turbo you're running. I'm guessing you had it laying around and are installing it now to get it out of the way in preparation for a larger turbo down the road?


Yeah, Mark, I realize the Magnus manifold is overkill. I'm assuming it will probably even hurt my low end torque with a B16G. I wanted to install it now though, in preparation for upgrades in the future. Swapping the intake in the car is a pain, so I figured now was the best time to throw it on.

The whole reason I just wanted to throw the original motor back in, was because I really didn't have everything I needed to install the built motor with all the supporting mods it truly required. I have been acquiring parts for the build over time, but in no particular order. I was just buying whatever I needed as it came along. Hence, having a Magnus manifold and no turbo to go with it. After thinking more about it, I thought this was as good an opportunity as any to go ahead and install the new setup, and build on it as time and budget allowed. I'll have the core components to have a running setup, but it will by no means be complete or optimal. Hell, I still haven't even sourced a front mount intercooler. I know it defies logic to have a Magnus intake mani, while still running the tiny little stock FMIC. I say this only to reaffirm that I do have a plan for the car in mind, it's just coming together more slowly than I would like. I swear, I'm not haphazardly throwing parts together, I just didn't anticipate throwing this setup in the car anytime soon.
 

coyotes

Well-known member
Joined
Nov 15, 2013
Messages
1,544
Location
Seattle, WA
I think it looks great, your build is far from cobbled together or without a goal. I'm excited to get my engine together like that.
 

turbowop

Well-known member
Joined
Apr 29, 2001
Messages
11,972
Location
Yakima, WA
Word, no worries. I figured it was something as simple as just having it on hand and wanting to install it now rather than later. Should be easier now anyway since you're still running the soft IC piping. Having to modify hard piping down the road to fit the lower placement of the throttle body mounted to a SMIM is way more of a bitch. Now you can fab up hard piping and FMIC with that already in place.
 

GSTwithPSI

Well-known member
Joined
Jan 1, 2012
Messages
3,461
Location
SoCal
Decided it was time for a few creature comforts. The 20 year old sound system just wasn't cutting it, especially after I installed the new deck. I found out why. Let's just say the OEM speakers have seen better days:
WP_000935.jpg

WP_000936.jpg


I used to be big into the car audio scene, but over time, I just feel like I lost interest. Back in the day, I'd run new wiring to each component and all the other BS to get the best sound. Nowadays, I hardly feel like soldering on new connections at the speaker terminals. Not to mention, removing 20 year old door panels is probably one of my least favorite things to do of all time. My intent here was to simply get something in the car that sounded decent, without breaking the bank and causing me too much hassle. Typically, I'm a brand whore when it comes to audio equipment, and only buy Alpine stuff. But, I got a really good deal on a new full set of Kicker DS series coaxial components, so I picked them up for the Galant. Never had a set of Kicker speakers, so hopefully they sound good. Anything over the old stuff should be an improvement, though.
WP_000932.jpg

WP_000937.jpg


Overall, the car is coming along. I have the engine bay clean, and almost prepped for paint. There's just so much cleaning required, which really sucks up time. I'm hoping to have the engine bay painted by next week so I can start dropping the motor back in. I picked up an EVO 8 FMIC to replace the stocker. The idea being that I can retain most of the OEM piping and have something to hold me over until I can pick up a larger core. I also started relocating the battery to the trunk. Running the 2GA wire wasn't as bad as I thought it would be. BIG thanks to James Foster! He hooked me up with his old trunk battery setup for next to nothing, and it's a REALLY nice kit. If you all don't already know, James is an awesome guy, and I appreciate his generosity.
 

GSTwithPSI

Well-known member
Joined
Jan 1, 2012
Messages
3,461
Location
SoCal
I finally got around to painting the engine bay. I spent what seemed like forever cleaning grease and sh*t from every crack and crevice under the hood. I dropped most of the front subframe as well for a good cleaning and paint. It turned out pretty nice. I snapped a few crappy pics with my phone, but they don't do a very good job showing how nice it turned out. A fresh coat of paint really made a night and day difference and I feel much better about dropping the nice clean motor in a spiffy engine bay. Here's the progression:


Engine Bay:
WP_000831.jpg

WP_000971.jpg

WP_000988.jpg

WP_000969.jpg

WP_000976.jpg


Front Sub-frame:
WP_000837.jpg

WP_000972.jpg

WP_000974.jpg


Brake booster/Strut tower:
WP_000833.jpg

WP_000967.jpg

WP_000977.jpg


Firewall:
WP_000839.jpg

WP_000968.jpg


Battery location/passenger frame rail:
WP_000832.jpg

WP_000844.jpg

WP_000979.jpg

WP_000980.jpg


I also finished relocating the battery to the trunk. I'm just waiting for my cutoff switch to finish up. BIG, BIG, thanks to James Foster, who hooked me up with all the stuff to get this done!
WP_000982.jpg


Got all my drivetrain components cleaned and ready to reinstall. I also pressed in a new bearing for the intermediate axle shaft. The old one felt a little too lose.
WP_000986.jpg

WP_000987.jpg


The car is coming alone nicely, but I'm crossing my fingers to get it done in time for the shootout. I'm still struggling about what to do about an intercooler setup. Sadly, I'm not in a position to drop a bunch of money on a nice ETS setup, which is really what I want. I picked up a Evo 8 core, but it isn't going to work like I want. I'm open to any suggestions on a budget friendly solution that is an improvement over the stocker.
 

coyotes

Well-known member
Joined
Nov 15, 2013
Messages
1,544
Location
Seattle, WA
Damn dude that looks really nice. I admit having a black car makes it a lot easier to keep things from looking super gross over white for sure. How did you paint it exactly? I imagine it would be a pain with all the parts you kept in place.

As for intercooler, I dunno. You looking for just a core or a whole kit? I got my core from here: click I'm pretty happy with the one I got. Although, I have only driven my car about 6 miles since I put it on.
 

GSTwithPSI

Well-known member
Joined
Jan 1, 2012
Messages
3,461
Location
SoCal
Thanks for the compliments guys. The painting process was pretty straight forward. I started by cleaning everything really well with Simple Green. After I remove all the grease and grime, I sand with 800/1000/2000. Once everything is smooth, I use reducer to prep/clean the surface before painting. I wet down the floor in the garage to minimize the dust and do a quick wipe with a tack cloth right before spraying.

The first coat I did was the Rust Bullet. I use a cheap Harbor Freight HVLP gun to lay it down. After the Rust Bullet dires, I sand where necessary if needed. After the Rust Bullet, I apply the W09 base coat right on top. I use a Devilbiss GFG-670 Plus for color and clear. I sprayed two coats of color, and 4 coats of clear. I just used some epoxy based spray paint for all the subframe crossmembers.

I pulled everything I could away from the body. I didn't remove the firewall blanket, so everything below the data plate was untouched. Everything that was too much of a pain to remove just got taped off. I was pretty easy to do, it just took forever. Honestly, that's pretty much how I'd sum the whole job up. Easy, and extremely time consuming. Well worth the effort though, IMO. The car looks 110% better than before. It's also a nice feeling knowing the car is completely rust free. All the little problem areas are taken care of at this point.
 

rebelboost

Active member
Joined
Aug 3, 2013
Messages
33
Location
Pensacola, Florida
Beautiful work! I love the white factory color and how clean the engine bay is becoming. I have had alot of people say great things about the engine bay work you done with 1813. /ubbthreads/images/graemlins/cool.gif Just like you I am still in the market looking to buy a inter-cooler(short route). Good luck!
 

GSTwithPSI

Well-known member
Joined
Jan 1, 2012
Messages
3,461
Location
SoCal
Dropped in the motor today. Still lots, of work to do, but it's coming along.
WP_000995.jpg

WP_000997.jpg

WP_001000.jpg

WP_001005.jpg


Finished the battery relocation, and got the cutoff switch installed.
WP_000991.jpg

WP_000992.jpg


The JICs on the car have seen better days. The definitely need some attention, but for the life of me I can't get the adjustment rings on the rear coilovers to loosen up. I don't want to bang on them, or do anything that will damage the rings. They are soft aluminum, and even deform a little when I apply a lot of torque with my spanner wrench. I've soaked them in penetrating oil as well, which didn't do anything. Any ideas on how I can get these apart without destroying them?
WP_001007.jpg
 

CutlassJim

Well-known member
Joined
Jul 17, 2006
Messages
1,699
Location
Manchester, NH
The collars on my Hotbits are frozen and I Emailed them about it and they said to just cut them off and buy new ones.
 

coyotes

Well-known member
Joined
Nov 15, 2013
Messages
1,544
Location
Seattle, WA
click

I have seen others around, just have to search or call. You just have to find right diameter and thread pitch
 
Last edited:

GSTwithPSI

Well-known member
Joined
Jan 1, 2012
Messages
3,461
Location
SoCal
I measured the OD of the rear damper at 1.915 which according to Google is 48.641mm. That appears to be right in the middle of both rings offered by KSPORT. I don't have a metric thread pitch gauge to check the pitch on the dampers. This f***ing sucks.

WP_001008.jpg
 

coyotes

Well-known member
Joined
Nov 15, 2013
Messages
1,544
Location
Seattle, WA
I'm amazed jic wouldn't have the part. I would call them up and talk to someone. Just because they don't make the coilover anymore shouldn't mean they don't have parts for rebuild or one from another application won't fit. Many companies design a coilover for many applications but use different mounting brackets to make a specific fit to different vehicles.

But the components themselves on the coilover body are the same.
 
Last edited:
Support Vendors who Support the GVR-4 Community
Boosted Fabrication ECM Tuning ExtremePSI Fuel Injector Clinic Jacks Transmissions JNZ Tuning Kiggly Racing Morrison Fabrications RixRacing RockAuto RTM Racing STM Tuned

Recent Forum Posts

Top