The Top Mitsubishi Galant VR-4 Resource

Join the best E39A 1991-1992 Mitsubishi Galant VR-4 community and document your GVR4 journey.

  • Software Upgraded - Reset Your Password to Login
    In order to log in after the forum software change, you need to reset your password. If you don't have access to the email address you used to register your GVR4.org account, you won't be able to reset your password. In that case, follow the instructions here to regain access to the forum.

building of a ggsx

tektic

Well-known member
Joined
Dec 19, 2012
Messages
1,497
Location
ronkonkoma, ny
I corrected some tuning issues as well as a loose axle nut and hopefully my fan issue too. When the car was back on the ground I took it for test drive. Damn does this thing pull !!! Its not registered yet so I only drove around local streets. I just barely got over 4k but she is fast. nb02 is reading rich and does smell slightly rich but running good. Idle needs a little more dialing in too. I'm using code that allows me to run open atmosphere blow off valve dump with my maf setup. It finaly drives like it should! Ordered a triple gauge mounting panel for a single din radio opining new heater core hoses and a power steering seal kit. The car decided to dump the entire contents of my rack over the top of my alternator today.

It's finally significantly above freezing today. As soon as my eclipse melts out of it's ice cocoon I will get the wide band out of her. I got the oil pressure gauge today and have the boost gauge coming in the mail still. I'm still worried about the crushed waste gate and how much boost its holding to relay get on it with out monitoring it.

I don't think i posted this here but a few weeks back my DD eclipse over heated from a bad heater core hose. It popped the head gasket and for the last 5 weeks I've been driving my lifted wrangler everywhere. Its not a commuter by any means, but it doesn't care about pot holes. I cant wait to get this Galant going.

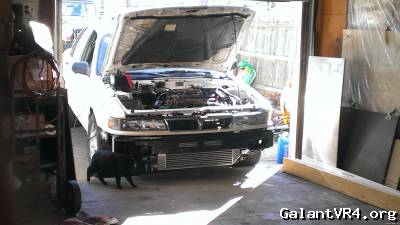
Edit: Picture for good measure.


Last edited:

tektic

Well-known member
Joined
Dec 19, 2012
Messages
1,497
Location
ronkonkoma, ny
Been a while since I updated this. I was having some clutch issues and it took me a while to chase down all the leaks and air bubbles. I put the project on hold for a while because it was pissing me off.

I returned to Gegee (Yes I named Her) today and lowered that little slut!

fender opening is within 1/4" of 26" at all four with evo 8 rims and 225 45 17 tires.
evo 8 mr tophats and springs with dsm gr2's in the rear
Up front she has galant top hats, with Exel-G shocks, Ground control hardware with 275lb 7" (part number says 7" but they measure just over 6.25") springs. Coil is adjusted all the way to the top. I also added camber bolts to the top strut bolt hole.

The alignment is horrendous right now. The rear is tow in on both sides and camber is off all around. I Will try to have it done tomorrow. I only drove the car around the block to make sure my clutch was working properly and to get an overall impression of the days mods.

First Impression: Better! No unusual clunks. Much firmer ride. I actually felt how soft the seat was, as opposed to the big sloppy tires and springs. I had 225/55/16s on her prior with the stock ggsx suspension. As she sits the front feels as sprung as the back, and I'm not sure that's a good thing. The evo 8 rear springs are very short. They do ride well and feel solid on the ground, however when lowering them off the jack I had to hold them in place until there was some weight on the tires, then make sure to seat them properly. I think an 8" 280-300lb spring up front may be more in order. I might also utilize my rear gc setup with some 9" or 10" springs. There may or may not be reason for this... I have to drive it more.

So many other gremlins to work out though. I need to weld together a real intake tube for the recirculation of the bov. Water pipe is leaking at water pump o-ring. transfer case is wet. turbo oil return bolt still leaking. AC tensioner bearing is shot. trans cables need better adjusting. Need to add relays for my wbo2 and fuel pump rewire. mount all my gauges up permanently. then the cosmetic stuff... and the interior needs to be cleaned!


The gap in the rear is just perfect for my likening. I might lower the front just a tad more to add just a little bit of rake.
 
Last edited:

coyotes

Well-known member
Joined
Nov 15, 2013
Messages
1,544
Location
Seattle, WA
looking good. I got a coolant leak in the same spot, been bumming me out. hopefully gonna fix it on friday. Keep it up man
 

tektic

Well-known member
Joined
Dec 19, 2012
Messages
1,497
Location
ronkonkoma, ny
So I truied to clear up some problems today. Put my driver side under dash back together. Fixed a dislodge lock mechanism in my rear drivers side door. Un locked my glove box and made it compatable with the ignition key. Re installed that..... It seems week on the right side. Is there a bracket between where the mph relay mounts and the frame? I also painted the upper door trim flat black on the drivers side. Spent over an hour masking it off. It looks good. Spent some time wedding missing bushings to the shifter cable asembly and adjusting the linkage. Haven't tried it yet but seems smoother. Regestered her for another 2 years today also.


Last edited:

SSGdave

Well-known member
Joined
May 31, 2011
Messages
137
Location
San Diego, CA
Quoting tektic:
I returned to Gegee (Yes I named Her) today and lowered that little slut!


HA, my old black GGSX (The Stolen one) was named GiGi after the Rally Driver


EHmotorsports

Well-known member
Joined
Sep 25, 2012
Messages
1,278
Location
Beaverton
you have the wrong wheel lug nuts. they need to be the Mag style with the sleeve. it is not safe to drive with the acorn nuts.
 

tektic

Well-known member
Joined
Dec 19, 2012
Messages
1,497
Location
ronkonkoma, ny
Yeah I guess it's more of a likely nick name. I'm scared of theft. Sorry for your loss.

Thanks for the concern about my nuts but I'm not sure where you got the idea I was using acorns. I have the hollow ones with the sleeves and washers in the pictures above. /ubbthreads/images/graemlins/dunno.gif
 

SSGdave

Well-known member
Joined
May 31, 2011
Messages
137
Location
San Diego, CA
That car was stolen ages ago, im totally over it.
 

EHmotorsports

Well-known member
Joined
Sep 25, 2012
Messages
1,278
Location
Beaverton
Quoting tektic:
Yeah I guess it's more of a likely nick name. I'm scared of theft. Sorry for your loss.

Thanks for the concern about my nuts but I'm not sure where you got the idea I was using acorns. I have the hollow ones with the sleeves and washers in the pictures above. /ubbthreads/images/graemlins/dunno.gif


got ya they just looked like the hollow tapered lugs.
 

tektic

Well-known member
Joined
Dec 19, 2012
Messages
1,497
Location
ronkonkoma, ny
Thanks!

The linkage bushings and adjustment I made yesterday worked awesome! I drove around today and for the first time everything worked like it was supposed to. I'm so pleased with how it shifts and drives.

I have to clean the body up some more. Paint some things and try to shampoo the interior again. Install the radio connections, radio and make a shift boot. I wonder if the speekers are any good.

I also want to make some heat shields for the exhaust housing. It gets hot under there. I think the heat may be causing my illusive alternator draw issue.
 

tektic

Well-known member
Joined
Dec 19, 2012
Messages
1,497
Location
ronkonkoma, ny
Swapped out the front coil springs from 7" 275# to 6" 375# much better over all performance. Where the first spring was all the way at max high adjustment it still bottomed out. The new spring is set about 3/4" lower and has not bottomed out yet. It does ride slightly higher but every thing about the ride is better. There is 73mm between the sidewall line on the tire and the bottom of the fender now on both sides in the front. the back is slightly different side to side because there not adjustable and weight differences but there about 5-8mm lower. Still with the stock evo 8 mr springs and dsm gr2 shocks.

It's not a bad ride but tomorrow I'm buying a set of evo MR bilsteins with swft r-spec springs. I am convinced this is probably the best suspension to own. For the mono tube design of the struts and the variable rate of the springs. That and the pics and stories I have seen here of users on this board who have this particular set up.

I would like to show you guys these weldable shock eye kits. It's just tube stock cut to size but you get a real bushing and tube stock for a decent price. or this I Don't know if these are the right size as I haven't measured, but I imagine the right size bushing can be obtained. Two pieces of steel tube welded together crisscrossed. One for a bolt the other for a bushing.
I was also thinking of ways to adjust height... But I guess that's better done with spacers on the tophat. Or extra holes on the strut if I'm not welding to the shock and instead make a adapter bracket.

Edit: woke up to another drained battery. Really funkin pissed! I'm going to bring my 90amp to have it rebuilt. Although I have to re test some things.

Edit 8/6: evo suspension looked too beat up to buy. Going to rock the gc coils for a while till I find something else.
 
Last edited:

tektic

Well-known member
Joined
Dec 19, 2012
Messages
1,497
Location
ronkonkoma, ny
New heat shield and stru tower support


Still not driving it much due to leaks. Oil cooler an -8 45 fitting. 3rd one that's leaked on me. And transfer case.
 

tektic

Well-known member
Joined
Dec 19, 2012
Messages
1,497
Location
ronkonkoma, ny
Finally figured out my drivetrain noise. No matter what anyone tells you auto and manual intermediate shaft brackets are different. The auto version I had installed originally placed the shaft 1-2 mm further back than the manual one. It started leaking at the trans seal and has made noise since day one.


I also reseald my transfer case


And swapped on a new yoke and u-joint.


I spent all day getting this sorted out... Axle and seal are done but everything else needs to go back on.

Work to do before east coast mod:
1000mile oil change (was going to use shell 10w-30 full synthetic- what do you think? Too soon for full synthetic?)
Fix oil cooler an 8 45 for the 4th time
Fix turbo return oil leak
Install transfer case an exhaust
Install radio and boost gauge
Paint rear bumper and passager side trim
Replace backed out bolts check stuff for tightness


That's a lot of work ... I'm not going to get it all done.
 

tektic

Well-known member
Joined
Dec 19, 2012
Messages
1,497
Location
ronkonkoma, ny
All done except for radio and boost guage.


I used these two bolts for the axle carrier bearing bracket. One on right is stock the one on the left is longer but has the same size sholder and says grade 10.9 instead of the stock 7 which I think makes it grade 8? Eitherway the stock bolt was too short as the threads in my block were beat up.
 

tektic

Well-known member
Joined
Dec 19, 2012
Messages
1,497
Location
ronkonkoma, ny
Well just a little over a week later the exhaust and transfer case came down again. This time not for leaks but because of drive train noise. It came to my attention that me engine mounts and brackets were in fact very different than manual Galant mounts so I swapped them out. The drive shaft angle is much better and there is significantly less vibration at idle. That's as far as I got. Just put the car on the ground but there are 3 cars behind it in the driveway. Ecmod is tomorrow... I will try to make it out there. I should realy adjust stuff like the ic piping. See what happens.

edit: Swapping the engine mounts made my down pipe hit my rear sub frame. I swapped to an evo 3 o2 housing, but it then hit on the other side. I kept the evo housing and cut a slice in the dp and had it welded.
 
Last edited:

tektic

Well-known member
Joined
Dec 19, 2012
Messages
1,497
Location
ronkonkoma, ny
After swapping engine mounts and having my exhaust adjusted, the first two times I boosted over 20psi the intercooler couplers popped off. Yes it happened twice. I'm going to swap to the solid mount in the rear and hopefully it will elevate that issue.

Any way while reattaching the ic coupler I noticed coolant leaking from my head gasket.

Long story short the engine was torn down to a block and crank and returned to the machine shop for refinishing.

Today I ordered:
-acl oil pump
-acl race main, and rod bearings
-oem stubby shaft
-NPR rings
-B&A lower gasket set
-oil cooler hose and an fittings

I Still need a New Head gasket. I have 3 or 4 composite gaskets from b&a and fel-pro kits. I was considering the Nippon racing MLS Gasket. Seems to be identical to the OEM MLS and around $70 less expensive.

The block was honed and the deck was redone. The crank was polished and 3 valves in the head were lapped. The cam journals were also polished. I should probably have the cams polished too. I will take a closer look at them.

I bought all the stuff to degree my cams correctly when It's time to assemble. Just need to make some solid adjustable lifters.

I dissembled my oil pump today and there was all sorts of things lodged in with the main gear shaft. the casing was slightly worn as were the shafts so I just ordered a new ACL one from extreme psi. Mine was probably still useable but it did show wear.

I need to clean out my ofh and turbo too. A rebuild may or may not be necessary, but I guess it doesn't make sense to take it apart and put the same thrust bearings amd o-rings back in. I have to buy a new oil feed line for it and a new oil cooler also. I managed to mangled my oil pan trying to get it off. "The right stuff" wouldn't budge for almost 40 min of banging prying and cutting. I'm going to weld a fitting on there so I don't have to deal with a leaking turbo return any more.

Anything I'm missing?
 
Last edited:

GSTwithPSI

Well-known member
Joined
Jan 1, 2012
Messages
3,461
Location
SoCal
Everyone always knocks using oil pan gaskets, but what you've just described is exactly one of the reasons I like them. I've always had good luck with them, and it makes the pan much easier to remove if it ever has to come off. I know it's not everyday you need to drop the oil pan on your car, but when you do, it can be a bastard to get off sometimes.

I was hoping to see this thing at East Coast MOD. Hopefully you can get things sorted out in time for next year. Good work thus far though!
 

tektic

Well-known member
Joined
Dec 19, 2012
Messages
1,497
Location
ronkonkoma, ny
I got all my parts back from the shop. Spent the last 5 hours cleaning stuff and I'm no where close to done. Therese a very protestant black silty mess stuck to everything. I was inspecting the head and it was not as clean as it could have been. The dirtiest part was where the lifters seat. Those bores seemed to have been completely over looked. The drain trails leading to the block needed some cleaning too. Therese no way I'm having this thing get contaminated and fail again. I need to swap in the weak springs to do the cam degreeing but other than the the head is now ready to assemble.

I still need a fly wheel and probably piston rings. I ordered a set but I don't think they are the right material. I sent an email over to npr hopefully they can give me the info I need.

So to recap, GeeGee is on the road to a contaminant free future. thats all for now. More cleaning to do!
 
Support Vendors who Support the GVR-4 Community
Boosted Fabrication ECM Tuning ExtremePSI Fuel Injector Clinic Jacks Transmissions JNZ Tuning Kiggly Racing Morrison Fabrications RixRacing RockAuto RTM Racing STM Tuned
Top