The Top Mitsubishi Galant VR-4 Resource

Join the best E39A 1991-1992 Mitsubishi Galant VR-4 community and document your GVR4 journey.

  • Software Upgraded - Reset Your Password to Login
    In order to log in after the forum software change, you need to reset your password. If you don't have access to the email address you used to register your GVR4.org account, you won't be able to reset your password. In that case, follow the instructions here to regain access to the forum.

1517's thread ***More pics added 12/31***

I'm thinking of running a Competition Clutch 4 puck solid hub setup. Any thoughts? Anyone have experience?
 
Last edited by a moderator:

Well I ordered the clutch in the above posting. I guess I'll know soon enough if it is any good or not. It should be here by this weekend.
 

Well I've picked up my new trans from Jack on Tuesday, and my new clutch and clutch fork showed up today. I haven't been able to even look at the clutch parts yet, because the job has placed me out in Grand Junction, CO for the night. I'll be back tomorrow though, and will post a first impression.
 

I'm bored. I want to work on this thing some more. But waiting on my clutch to get back so the car can go back together. And when i pulled the trans out, i only left about 3 inches between the front of the car and my garage door(when closed) so it is kind of hard to put the bumper back on. I suppose i could mount the nitrous bottle, but i would prefer to build a bracket so that i don't have to drill any more holes in the trunk. And my neighbor has to fill his gas for his welder before i can do that. Maybe my focus should be trying to sneak this thing through smog before i worry about that. I don't know.

Maybe this is just my random post of the week. /ubbthreads/images/graemlins/dunno.gif
 

Diego

Well-known member
Joined
Dec 9, 2007
Messages
2,132
Location
In a van down by the river, Iowa
When do you have to test.. maybe that's what we do on our meet while at your house...
 

Ehh, plates are good through the end of September. Plus i'd hate having everyone stand around while i took shots in the dark at trying to circumvent the total lack of vacuum lines under the hood.
 

I wish I had a robot, or a clone. Or that I could be in two places at once.

I put the car back together this afternoon. Everything seems real good except that the clutch engages way to close to the floor. I need an extra body to bleed her some more.
 

Diego

Well-known member
Joined
Dec 9, 2007
Messages
2,132
Location
In a van down by the river, Iowa
Wish I could help I ordered a STM extended slave rod today should be here in a few days. Hopefully that helps with a little extra, that's the only thing I can think of that I'm missing my old slave had it but I didn't think twice to save it before I tossed it for scrap.
 

Terry Posten

Well-known member
Joined
Dec 16, 2003
Messages
9,009
Location
Davenport, Iowa USA
I was able to tweak the adjustment rod at the pedal to get mine in the sweet spot.

Mine was too high, then too low. I was turning the threaded rod to much.

I found that the best way to adjust the throw was to turn the rod only 1/8th turn at a time and take it for a drive each time.

It will take a while but it is very touchy.
 
Last edited:

toybreaker

iconoclast
Joined
Apr 30, 2006
Messages
3,581
Justin,

Are you trying to bleed the clutch hydraulics while the front of the car is up on stands?


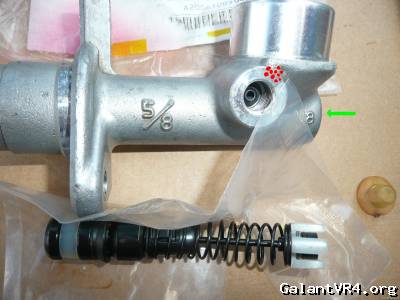
The green line is the thermal compensating port where fluid can enter/leave the master cylinder bore from the reservoir.

That's the comp port at the bottom of the bore.


Note it is on the centerline of the bore, leaving a "pocket" area where air can be trapped above it and in front of the side port.

Most of that air will be purged when the piston displaces fluid out and into the system thru the side port that leads out to the slave during the beeding proccess.

... However, some will be trapped there, (red "bubbles" in top pic... doan b hatin on my paint skillz ... /ubbthreads/images/graemlins/grin.gif )

... especially if you have the nose of the car up on stands, ... and it can be a real bitch to get it all out ...

Even a small amount of trapped air can contribute to release issues


This is why I always recommend folks bench bleed their components beofre they install them on the vehicle. You can optimise the angle, and give the air a high point to leave the system, and in just a couple of strokes, remove all the air from the master.

A vacuum bleeder can do a workman like job working the air down and out the slave bleeder, but it;s hard to tell when you;re done becuase air "sneaks" down the bleeder screw threads and shows up in the fluid stream, making it look like the systen is still chock full 'o air.

Letting the system "gravity out" for a few minutes will show when things are good to go.


It's also why on installed compnents, I prefer reverse bleeding the system from the slave upwards/back towards the master with the phoenix style bleeder. (it pumps fluid into the system at the slave bleeder screw, and you remove the flushed fluid from the master cylinder reservoir.) The air will head up easier than it heads down, and you can monitor your progress up at the reservoir. When the bubbles stop, you;re golden!
 

As always John, thanks for the advice. I never realized that was even a possibilty. I didn't actually break the system open when i dropped the trans out. I just pulled the slave off of the side and unbolted the bracket that holds the line, then took advantage of the flex line to allow me to set the slave up by the washer bottle.

I have to assume that it needs to be bled. And because it was a one man show today, I called it a night and will get assistance tomorrow.

If bleeding doesn't help, the trans is coming back out.

My master cylinder pushrod is maxed out on its adjustment already, I have the smaller diameter slave installed, the entire hydraulic system has less than 8k on it, and I gave the disc/pressure plate/flywheel all to Jack (Jack's Trans) so he could have his guy do his magic with the flywheel cut.
 

Quoting toybreaker:


A vacuum bleeder can do a workman like job working the air down and out the slave bleeder, but it;s hard to tell when you;re done becuase air "sneaks" down the bleeder screw threads and shows up in the fluid stream, making it look like the systen is still chock full 'o air.


One simply way to circumvent this issue with vacuum bleeders is by applying some wheel bearing grease to the area around the threads of the bleeder screw.

The suction of the vacuum bleeder will be applied equally to the system. That suction creates a pressure differential, which, do to the laws of physics(or something like that /ubbthreads/images/graemlins/dunno.gif), will try to equalize itself by drawing in fluid. Because air flows more easily than brake fluid, the bleeder screw threads are usually the path of least resistance. /ubbthreads/images/graemlins/banghead.gif

But brake fluid flows more easily than grease /ubbthreads/images/graemlins/grin.gif. By applying the wheel bearing grease to the threads of the bleeder, you change the path of least resistance to the hydraulic system itself, and therefore have a steady stream of fluid once the system has purged itself of air.

An added benefit of this is that the grease will combat corrosion build-up around the bleeder screw, making it much easier to open many moons down the road.
 

toybreaker

iconoclast
Joined
Apr 30, 2006
Messages
3,581
Justin,

that's a good tip, but DONT USE WHEEL BEARING GREASE!!!

it will comtaminate the system leading to all kinds of prblems further down the road gaurandamnteed.


The only product suitable for that task is hydraulic system assembly lube.


I saved a bunch of thiese packets from my aviation days

... but any ate/lockheed/girling hydraulic assembly lube made specifically for use internally in brake systems will do ... (this product is usually red in color to distinguish it from the other brake lube meant for the external parts like sliders)


... let me repeat that, because it is very important to not contaminate the system.

do not use anything other than specifically designed assemby lube anywhere on a hydraulic system that may come in contact with the brake fluid

at some point I may do a write up on how to optimise the hydraulic systems of these cars, (the toybreaker way /ubbthreads/images/graemlins/tongue.gif ), but i'm not sure ther's enough space on the server. /ubbthreads/images/graemlins/crazy.gif
 

John, i understand the contamination factor completely. But I have a hard time believing that any grease will actually make its way past the threads. I'm not talking about removing the bleeder and then coating it and putting it back in.

Just dabbing some around the outside before you crack the screw.

With the incredible viscosity difference between the grease and the brake fluid, and the fact that the threads provide effectively a "the eye of a needle" sized passage to get past the bleeder seat, it seems extremely unlikely.

But I do agree that the risk is real.....

Just next to impossible after factoring everything in.

I've seen guys squirt 20W-50, around a bleeder, and that I'd never do.

But I suppose that for the purposes of trying to provide real, honest, safe advice to this community, you are absolutely correct.


Edit: Is there a foot in mouth icon?
 
Last edited by a moderator:

toybreaker

iconoclast
Joined
Apr 30, 2006
Messages
3,581
I only know this because I done done it /ubbthreads/images/graemlins/smile.gif

... once ...

And once was enough!

Damn cup swelled up an started to stick/bind in the bore

it finally rolled over on itself and spat out all the fluid when I got all "diego" on it.

... wasn;t purty, to say the least! ... /ubbthreads/images/graemlins/devil.gif


neighbors little girl came over later and asked what rassafrackin meant /ubbthreads/images/graemlins/crazy.gif

Quoting 1517:
I'm not talking about removing the bleeder and then coating it and putting it back in.


yeah, I didn;t think about doing it that way...that's probably safe~ish, I just don;t want to take any chances on the hydraulic system anywhere

I actually do remove the bleeder entirely and coat the whole kit, kat and kaboodle, threads an all, the whole shitarree, with assembly lube ... all the way down to the step down.

This keeps any air from migrating down the threads.

I did this on Diego's car, but we didn;t have any air to use my cool guy vacuum bleeder, so we had to do it the hard way as the sun set over yonder horizon.

... think his neigbors might have learned a few new words as well /ubbthreads/images/graemlins/rofl.gif
 
Last edited:

I'll be damned!

It is actually possible to pass emissions with no EGR, no solenoids, carbon canister disconnected, 750's, vacuum line elim (except for the FPR, BOV, and wastegate), and I did it without paying someone at the e-test station off.

Damn it feels good to be a gangsta!

This is all a very good thing because the Galant has been forced back into DD duty. In a fit of extreme dumbassery, I rearended some poor guy with my beater S-10.

It won't be long until the truck is back on the road though.
 

Diego

Well-known member
Joined
Dec 9, 2007
Messages
2,132
Location
In a van down by the river, Iowa
Do tell your secret haha..

How has she been running since the meet up? Fix that release problem yet?
 

I wish I could let you in on some secret. I went down there 100% expecting to fail. But I suppose there was some help considering that everything under my hood is new. The motor, O2 sensor, ECT, air/oil/fuel filters, the cat only has ~500 miles on it, I'm boost and exhaust leak free, and when you open my hood everything is clean. I mention that last part because when the guy opened my hood he knew right away that my car isn't hacked together. We talked after it passed and he told me "nice car man", and he said that he knew I was missing a couple things but he also knew that if I had put the car together correctly it would still pass. He said he thought it would be a touch dirtier than it actually was, but he realized that he shouldn't just can it because my EGR is gone, because it looked to him like I knew what I was doing.
 
Support Vendors who Support the GVR-4 Community
Boosted Fabrication ECM Tuning ExtremePSI Fuel Injector Clinic Jacks Transmissions JNZ Tuning Kiggly Racing Morrison Fabrications RixRacing RockAuto RTM Racing STM Tuned
Top