The Top Mitsubishi Galant VR-4 Resource

Join the best E39A 1991-1992 Mitsubishi Galant VR-4 community and document your GVR4 journey.

  • Software Upgraded - Reset Your Password to Login
    In order to log in after the forum software change, you need to reset your password. If you don't have access to the email address you used to register your GVR4.org account, you won't be able to reset your password. In that case, follow the instructions here to regain access to the forum.

The "I can't make up my mind" build.

GSNT

Well-known member
Joined
Jul 6, 2003
Messages
521
Location
Louisville, KY
Damn, that does look good! What did you use to dye it?

I don't have that rear dome light cover btw, the parts car is a sunroof car and doesn't have a rear dome light.
 

citymunky

Well-known member
Joined
Sep 22, 2010
Messages
1,761
Location
Chesapeake, VA
Flat black Dupli-Color vinyl & fabric spray.
 

citymunky

Well-known member
Joined
Sep 22, 2010
Messages
1,761
Location
Chesapeake, VA
Well all great builds must to a end, and even if it's prematurely. I'm stopping the project build on this car, as well be for sale soon.


But I have a good reason to stop, I going to be picking up 1505/2000 shell, and move forward with it.
100_8794.jpg
 

citymunky

Well-known member
Joined
Sep 22, 2010
Messages
1,761
Location
Chesapeake, VA
It's been a while since I worked on 1505, so here are the starting pic's.

Currently I'm rebuilding the front axles (new paint, new boots). I was about to fix my TH05H-20G, so I just ordered a rebuild kit for that.


Last edited:

citymunky

Well-known member
Joined
Sep 22, 2010
Messages
1,761
Location
Chesapeake, VA
I was able to have my turbo center fixed for a total of $70 buck /ubbthreads/images/graemlins/grin.gif (A piece of the compressor side back plate was cracked, and fell off.) With that being said I ordered a TH05 rebuild kit this weekend. I also order new Ball joints and tie-rod ends. I was also able to pick up a manual steering rack form a 94 1.8L 1g. However I not sure if I want to use it or not. /ubbthreads/images/graemlins/dunno.gif

I just got done applying 4 coats of VHT Flameproof to my FP Manifold, 20g hotside, o2 housing, Wastegate housing and open dump tube. I going to let them cure overnight, and tomorrow they will be baked.

I'm still rebuilding the front axles. I paint the shafts a few days ago. I'm letting the green paint cure on the outer axle bearing retainers first before I reassemble them. I also painted the USDM foglight brackets/frame brackets and hardware. Does anybody know remove the foglight glass? The aluminum is form white powder in one the light housing. I want to remove the corrosion before it's too late.
 

citymunky

Well-known member
Joined
Sep 22, 2010
Messages
1,761
Location
Chesapeake, VA
Just finish baking all the hot parts, While stuff was baking I sand basted the A/C fan and brakets here and there. I also Clean the undercarriage in prep of some Rubber undercoating tomorrow. I'm looking to start paint this weekend.

But before I do I need to remove the rust and paint the rear subframe and install back in the car.
 

citymunky

Well-known member
Joined
Sep 22, 2010
Messages
1,761
Location
Chesapeake, VA
Undercoated the wheel wells yesterday. Today I assembled my Front axles with new boots. They look near new now with the paint job. I also painted the rear sub-frame assy, and my adjustable rear trailing arms.
 

citymunky

Well-known member
Joined
Sep 22, 2010
Messages
1,761
Location
Chesapeake, VA
22mm Whiteline (front) Swaybar, and 27.5mm custom fabricated Quickor Suspension (Rear) Swaybar, with a new paint job. These were off of 923/2000....RIP. /ubbthreads/images/graemlins/frown.gif

Before (Not a GVR4 sway, but they looked like this when I started)


After (Hammered Sivler)


The CV Axles

Before


After


The Rear sub-frame was not too bad, but I painted it anyway.


I Also painted my adjustable rear control arms. Cadmium coating never seems to last to long.
 
Last edited:

AWDPower

Well-known member
Joined
Feb 28, 2011
Messages
107
Location
Vacaville, CA
It's looking very good, those axles look brand new. I also painted my sway bars. To keep them from getting all scratched up when installing them, I put blue painter's tape on them (lengthwise so it was easy to remove, don't wrap them.)
 

citymunky

Well-known member
Joined
Sep 22, 2010
Messages
1,761
Location
Chesapeake, VA
Thanks, a first look than do look new, a few other people said the same thing. Also that's a good tip, thanks.
 

se7enine

Well-known member
Joined
Apr 14, 2012
Messages
253
Location
Reno, NV
Parts are looking great, i wish i had the patience to do the same for my 4runner.
 

citymunky

Well-known member
Joined
Sep 22, 2010
Messages
1,761
Location
Chesapeake, VA
That last two weekend end I been prepping the car for paint, hopefully I can start straying on Sunday.

Since I can waste time waiting for Sunday I removed the whole power steering system due to a leaking P/S Steering rack. I'm prepping my manual steering rack from a 1994 1.8L Eclipse to be installed. /ubbthreads/images/graemlins/grin.gif I cleaned it up a bit, re-greased the pinion gear and rack teeth. The housing is going to get a coat of paint some time today. I installed new outer tie rods and boots, the inner tie rods were still good.

I cleaned all the caked on grime off the lower control arms and front subframe connectors. I installed new ball joints, new anti-swaybay end links. I ordered new front wheel bearing and seal. Now to start removing the wheel bearing.
 

GSX_TC

Well-known member
Joined
Apr 7, 2011
Messages
3,725
Location
Houston, Texas
I love it when guys do these things to keep these cars pristine. Keep up the good work you are a dedicated And loyal GVR4 owner!
 

citymunky

Well-known member
Joined
Sep 22, 2010
Messages
1,761
Location
Chesapeake, VA
Thanks mike.

Well yesterday I started removing the front wheel bearings, the worst part of the job was removing the snap rings from the back. Big snap rings for the most part are already a pain in the ass. But snap rings with no holes for snap ring pliers is just dumb. Now I have to wait for the new seals and bearing to come in the mail.
 

citymunky

Well-known member
Joined
Sep 22, 2010
Messages
1,761
Location
Chesapeake, VA
Well I just got done with replacing my Valve Stem Seals. I borrowed the EuroExport valve spring tool for the job. Use that tool with the head off the car was not best. About 10 of the 16 valve retainers wouldn't separate from the keepers since I didn't have compressed air pushing up on the bottom of the valves. The only way I found I could remove the keepers was to compress, and decompress the valve to start working the keepers loose. After some time messing with the keepers and crap I removed all the old stem seals and the bare head was cleaned in my parts washer for a total of 3 runs.

Tonight I installed the new seals, re-installed my valves, and Crower Springs. Once its not so hot outside/garage I can start working on motor.
 

citymunky

Well-known member
Joined
Sep 22, 2010
Messages
1,761
Location
Chesapeake, VA
Here are some pic's after we started to wet sand a few weekends back. I the car was 90% ready for paint, but it's been so hot these pass 2 week than I petty give up on sweating my balls off in the garage to work on it.


DynastyLCD

Well-known member
Joined
May 12, 2006
Messages
761
Location
Harwinton, CT
Quoting citymunky:
Well I just got done with replacing my Valve Stem Seals. I borrowed the EuroExport valve spring tool for the job. Use that tool with the head off the car was not best. About 10 of the 16 valve retainers wouldn't separate from the keepers since I didn't have compressed air pushing up on the bottom of the valves. The only way I found I could remove the keepers was to compress, and decompress the valve to start working the keepers loose. After some time messing with the keepers and crap I removed all the old stem seals and the bare head was cleaned in my parts washer for a total of 3 runs.

Tonight I installed the new seals, re-installed my valves, and Crower Springs. Once its not so hot outside/garage I can start working on motor.


for future reference, a rubber mallet or a plastic one works great for freeing the valves. i usually keep a small magnet over the opening, and catch both the keepers when you hit the valve with the mallet.


the project looks great so far! cant wait to see the post-paint results!
 

citymunky

Well-known member
Joined
Sep 22, 2010
Messages
1,761
Location
Chesapeake, VA
Thanks man.

The block is a manikbastrd's old block. Spec's are:
-1g 21mm wrist pin JE Piston
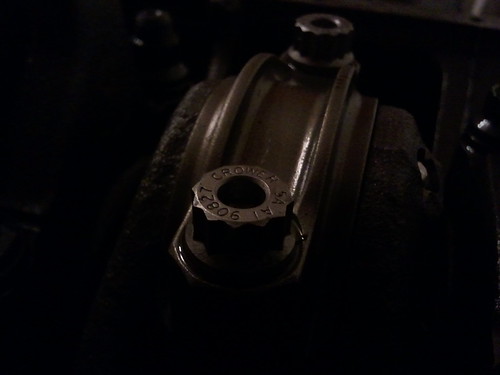
-Crower connecting rods
-Stock crank
-Balance shaft deletion
-ARP Main Studs
-ACL Race Bearings (Rod and main's)
-OEM oil pump and gears
-OEM water pump
-OEM Tensioner pulley
-New Knock sensor

The Head
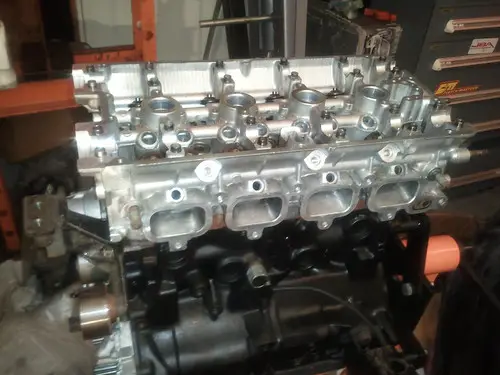
-Ported and gasket matched runners
-Crower springs and retainers
-3g lifters
-Stock valves
-HKS 272's
-OEM MLS headgasket.


manikbastrd also hooked me up with a New A/C compressor, and alternator. The motor only run for about 3 hours before being pulled due to the car being damage/totaled from shipping it to the west coast. The motor was build by the same guy who built the "Purple Monster." I rechecked all the clearances that I could using the FSM, everything up to spec.

Video's of say "purple monster"
http://www.youtube.com/watch?v=x4wBueJHKp4
http://www.youtube.com/watch?v=25-KyQNkFYY


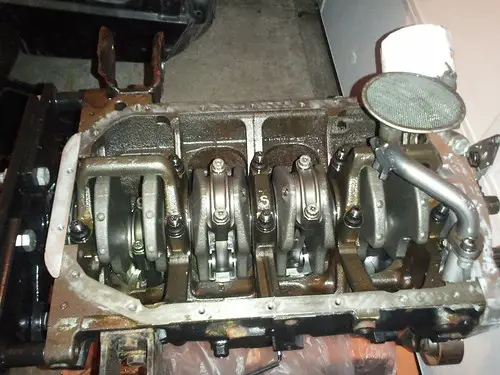
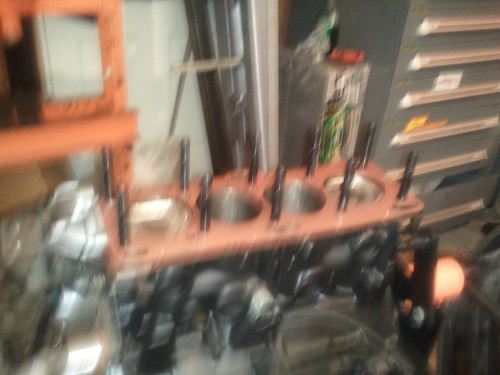
Ok back to my build, here are some engine pic's.

The head is off 923/2000. The head surface was decked, I replaced the stem seals. I cleaned and reuse the valves, and Crower Springs.

7577393690_c2c00c5ac9.jpg

7577390708_119a542bfe.jpg


This is a bad pic, but it shows the OEM MLS head gasket coated in copper spray.
7577387852_1a850a500d.jpg


The head is off 923/2000. The head surface was decked, I replaced the stem seals. I cleaned and reuse the valves, and Crower Springs.
7577384912_bfef52f41f.jpg
 
Last edited:

citymunky

Well-known member
Joined
Sep 22, 2010
Messages
1,761
Location
Chesapeake, VA
Yes, but it's been to hot to even think about painting.
 
Support Vendors who Support the GVR-4 Community
Boosted Fabrication ECM Tuning ExtremePSI Fuel Injector Clinic Jacks Transmissions JNZ Tuning Kiggly Racing Morrison Fabrications RixRacing RockAuto RTM Racing STM Tuned
Top