The Top Mitsubishi Galant VR-4 Resource

Join the best E39A 1991-1992 Mitsubishi Galant VR-4 community and document your GVR4 journey.

  • Software Upgraded - Reset Your Password to Login
    In order to log in after the forum software change, you need to reset your password. If you don't have access to the email address you used to register your GVR4.org account, you won't be able to reset your password. In that case, follow the instructions here to regain access to the forum.

My first attempt at a tubular manifold

85tr

Well-known member
Joined
Oct 21, 2006
Messages
208
Location
washington
Thought i would share some pics of a manifold i started about a year ago and have been very slowly working on . Just have the wastegate flanges and dump tubes to finish. Turbo is a holset hx35 ,be nice on the welds i dont have alot of practice.


85tr

Well-known member
Joined
Oct 21, 2006
Messages
208
Location
washington
The manifold sits about 1 3/4 inches away from the hood so im sure ill need to insulate the hood somehow and yea i made the collector , sure glade thats over.
 

Whoodoo

Well-known member
Joined
Jul 11, 2009
Messages
927
Location
Binghamton, NY
The welds don't look too bad actually. As long as you get penetration you're fine. Once you get the function of a weld down, getting it to look nice becomes much more of an art. The only thing you might want to worry about is grinding down any 'drips' you may have on the inside. If you get too much heat into the bead and you find you're dumping a lot of filler rod in it, then you're most likely just sending it all into the tube, making a big obstacle for your exhaust gasses to get by. But, if you can get to it with a grinder that is easily fixed.

Good job man. I'll be diving into a project like this in the future myself. Just make sure you have the flanges faced once its completely done.
 

85tr

Well-known member
Joined
Oct 21, 2006
Messages
208
Location
washington
The turbo is twinscroll and the manifold is fully divided , im gonna have to run two wastgates . I was a bit hot on the welding but luckly i did not have any rod push through into the manifold, i have done that on very thin material, would have sucked if it happend on the manifold. Thanks for the comments guys.
 

Galantvr41062

Well-known member
Joined
Aug 20, 2007
Messages
410
Location
plymouth, MN
That looks good, as said above TIG welding is all about getting it stuck together and then working on the good looks. I am still working on the art, I think my welds are OK but most people say they look really good. I suppose the DNP divided manifold was not out when you took on this project? Good job making your own parts, it can be a lot of fun and a great sense of accomplishment, and a huge head ache at the same time. Keep up the good work.

~John
 

jepherz

Staff member
Joined
Aug 8, 2004
Messages
7,877
Location
KC, Missouri
Looks awesome! What is it made out of, tubing thickness wise? And how did you go from round tubing to the oval in the head flange?
 

grocery_getter

Well-known member
Joined
Jun 20, 2004
Messages
1,225
Location
Kent - industrial suburbs of Seattle, WA
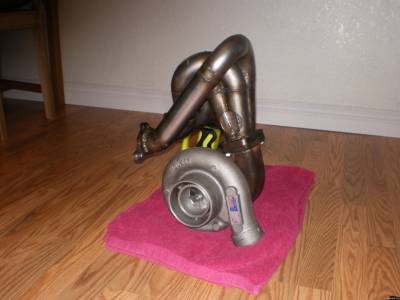
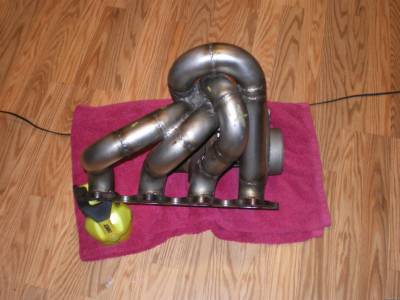
Hi Bill!! Great effort there finishing the manifold. Many people that have never done this sort of fabrication will not understand the effort that it takes to make a manifold. It is no monster garage show where everything is done within an hour long show. So definitely a good accomplishment to build something like this.

On some welding pointers

Not putting in the appropriate amount of heat to achieve full penetration to avoid inside the tube slag is not the right method to use. The weld should have been purged on the inside for strength. With the right amount of heat applied, you will be able to get full penetration with the filler rod and with the inside purged with argon, the inside weld will not turn into crusty slug. With inside purge, the inside weld will blend over the inside wall by itself without needing to be ground down afterward. I know this is hard to explain. I also know it will cost more money to do an inside purge. My big bottle of argon each cost around $150-180 and when I am purging a manifold you can definitely see the argon gauge going down fast. More cylinders, more purging time as each runners is purged and finished weld separately. On top of that having 2 separate argon regulator setup, having more than just one bottle of argon and buying the rest of the purging setup also add to the overhead.

Off course...

Not getting full penetration will also encourage cracks to form from uneven hot/cold cycle expansion and contraction at the weld seam. Off course you can always weld it later (fix it) but by then you will also have to deal with the carbon contamination from exhaust service. Nothing frustrate me more than dealing with little volcanoes of weld that erupted when you accidentally weld over these contaminants.

I am not trying to be too critical, just offering a different point of view.
 

85tr

Well-known member
Joined
Oct 21, 2006
Messages
208
Location
washington
Thanks for the comments guys and thanks for the tips andre, i backpurged the whole manifold so there is no need to have to clean up the inside of the manifold. Youre definitly wright about the argon andre i cant even remember how many 150 tanks i went through.As far as the welds they were just a bit hot and not as uniform as i would have liked but i would be very surprised if i had to repair the manifold anytime soon, I made 3 passes over the manifold.I used schedule 10 304 stainless. Ill post pics when i finish the wastegate setup next week . again thanks for the comments guys.
 

85tr

Well-known member
Joined
Oct 21, 2006
Messages
208
Location
washington
jepherz , the head flange is from sls and is machined so that round pipe will fit into the flange and then it transitions to oval.
 

Galantvr41062

Well-known member
Joined
Aug 20, 2007
Messages
410
Location
plymouth, MN
What I like to do with stainless welding is use a flux instead of back purging. I buy a can of powder called Solar type B flux, mix this with pure methonal and apply to the inside of each weld joint while the parts are cold. Then weld like normal for stainless steel. You should be using 308 filler rod, post purge a good 20seconds for a 1" long weld and use around 1/2 the amps as welding mild steel of the same thickness. Stainless steel is a really good thermal transfer barrier, so the material does not take in any heat from the weld pool, so I find the less amps the better it welds.

~John
 
Support Vendors who Support the GVR-4 Community
Boosted Fabrication ECM Tuning ExtremePSI Fuel Injector Clinic Jacks Transmissions JNZ Tuning Kiggly Racing Morrison Fabrications RixRacing RockAuto RTM Racing STM Tuned
Top