The Top Mitsubishi Galant VR-4 Resource

Join the best E39A 1991-1992 Mitsubishi Galant VR-4 community and document your GVR4 journey.

  • Software Upgraded - Reset Your Password to Login
    In order to log in after the forum software change, you need to reset your password. If you don't have access to the email address you used to register your GVR4.org account, you won't be able to reset your password. In that case, follow the instructions here to regain access to the forum.

555/1000

mitsuturbo

Well-known member
Joined
Jun 2, 2008
Messages
3,551
Location
Near Seattle, Washington
I got my AN to NPT adapter fittings today, so i decided to make sure i'm going to be able to mount the breather can/oil separator where i want it. I need to have a little aluminum tab welded to the bottom so i can bolt it to the top of the tranny mount with an existing bolt/hole. Here's the mockup.


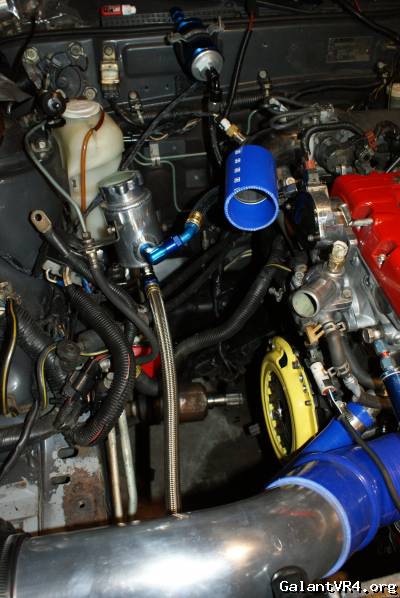
I've got a -10AN bulkhead fitting on the way too, so what i'm going to do is put the long side inside the intake pipe after i put a slashcut on it. I'm hoping this will help pull a little vacuum out of the separator can, and aid in relieving crankcase pressure.
 

Nartanian

Well-known member
Joined
Jan 14, 2009
Messages
611
Location
Richfield, MN
This is a sweet build. Looking good!
 

mitsuturbo

Well-known member
Joined
Jun 2, 2008
Messages
3,551
Location
Near Seattle, Washington
Inventory, take two:

ENGINE:
Full gasket set
Nippon MLS HG
OEM Timing Belt
SI Valves
SI Guides
3g Lifters
Mahle 4032 Forged pistons (3.385") with pins/rings @ 8.5:1
Eagle H-beam Rods
ARP Mainstuds
Clevite Main & Rod bearings (std)
ARP Headstuds
Balance shaft eliminator
Unorthodox adj. Cam gears
Unorthodox underdrive pulley
Prothane motor mounts
7g Power steering pump w/4 rib belt

TURBO/INTAKE/EXHAUST:
Magnus SMIM
70mm S90 Billet Throttle body
FP Race Exh. Mani
Garrett 700177-13 GT3076r BB 60trim 59.83mm ind. 76mm exd.
FP30 Turbine housing
FP Stainless 2.5" O2 housing
XRP 20 micron inline turbo oil feed filter
-4AN oil supply line
-10AN oil return line
-6AN Turbo water lines
Tial MV-R wastegate
-4AN wastegate water supply lines
Megan Racing 3" downpipe
3" catalytic converter (may help pass emissions)
3" resonator (will be used as cat replacement)
3" mandrel bent catback - magnaflow muffler
Spearco 2-120 FMIC (from MachV)
2.5" Short route stainless piping / T-bolt clamps / Turbosmart Couplers
HKS SSQV
Custom 4" aluminum intake pipe
K&N - metal top

FUEL:
JayRacing 340lph fuel pump
Fuelab 515 Fuel filter
-6AN Stainless fuel line from tank to Fuelab filter
Fuelab Mini AFPR and -6AN Russell ProClassic hose/fittings
MSD 96lb/hr (1000cc) Injectors
Filter to rail feed line -6AN Russell ProClassic hose/fittings
Non Cruise throttle cable

MANAGEMENT/ELECTRONICS:
ECMlink V3
GM IAT
4 bar MAP
ECMTuning SD cable

Blitz SBC-iD URAS D1 Edition (AEM Oil pressure and Fuel pressure sensors - 5V line drop for power to sensors - Oil & Fuel pressure display on SBC-iD as well as 12v+ voltage)

Blitz Power Meter-iD URAS D1 Edition
Blitz DC-II turbo timer
Apexi EL 1200°c EGT
Innovate LC1 WBo2 w/blue digital gauge
Clifford matrix 3.2x alarm

BREATHER:
Hal Landry spec -10AN Breather Oil cap
-10AN Icore Progold breather lines
Moroso 85471 oil separator/breather tank
-10AN slashcut bulkhead fitting in intake pipe (old setup)
-10AN Vibrant Exhaust evac slashcut (new setup)
Almost new factory valve cover (PO pd over 300 for this in 2009)

COOLING:
90 OFH w/-8AN Adapters
90 Oil cooler w/-8AN Icore Progold lines and fittings
AFCO Scirocco radiator
Silicone hoses
185° thermostat
New water pump

BATTERY/ELECTRICAL:
JayRacing steel alternator relocation kit
New alternator
Optima yellowtop battery
Stinger 250a Circuit breaker (0AWG in/out)
KnuKonceptz 0awg +/- battery wires
NGK plug wires
Moroso battery box
Moroso 2 circuit battery switch
Moroso long battery lever kit
Single pole battery/wiring junction block

DRIVETRAIN:
Shepracing Stage 4 transmission with double synchros throughout, (evo3 input/1st, evo3 3/4, 4 spider center, REM ISF, LSD insert)
ACT Flywheel
ACT 2600pp
ACT 6puck solid hub disc
OEM TOB
New 2g Slave cylinder
4 Bolt rear W/4WS
Stainless clutch flex line
MT spec 3000GT short shifter
Solid shifter cable mount bushings
Solid shifter cable bushings

SUSPENSION/STEERING:
Sparco L505 (Lap 5) steering wheel
Energy suspension front LCA bushings
Whiteline 22mm front swaybar
BC RM Series coilovers
5Zigen FN01R-C (1051's old wheels)

COSMETIC:
Zaklee clear camgear cover
Aluminum spark plug well cover
LoTek Dual A pillar pod
93 Headlights


There may be more I'm forgetting. I just wanted to put this here so I could go over it again later, and update. I don't want to forget anything. <img src="/ubbthreads/images/graemlins/grin.gif" alt="" />
 
Last edited:

mitsuturbo

Well-known member
Joined
Jun 2, 2008
Messages
3,551
Location
Near Seattle, Washington
So, i decided to upgrade my whole fuel line to -6 AN. I ordered the hose from Jeg's last week, and had hose ends and the adapter i needed on hand.

I didn't want cushion clamps all the way up, though. I didn't want the possibility of the line sagging to nag in the back of my mind all the time. So i took a cue from what i've seen some nascar teams do. I decided to run a "safety tube".

Here are some pics. The welding turned out like sh*t where i welded it to the car in front and back, but it will hold, and it's out of sight. At least in the middle i was able to just bolt it up to a factory threaded hole.

I've not yet got all the cushion clamps in place in the rear, but i got a couple done and was able to put them on factory bolt holes as well.

From the front, under passenger side.


From the back, under passenger side, fuel line crossing over to driver side.
 
Last edited:

mitsuturbo

Well-known member
Joined
Jun 2, 2008
Messages
3,551
Location
Near Seattle, Washington
I'm finally working on the car again and hope to have it up this summer.

I got the IC plumbing all done. I may need to utilize a couple of hump couplers, but at least i got the SSSQV IV and my Moroso oil separator/breather/catchcan all set up.
The 4" intake pipe has a long -10 an bulkhead fitting inserted, which is slash cut, to try and create a little vacuum for the oil separator, and thus the crankcase.

It looks a little different than before, because i decided i wanted to use a Moroso oil separator. I didn't like the Stef's unit, because it had NPT threads, and the Moroso has -12AN male fittings on it already. Much easier to deal with.


Next, i think i'll clean up a DSM radiator cap/water neck and put it on, then do the battery mounting and wiring.
 
Last edited:

JNR

Well-known member
Joined
Apr 23, 2004
Messages
9,814
Location
ca
Holy blue balls batman!

he he, j/k

Looks like it's starting to come together...need to read more of these so I can do something on mine (did sand the v/c today if that counts)
 

JNR

Well-known member
Joined
Apr 23, 2004
Messages
9,814
Location
ca
when do you anticipate it starting up? Be a cool moment!
 

Awesome build very clean.. Can't wait to see more pictures.. I'm going to stay tuned to this.. :)
 

Jesus_Negros

Well-known member
Joined
Jan 7, 2012
Messages
2,344
Location
USA
Why cant I find something this clean?
 

mitsuturbo

Well-known member
Joined
Jun 2, 2008
Messages
3,551
Location
Near Seattle, Washington
Alarm and remote start are 90% installed now. Just need to wire the "neutral safety" wire to the parking brake, tuck the wires away more neatly, and put the dash back in. After that, i can put the carpet back in. I cleaned it a couple weeks ago. Unfortunately i did not take a "before" pic, but i can tell you it was the absolute dirtiest carpet i've ever seen in a gvr4.

Well, here's an "after" pic, at least.
 
Last edited:

mitsuturbo

Well-known member
Joined
Jun 2, 2008
Messages
3,551
Location
Near Seattle, Washington
Found out last night that the PO had replaced the hood. I think maybe the battery blew up at some point, because the fuse block and wiring that is associated with it, which bolts down on the battery post, has been replaced. Also, the large under hood fuse box cover is slightly distorted/melted. The hood does not have the extended area which pushes the hood pin switch down, so i need to figure out something for that, so the alarms work properly.

Once i figure out the "kill" circuit on my battery switch, mount the radiator, mount the battery box, do some welding on the exhaust (v bands) and rewire the alternator (because it's been relocated), i think all that's left is to figure out what i want to do for a transmission. I don't want to run any of the 3 stock transmissions i have lying around, because i don't think they'll hold up for very long. I don't think any of them have ever been rebuilt, and one of them has a cracked bellhousing. Some asshole worked on this car before i got it, and didn't put "the special bolt" in the back lower side of the bellhousing. /ubbthreads/images/graemlins/frown.gif
 

mooserage

Staff member
Joined
May 17, 2004
Messages
1,293
Location
Seattle, WA
The car looks like its coming along nicely.

A lot of people just unplug and remove the hood alarm button. Mine worked fine for a couple years that I owned it, then one day just decided it would start randomly going off whenever it felt like it, so I unplugged it and problem solved.
 

mitsuturbo

Well-known member
Joined
Jun 2, 2008
Messages
3,551
Location
Near Seattle, Washington
I'm trying to use the factory hoodpin switch in conjunction with the aftermarket alarm. Much like i've done with the doors and the trunk/boot.
 

mitsuturbo

Well-known member
Joined
Jun 2, 2008
Messages
3,551
Location
Near Seattle, Washington
Got the dash and carpet put back in.


Got the battery wiring done. Just need to mount it with the box now, and hook up a "kill" circuit. I'm using a relay which will likely disconnect a ground to the main MPI relay in order to cut the ignition when the switch is turned off.


mitsuturbo

Well-known member
Joined
Jun 2, 2008
Messages
3,551
Location
Near Seattle, Washington
Got these yesterday.

Shep stage 4 transmission, w/evo3 input, 1st, 3rd, 4th, double syncros throughout, 4 spider center, REM ISF process, and front LSD insert.
Afco Scirocco radiator.


Note: PHONES ARE NOT CAMERAS
 
Last edited:

mitsuturbo

Well-known member
Joined
Jun 2, 2008
Messages
3,551
Location
Near Seattle, Washington
Someone asked me about the short-route plumbing.

This is about the shortest route i could come up with, i think.


mitsuturbo

Well-known member
Joined
Jun 2, 2008
Messages
3,551
Location
Near Seattle, Washington
Last few days i've spent a few minutes each evening trying to get all the aftermarket wiring put into place. I extended the wiring for the relocated alternator. I just have to get some split loom to cover it now.
I mounted the fuel and oil pressure sensors.

Also, I fabricated a new visor to house my Blitz power meter, and boost controller and mounted it. Now i just need to make a passenger side visor to match, with a lighted mirror. Should be easier than this one i just finished.
But first, I've got to get this stuff all set up and operational. I have to connect 12v +/- to the 12v-5v line drop, 5v +/- out to the AEM 100psi sensors for fuel and oil, sensor output wires to the Blitz in the visor, other wiring to the ecu for the power meter, and get power to the LED footwell lighting i've put on the driver side. (Not sure about putting a light on the pass side yet.. lots less space over there.)


The hard part isn't making the connections. That's easy. The hardest thing about doing all the wiring, is making it nice and tucked away neatly, rather than just crammed under the dash somewhere it may come slithering or falling out later. If i have to go into it later for some reason, i don't want some birdnest falling out of there where i have to decipher what goes where!
 

mitsuturbo

Well-known member
Joined
Jun 2, 2008
Messages
3,551
Location
Near Seattle, Washington
I haven't done much with this in the past 2 months, but i did spend 2.5 weeks in cambodia during this time.
I also just bought a new Velosteraptor (Hyundai Veloster), so anything requiring money is on hold. I still hope to roll it out of the garage this summer some time. I did manage to mount the transfer case the other day. Just need to fill the gearboxes, and do some little bits here and there. Vac lines, hose clamps... you know, the annoying sh*t that if you don't go over meticulously, will always result in some little pain in the ass leak or something.
 
Support Vendors who Support the GVR-4 Community
Boosted Fabrication ECM Tuning ExtremePSI Fuel Injector Clinic Jacks Transmissions JNZ Tuning Kiggly Racing Morrison Fabrications RixRacing RockAuto RTM Racing STM Tuned
Top