The Top Mitsubishi Galant VR-4 Resource

Join the best E39A 1991-1992 Mitsubishi Galant VR-4 community and document your GVR4 journey.

  • Software Upgraded - Reset Your Password to Login
    In order to log in after the forum software change, you need to reset your password. If you don't have access to the email address you used to register your GVR4.org account, you won't be able to reset your password. In that case, follow the instructions here to regain access to the forum.

Rear Battery Tray

pot

Staff member
Joined
Oct 28, 2003
Messages
1,573
Location
Fayetteville, NC
I just wanted to share a picture of the aluminum rear battery tray Justin (EMX5636) fabricated for me. I wrote a "Good Guy" post depicting the dedication and effort Justin made toward helping me fulfill my goal. But words cannot truly describe how incredible he is in both spirit and craftsmanship. I seriously think he's been holding out on the board with his aluminum welding/fabrication skills <img src="/ubbthreads/images/graemlins/devil.gif" alt="" />

This is how we started…..


This is how the mount sits….


I was going to do a battery relocation "How to…" for the archives but with two writeup's already, I didn't want to pollute the already good collection of information. For good measure, I pulled Hertz's via Blacksheep's and Lofty's two posts and went to town on the relocation. In terms of material and tools I used the following:

<b>Tools</b>

- Channel Locks (Sears)
- Carpet Trim Removal Tool (Harbor Freight)
- 3/8 wratchet 10/12mm shallow socket

<b>Materials</b>

- Odyssey PC680MJT-A $137.67 (www.odyssey.com)
- 2 gauge Welding Cable x 17ft (Red Ball Electric) *15 1/2ft for positive $33.32 @ $1.96ft
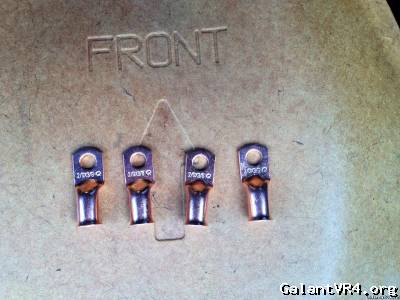
- 4 Cable Terminal Ends (NAPA) $9.00

<b>Total Price</b> $179.99


Again, I just wanted to share my battery relocation project and take an opportunity to show off Justin's craftsmanship. Thanks again brother.
 
Last edited:

EMX5636

Well-known member
Joined
Jun 28, 2008
Messages
1,631
Location
Bucks County, PA
Glad I could help out, seriously. As much as I like the paychecks of working on diesel trucks, I still love fabricating and tinkering on things when I have some free time! /ubbthreads/images/graemlins/grin.gif I'm glad you guys liked my hidden battery idea enough to have me replicate it.
 

G

Staff member
Joined
Feb 24, 2004
Messages
8,896
Location
zompton
That looks awesome, how much does that batt weigh? I'm wondering if those 3 screws will be enough to hold that? Maybe upgrade to bolts?
 

pot

Staff member
Joined
Oct 28, 2003
Messages
1,573
Location
Fayetteville, NC
The battery weighs in the neighborhood of 15.4 - 15.8 lbs. I questioned transparentdsm who has an identical mount and identical hardware (trim/stereo screws) securing the mount, but he stands by it as do I, albeit for the interim.

My preference was to utilize different hardware but I didn't want to remove the plastic inserts for the bottom two bolt holes nor bore out the factory hole to the left of the battery. I'll take the g-ride for a few spirited runs prior to making a decision on the choice of hardware. For now it is stable.
 

EMX5636

Well-known member
Joined
Jun 28, 2008
Messages
1,631
Location
Bucks County, PA
For anyone curious, check out my build thread in my signature for the pics of it hidden/finished, or transparentdsm's current build thread.

Now, I'm not an engineer by any means, but there is also a 4th mounting point that attaches with double sided tape to the tab/inner fender section. I built the 51 series fullsize battery tray over 6 years ago in my car, and have hours and hours of spirited driving, and railroad bridge jumps behind it. Never moved, never loosened a bolt, never fell out. I'm not saying it can't happen, but I have had no issues, even launching the car dozens and dozens of time with 500whp. Once the battery is in there, it feels pretty solid. Only other way to add to it, would be drill and use a self tapping screw down into the block inside the rear fender (where the corner light goes I think), but I've been building everything for my personal car, that doesn't require any holes to be drilled, metal to be cut etc. I don't like hacking things apart.

For pricing, I'm not really "offering" these to build. A few have sent me PM's, and if time allows, I don't mind doing them. This started to help Pot out, because a fab shop local to me, had some big projects and limited time for me to drop my car off there, so they could build him one. One thing led to another, and I just ended up building it in-house to send out to him. IF you are interested however, shoot me a PM. I just don't want this turning into a "I told him I wanted one 4 days ago, and it hasn't shipped yet!" because I like most of you guys too much to create tension around here, and I do work a lot and have Mitsu repair/upgrade work going on etc.
 
Last edited:

transparentdsm

Well-known member
Joined
Jul 27, 2011
Messages
3,690
Location
Cherry Hill, NJ
been driving my car very hard and the battery tray has not moved at all. i check it every so often just to be sure. justin thank you again, i love it and to be fair considering the made at home factor and doing it in your spare time i feel that the 2-3 week wait is more then well worth it. i never thought to take the other side of the tape off though, i thought it was just there so it didnt make contact and a rubbing noise.
 

EMX5636

Well-known member
Joined
Jun 28, 2008
Messages
1,631
Location
Bucks County, PA
^ I thought of that as I typed that reply, that I didn't mention it was double sided tape, and not just a rubber/foam bumper. You will be fine without it taped, since I powdercoated mine wrinkle black, the tape never stuck so it just became a pad for the tray to sit on. /ubbthreads/images/graemlins/banghead.gif
 
Support Vendors who Support the GVR-4 Community
Boosted Fabrication ECM Tuning ExtremePSI Fuel Injector Clinic Jacks Transmissions JNZ Tuning Kiggly Racing Morrison Fabrications RixRacing RockAuto RTM Racing STM Tuned
Top