The Top Mitsubishi Galant VR-4 Resource

Join the best E39A 1991-1992 Mitsubishi Galant VR-4 community and document your GVR4 journey.

  • Software Upgraded - Reset Your Password to Login
    In order to log in after the forum software change, you need to reset your password. If you don't have access to the email address you used to register your GVR4.org account, you won't be able to reset your password. In that case, follow the instructions here to regain access to the forum.

Just installed "Curtis" frame-ties - Pre-paint

Terry Posten

Well-known member
Joined
Dec 16, 2003
Messages
9,009
Location
Davenport, Iowa USA
I just got my rails installed.

I wanted to post up a few pics and give you all my first impressions on these.

Installation:

The act of installing then was simple. The hardest part was striping the undercoating off. The next hardest part was getting the car up off the ground far enough and still being able to "load" the suspension so that the frame/body was at "normal" resting state without a drive-on lift.

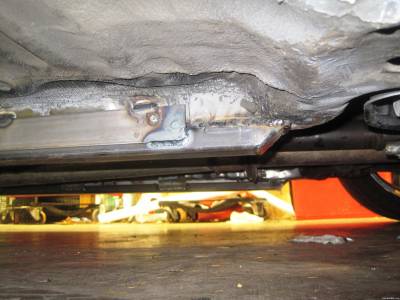
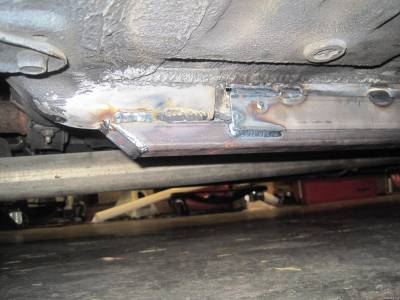
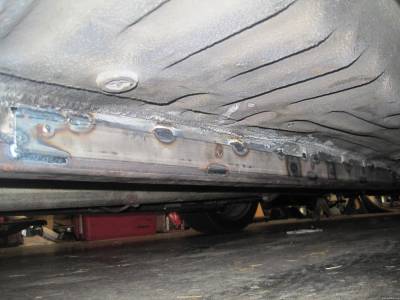
The pics below show the extent of the welding we did.

First driving impressions:

The car now has a more "connected" feeling on the highway. Before the ride was super soft and more of a floating feeling. Now the car reacts to the pavement on each seam and dip. You can actually feel the struts and springs do their job and not the chassis absorbing the road. I took a 25mph rated exit ramp cloverleaf at 55-60mph and it stayed flat and had no tire squeal. I need more seat time on the street but so far, they are simply awesome.

Thanks go out to Curtis for making these and selling them at a great price and a BIG thanks to Chris Beran (AKA - BoostinHard or HeadDynamics) for doing all the welding.

Now for the pics of the passenger side. (Driver side looks the same.)


broxma

Well-known member
Joined
Nov 16, 2009
Messages
911
Location
San Antonio Tx
Did you cut the other rails out or lay those over top of the existing rails? I can't tell from the picture but they look like they are over the top which I would assume, but one pic looks like it may have a cut in them. Might just be me bad eyes. How fun was it to weld onto that sheet metal? /ubbthreads/images/graemlins/smile.gif

Looks like it would make a big difference.

/brox
 

curtis

Well-known member
Joined
May 4, 2003
Messages
11,892
Location
Clarksville TN
Thanks Terry I build and ship alot of stuff alot no one ever sees or hears about. The only stuff thats seen is stuff I just build to throw out there to sell. Out of the 1000's of things I've built over the years I've probably only seen 10% in pictures. Glad you like Enjoy
 

Terry Posten

Well-known member
Joined
Dec 16, 2003
Messages
9,009
Location
Davenport, Iowa USA
Laid over top (actually under /ubbthreads/images/graemlins/grin.gif) the stock pan/rails. Chris made the welding look easy.
 

broxma

Well-known member
Joined
Nov 16, 2009
Messages
911
Location
San Antonio Tx
I'm a decent TIG on Steel and Stainless but I blow through aluminum like beer at a picnic. Not questioning the product at all but did you consider running the bead the length of the rail and is it welded on the inside seam as well or only the outside? I have no idea how the stresses are on the pan rails but it seems that if any weld failed or metal gave way, it would be the connection between the pan and the brace. Given that, it probably wouldn't matter if you did the full length weld anyway. That's not putting down the welds mind you, just thinking of what would break first under sheer or stress and I would guess, the pan would.

/brox
 

curtis

Well-known member
Joined
May 4, 2003
Messages
11,892
Location
Clarksville TN
I've welded these to God only knows how many mustangs back in the day. Back then the original ones that came out and sold in the magazines were nothing more than a piece of bent round tubing with a band of steel on the front and back about 3 or 4 inches wide. I always thought that was bunk and started doing more welds all over the rails using 1 x 2 like I sold with these. Over the years I've never seen the welds fail even when done with a oxy acetylene torch and a rod on a dirty floor pan not preped.

I even saw the after effects of a set I welded on a a friends 86 t top car. I was following a few other guys me being the last car and he came up from behind me flying and showing out. He though he would be funny and pass when he shouldn't on a back road. Down shifted and nailed it passed 4 cars and the first car had slowed to turn left into their driveway. He hit the brakes but was going way to fast and had to hit the yard. Well the yard had a concrete wall on each side of the driveway and a ditch. When he hit the core support went into the engine and he went into a flat spin and spin twice in the air and 2 times in the guys yard and bounced when it landed.....Dude was 3 kinds of pissed off. I just knew he was going to roll it but he didn't. We just kept on driving when he got out and just waved us on because we knew the cops would say that 4 sports car in a row heading to the back area on post/Ft Campbell were going racing. We actually we're just going back to the airfield to work. Cops gave him a ticket and car got towed back to the barracks. I went out and checked the car that night and the rails were all intact but the frame was diamond-ed about 6 inches and the rear control are on the passenger side was ripped from the body Later after the insurance company came the car went to the junkyard.

I really think they want ever rip out because the factory frame pan is so damn thin on any car and it strength only comes from the bends and placement of bends in the seams in the unibody. This is why if you ever place a jack or a jackstand on it it crushes in. The welds are 4 times as thick as the metal on the unibody and will easily just bend and flex around or near the weld but with these rails keeps the flexing to a minimum and doesn't allow it to happen. Now in a perfect world I would build these to recess into the pan but that would require the interior to come out and braces welded in and the body to be put on stands. After the rails are cut open either from the top or bottom the new rail would be dropped in or up and then all welded back together. This is the first step to building an all out drag monster car. You do this then cross bars out of like 3x3 across the backseat area then start adding plates for the main hoops and legs and start tiding stuff together. But with weekend warriors like most are around here and not adding a full rally car or 25.1 chassis build the difference between doing them on the bottom or inside would never be noticed.


If you ever do these you'll never regret it besides helping the car also gives a safe place to put your jackstand when the transmission comes out and in and your on your back fighting with it.
Screw you Polish some of us are old and tired with bad backs and not corn fed like you. /ubbthreads/images/graemlins/grin.gif /ubbthreads/images/graemlins/rofl.gif /ubbthreads/images/graemlins/grin.gif
 

That is the most impressive chassis mod I've ever seen. Are the rails just solid mild steel?
 

curtis

Well-known member
Joined
May 4, 2003
Messages
11,892
Location
Clarksville TN
No there 1 x 2 box tubing with ends welded on then flat bar welded on the side. I welded flat to the outsides of both and then included small tabs for the inside of the rails. Would have like to get something the exact width of the frame rail but wear on cars over the years puts the dimensions all crazy and new materials in the states aren't in metric sizes so 1 x 2 is the best i could do. Terry's car had been jacked up and damage and took him alot of work just to get to the point of welding them on. I really bet 8 out of 10 cars on here have dents and crushed areas from people using jacks over the years.
 

How did you go about working out the dents and crushed areas?

The damage on mine is visible, like you described.
 

Terry Posten

Well-known member
Joined
Dec 16, 2003
Messages
9,009
Location
Davenport, Iowa USA
I used a dead blow hammer on the floor pan to put it back to level (had to remove seats and carpet) and then used a slide hammer and stud welder under the car. And just worked it back down a little. Then the new rails went up and Chris started welding.

OH, and I did remove all the undercoating from the pan rails. That took about 5 hours each. NOT fun.

The "damage" looked worst than it was. Just the rail area right in the middle of the car was bowed up. The rest of the pan is good. I never had issues with the doors not aligning or anything that goes along with a tweaked frame.
 
Support Vendors who Support the GVR-4 Community
Boosted Fabrication ECM Tuning ExtremePSI Fuel Injector Clinic Jacks Transmissions JNZ Tuning Kiggly Racing Morrison Fabrications RixRacing RockAuto RTM Racing STM Tuned
Top