The Top Mitsubishi Galant VR-4 Resource

Join the best E39A 1991-1992 Mitsubishi Galant VR-4 community and document your GVR4 journey.

  • Software Upgraded - Reset Your Password to Login
    In order to log in after the forum software change, you need to reset your password. If you don't have access to the email address you used to register your GVR4.org account, you won't be able to reset your password. In that case, follow the instructions here to regain access to the forum.

139/1000 Rebuild

Nate

Well-known member
Joined
Feb 23, 2001
Messages
944
Location
Worcester, Pa
Ever hear of black spray paint? :)

Dash is much easier to yank if you just drop the steering column. I think it's 4 bolts.

Looks great, Nate. Much lighter than I made the Maroon Car, and good for you!
 

Hertz

Staff member
Joined
Jul 29, 2002
Messages
13,501
Location
Chicago, IL
Krylon Fusion black will do the trick and you'll never know it wasn't black to begin with.

While you're at it, you can paint the wiper cowl and exterior door handles. It'll look like new.
 
Last edited:

NateCrisman

Well-known member
Joined
Nov 22, 2008
Messages
2,054
Location
Blairstown, NJ
I painted the cowl, plastic vents, wiper arms when I sprayed the engine bay. I sprayed my carpet black (to hide a stain) with dupicolor vinyl/plastic dye, they might work well on the plastic covers vs paint.

The grey vs black is a minor thing, I actually hadn't even thought about it until seeing the above post. I don't care much for the car looking OEM of course, just clean and sanitary. If I pull the Tbelt side apart for something else, I guess I'll shoot them black.

As for door handles, window surrounds, & moldings: They all need a coat of paint for sure (typical fade). Once the car is driving and mechanically sound it's on the list along with window tint, de-badging, some vinyl decals, and a throughout exterior detailing. Not going to happen till september though, as Im leaving next tuesday on vacation for the rest of august.
 

NateCrisman

Well-known member
Joined
Nov 22, 2008
Messages
2,054
Location
Blairstown, NJ
Quoting Nate:
Ever hear of black spray paint? :)

Dash is much easier to yank if you just drop the steering column. I think it's 4 bolts.

Looks great, Nate. Much lighter than I made the Maroon Car, and good for you!


Yeah, heard of the spray paint, just didn't think of it. /ubbthreads/images/graemlins/rofl.gif /ubbthreads/images/graemlins/blush.gif

I put the dash back in already, along with black carpet, shifter, cables, aftermarket wheel, the blower motor, empty ac box. Still have some wiring to do around the ecu (wideband, clutch switch), center console and radio, seats and rear seatbelts. Ill post an interior pic tonight or tomorrow for posterity.

The only real pita thing left to do is make brackets to hold up the bumper covers since the metal supports are scrap. Fenders, fender moldings, headlight trim, plastic fender liners are all on. The headlights that came with the car have 2 pin oval shape plugs, but the chassis wiring harness has spade connector type plugs. maybe the car previously had 93 or jdm headlights or something? Easy issue to figure out.

I hope your bringing your maroon vr4! I haven't seen that car in person for many years, now Im very interested to see it. /ubbthreads/images/graemlins/worthy.gif
 
Last edited:

turbowop

Well-known member
Joined
Apr 29, 2001
Messages
11,972
Location
Yakima, WA
I wouldn't spray paint the timing covers. They're likely to scratch everytime you remove/install them and that will look worse than all solid grey or all solid black, IMO.
 

1badgvr4

Well-known member
Joined
Jul 2, 2006
Messages
1,242
Location
georgia

TB:. Dislike unused vac hose tubes. The damn rubber caps always blow up under boost and short vac lines with bolts plugging is hack. I wanted to get them tig'd shut, maybe still will eventually. But his works for now: 1/4"-27 set screws.
592531399_AEE5n-L.jpg


How did you get those tube out?
 

Hertz

Staff member
Joined
Jul 29, 2002
Messages
13,501
Location
Chicago, IL
Quoting turbowop:
I wouldn't spray paint the timing covers. They're likely to scratch everytime you remove/install them and that will look worse than all solid grey or all solid black, IMO.


If you use Krylon Fusion, they won't scratch, unless you're scratching into the plastic... if you're doing that, then you have a scratched cover anyway.

I thought you were better than that?

If you're pulling the thing off anyhow and you do happen to nick it or something stupid like that, spray it again, you don't have to mask anything and it takes 10 seconds.
 

NateCrisman

Well-known member
Joined
Nov 22, 2008
Messages
2,054
Location
Blairstown, NJ
Quoting 1badgvr4:

TB:. Dislike unused vac hose tubes. The damn rubber caps always blow up under boost and short vac lines with bolts plugging is hack. I wanted to get them tig'd shut, maybe still will eventually. But his works for now: 1/4"-27 set screws.
592531399_AEE5n-L.jpg


How did you get those tube out?


I hacksawed them off flush with casting (see saw marks).
Then drilled them out with the drill size for the 1/4" tap
then ran the tap through and plugged the holes.

Pretty simple. They don't crush like the thermostat coolant lines, so it's nearly impossible to pull the vac tubes out.
 

NateCrisman

Well-known member
Joined
Nov 22, 2008
Messages
2,054
Location
Blairstown, NJ
This morning I put the rest of the interior together:
seats, plastics, center console. Wired up a head unit.
Bolted on headlights, trim, corner lights. (still need oem headlight plugs)

went to take the car on a quick trip down the road to test it out, but alt isn't charging. Going back tonight to tryfixing that, but can't drive at night without headlights. Guess I'll get to drive it tomorrow. Maybe give it a first wash&wax tomorrow too.

Anyone know an easy place to get 4 usdm headlight plugs? The ones on my chassis harness must be for jdm lights or somethig.
 
Last edited:

turbowop

Well-known member
Joined
Apr 29, 2001
Messages
11,972
Location
Yakima, WA
Quoting Hertz:
Quoting turbowop:
I wouldn't spray paint the timing covers. They're likely to scratch everytime you remove/install them and that will look worse than all solid grey or all solid black, IMO.


If you use Krylon Fusion, they won't scratch, unless you're scratching into the plastic... if you're doing that, then you have a scratched cover anyway.

I thought you were better than that?

If you're pulling the thing off anyhow and you do happen to nick it or something stupid like that, spray it again, you don't have to mask anything and it takes 10 seconds.


I guess I've never used the Fusion stuff. Pulling the lower timing cover usually requires finagling that thing out of there with lots of bumping up against other parts, causing it to scratch, hence my comment. A scratch in grey plastic that is grey all the way through is hard to see. A scratch in black paint over grey plastic is easy to see. /ubbthreads/images/graemlins/dunno.gif If you scratch it during installation, it's a bit hard to touch up without getting overspray on other parts.
 

Hertz

Staff member
Joined
Jul 29, 2002
Messages
13,501
Location
Chicago, IL
Ah, you know I was thinking upper cover the whole time. Actually, after reviewing the pics again, the gray isn't that bad, although not "stock".

Nate, you need the harness side plugs?
 

NateCrisman

Well-known member
Joined
Nov 22, 2008
Messages
2,054
Location
Blairstown, NJ
Yes, I need 4 harness side headlight plugs for normal usdm headlights. They are oval shaped with two wires each.

Looks like I'm at a halt in progress. I spent last night triple checking my alternator wiring and it all is correct as far as I can tell. Alternator isn't charging, but it worked perfect on the last GVR4 that donated everything. Seems I'v got to pull the intake manifold, fuel rail, fpr, and xcase out in order to get the coil bracket out in order to get the alternator out. I'm not a happy camper right now.

The only thing I can think might be wrong is that there is no battery light on inside the gauge cluster. The electrical manual says that the Alternator Relay in the front fuse box is a "a backup for electrical flow to the field coil if there is a damage or disconnection within the charging warning light". The charging warning light never comes on, I bet the bulb is bad. I wonder if my alternator relay is also bad from being knocked around while chopping out wire, and this the alternator has no power to turn on the magnet field. I'll check that today.
 

NateCrisman

Well-known member
Joined
Nov 22, 2008
Messages
2,054
Location
Blairstown, NJ
Took a couple quick pics yesterday before putting the car back into the garage to pull the alt. (mistakenly, as it tested good at Napa this morning making 14.7+v)
617895980_CSuYT-L.jpg

617895512_8roKx-L.jpg

617894713_o9wng-L.jpg
 

I kind of like it like that haha. keep up the good work Nat. So since it tested good at napa does that mean the lack of the bulb is causing the no charing problem?
 

NateCrisman

Well-known member
Joined
Nov 22, 2008
Messages
2,054
Location
Blairstown, NJ
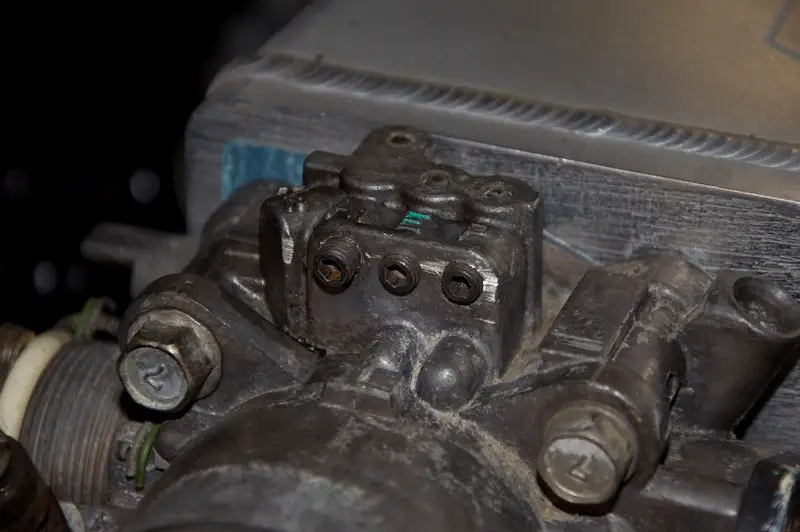
Figured out the problem with the alternator after checking the wiring 3 times, measuring voltage at every connection, additional 3 ground straps, pulling the gauge cluster out and checked the bulb...sure enough it wasn't blown out. Had continuity from the gauge cluster bulb to the alternator plug. I couldn't find anything in the wiring that was wrong! After putting the spare alt in out of frustration trying to get the dash light to work, I felt the plug push in about 1/4 more than before!

There is a little orange silicone bushing/seal thing on the alternator plug. Seems there was also one jammed into the hole in the original alternator too, thus the plug wasn't going far enough in to make contact.

Just as well I pulled the intake to remove the alt, as I never would have been able to see the second seal inside the alternator with it on the car. I figured it out after getting frustrated and putting the spare alt in and feeling the plug push in about 1/4" more! Dash battery light also started working once the alt plug would seat in far enough.

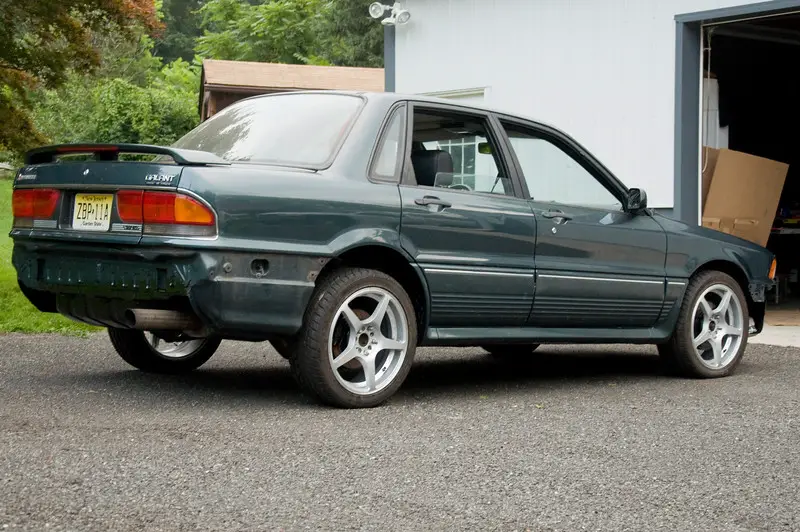
So I drove the car up the road about 5 miles. Holy crap it's loud and vibrates alot. Guess BSE kit + ES bushings + Poly engine mounts isn't going to be a cadillac ride. The super stiff coilovers will make it even worse:)


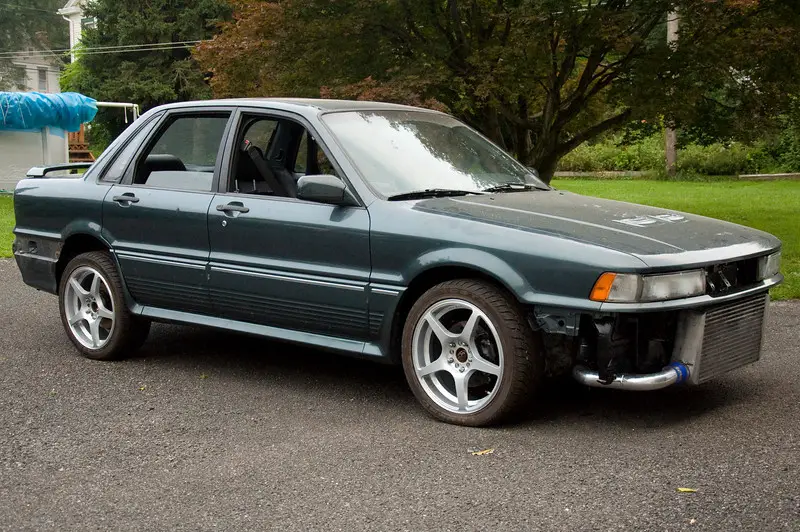
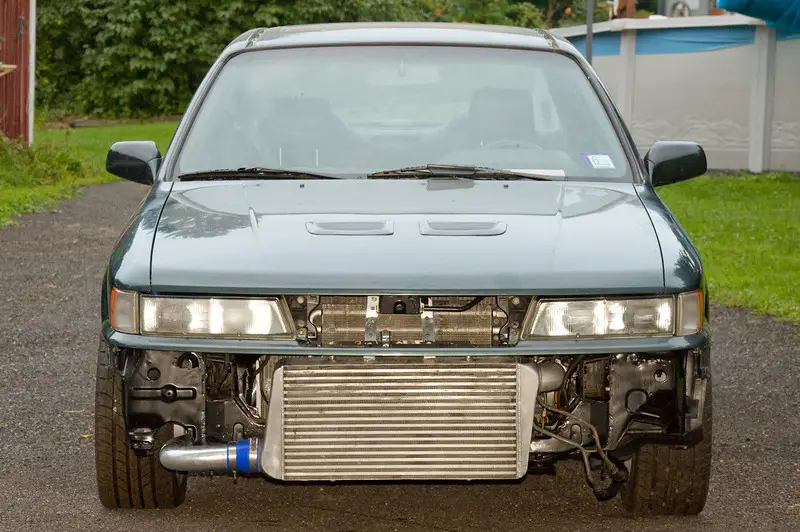
Tonight I'm going back to re-bleed the brakes (they are super mushy - unsafe), wire in the 4 headlight plugs, put on the front bumper and blinker lights, and bolt on the rear bumper. I'm so behind schedule Im just going to put the complete bumper assembly from #931 on since there are no broken bolts and it will go on in 5 minutes. I'll delete the rear bumper support in september when I have more free time. What little time I have before Friday/sunday racetrack days is better spent on tuning and setup and putting miles on it than sitting in the garage making brackets. So the car will hit Etown's scales 50lb+ heavier than expected. oh well./ubbthreads/images/graemlins/wink.gif

I'm going to adjust the tie rods for a little more toe in, and try to get the rear camber to 0 so I don't kill the tires too bad driving it around this weekend.


Oh yeah...Brent @ JMF sent me a new coil bracket...fits like a glove now, no more having to take the bracket off from the bottom, as it doesn't block the intake manifold bolt now. YEAH Brent = :heart:
 

Woody

Well-known member
Joined
Feb 9, 2009
Messages
88
Location
Plainfield, NJ
Im glad you found the problem, my friends car had the same problem with the altenator not keeping charge and we found out that it was the relay.GL
 

NateCrisman

Well-known member
Joined
Nov 22, 2008
Messages
2,054
Location
Blairstown, NJ
Joy of Joys, #139 was able to drive home tonight in the dark from shop to my house.

Brakes bled again, now they are rock solid.

Headlights now work. They need to be adjusted for height and oddly, the blue high-beam light in the gauge cluster doesn't work.

Front bumper cover is on without the support. Used a green one that came with #139, it has all the center fins cut out, more airflow to the fmic.

Rear bumper: I need to make light brackets to get that 50lb block of steel bumper support in the trash. But I want to drive/tune the car more than wrench anymore, so I put the whole rear bumper assembly from #931 on. The paint is poop, but the brackets aren't rusted at all. Project for september to swap the cover and ditch support.

Found two leaks:
oil pan is leaking a bit from the back passenger corner...it's coming down onto the xcase. I have a feeling the pan is cracked. The red 93 auto 1g awd I had a few winters ago had the same crack and it dripped at the same place.

Power steering rack is weeping just a bit out of the two rear steering ports that were blocked off. Ill have to pull the subframe crossmembers off to get at them to try sealing them up.

At this point, I just don't care about little things that aren't perfect. Just want to drive it for a bit before digging into the car anymore. Glad it moves, Ill drive it some tomorow, wash it, take some new pics. Troubleshoot any other issues.


Want to try and get it to Island on friday.
 

NateCrisman

Well-known member
Joined
Nov 22, 2008
Messages
2,054
Location
Blairstown, NJ
Now that the car is built, on the road, and been to the track twice: I think Im going to retire this thread and start a new one when appropriate for new mods and changes, as well as transfer all these posts to my blog and keep updating my "members" page.

So as a last post:
Took the car to Island on friday night: 11.9 @ 119.6 on 93 octane pumpgas at a steady 25psi, high 10's A/F, 12* of total flat timing. Launch was a very easy 1.82, traction was very poor.

Went to Etown today for the "shootout" race with no changes to the car/tune/setup. I had boost controller issues causing a big boost spike to over 29psi that causes the DS-Map ecu to fuel cut. I knocked the car into neutral due to the fuel cut on my first run (13.0 @ 112). Second run was a slow shifting 12.2 @ 116 with a 1.79 with the boost controller backed down to 20psi, but still got a spike to 29 in fourth gear hitting the fuel cut again once. Decided to pack it in for a variety of reasons, mostly Id rather not push it with a screwy mbc and blow it up racing in a class I can't win (up against 4 10 second cars and 2 low 11's).

Put the car on the scales at Etown:
3204 with driver/laptop/helmet. Gas gauge on E with gas light on.
2960 with drive/helmet off the scale (Im a plump 244 I guess)

Projects for september when Im back in NJ from vacation:
cleaning up the exterior with painting trim and a major detailing. claybar, wax. Getting a set of roof rails painted. Getting the 92 grill installed (it hits my fmic brackets)
install AEM Tru-Boost controller/gauge
Install coilover suspension.
fix a leaking oil pan and steering rack
align the driveshaft with shims to fix a driveline vibration.
new exhaust system: BR 3.5" SS turboback
tires/traction for the dragstrip.
 
Last edited:
Support Vendors who Support the GVR-4 Community
Boosted Fabrication ECM Tuning ExtremePSI Fuel Injector Clinic Jacks Transmissions JNZ Tuning Kiggly Racing Morrison Fabrications RixRacing RockAuto RTM Racing STM Tuned
Top