The Top Mitsubishi Galant VR-4 Resource

Join the best E39A 1991-1992 Mitsubishi Galant VR-4 community and document your GVR4 journey.

  • Software Upgraded - Reset Your Password to Login
    In order to log in after the forum software change, you need to reset your password. If you don't have access to the email address you used to register your GVR4.org account, you won't be able to reset your password. In that case, follow the instructions here to regain access to the forum.

thomcasey's rescue of #1025 build

thomcasey

Well-known member
Joined
Sep 24, 2014
Messages
907
Location
Indianapolis, IN
Thanks!! One down, two to go.

Quoting Pot:
In the image (six from the bottom) is the glove box light.


thomcasey

Well-known member
Joined
Sep 24, 2014
Messages
907
Location
Indianapolis, IN
LOL, I grew up in Arizona, played with many a snake, but I was really cautious. That is why I replaced the heater core, don't need any snake issues like Chapell had in Gone in 60 Seconds.

Quoting Wolfpuss:
Damm, I would have called it quits when I saw the snake skin (I hate snakes)

Keep up the good work OP!


pot

Staff member
Joined
Oct 28, 2003
Messages
1,573
Location
Fayetteville, NC
Also, in the following images (from the top):

- 3rd Image is more than likely a portion of a turbo timer harness *You can go ahead and remove it and reconnect your factory harness. You'll see what I mean when you remove the panel below the steering wheel.
- 5th Image that circuit is taped exposed (not connected) to the factory engine management portion i.e. ECU connector loom
- 6th Image Courtesy of Muskrat:

img.php


Also, you can Consult Chapter 13 (Fuel) of the Factory Service Manual Volume 1 for additional reference.
 

thomcasey

Well-known member
Joined
Sep 24, 2014
Messages
907
Location
Indianapolis, IN
Went out to install a new inner tie rod because the jam nut was seized to the rod and it had some play. Once I removed it I also found it a little bent.
 

pot

Staff member
Joined
Oct 28, 2003
Messages
1,573
Location
Fayetteville, NC
More often then not I usually have to use a torch to loosen the tie rod nut. Its always my driver side for whatever reason. So how is your electrical situation coming along? Were you able to get everything put back together?
 

thomcasey

Well-known member
Joined
Sep 24, 2014
Messages
907
Location
Indianapolis, IN
I haven't checked that green/black wire yet. Though I will when ready to finish off the engine harness
 

thomcasey

Well-known member
Joined
Sep 24, 2014
Messages
907
Location
Indianapolis, IN
Rebuilt the drive-shaft today with new Carrier bearings and all new u-joints.. Looks much nicer and the new carrier bearings will work much better than the cracked and dry originals. Still left the Lobro joint separated since when the shaft is completely assembled, it is too big for the tool room.


transparentdsm

Well-known member
Joined
Jul 27, 2011
Messages
3,690
Location
Cherry Hill, NJ
this was by far the best maintenance i did on my car. i swear it was like night and day and the car handled better and pulled harder. fresh driveshafts are amazing.
 

thomcasey

Well-known member
Joined
Sep 24, 2014
Messages
907
Location
Indianapolis, IN
Been a while since I have posted updates.

Pulled the ABS system and installed a non-ABS setup. Just need to clip all the sensor lines to clean it up at the wheels. The PO or two converted to 5-lug setup using knuckles from a non-ABS DSM, so the ABS system was just adding weight anyway.


Had my youngest helping me remove all the ABS lines, unfortunately he loosened the wrong bolt on the firewall and the AC system slowly evacuated the system overnight, so I just pulled it. I suspect somebody will be interested in the parts.

This is going in today, then it's just the small stuff.


thomcasey

Well-known member
Joined
Sep 24, 2014
Messages
907
Location
Indianapolis, IN
Quoting thomcasey:

And this wire. No place for it to go to in the harness:


Went to tracing wires yesterday. Found the Green/black stripe wires are for Sensor grounds, and this wire should run to pin 24 in C-61. There is already a solid green wire there, so it looks like someone already replaced the bad wire, but left the remnants, so that is good news.

I am deep into the RWS delete and have found that removing the rear lines from the front rack itself is much more than I want, so I am fabricating a loop from the flare lines that connect the front rack lines to the lines from the rear. That will do for me until I desire to replace the front rack with a DSM rack.
 

thomcasey

Well-known member
Joined
Sep 24, 2014
Messages
907
Location
Indianapolis, IN
Spent some time laying in the driveway yesterday afternoon. I had no helpers for the pull and assembly, but was able to recruit the wife and youngest son (17) to install the new subframe.

Pulled this monstrosity out:


Then installed this 60k mile 4-bolt with poly sway bar bushings and poly camber bushings:


thomcasey

Well-known member
Joined
Sep 24, 2014
Messages
907
Location
Indianapolis, IN
Did some painting of parts yesterday. I ordered a spray can of Belize green basecoat and a can of gloss clearcoat from AutomotiveTouchup.com for a test. Needless to say from the pics you will see below, the colormatch was awesome. I no longer have a black mirror, a white mirror and a white dogleg. I am very pleased with their product and will continue to use them.

White mirror before ("Gave it a little key" as they say on Wheeler Dealers)


After mirror. two coats of basecoat, three of clear:


Painted white dogleg:


Dogleg mounted:


Should be getting in my new Pressure Plate to flywheel and xfer case mounting bolts in today. Expectation is to get the drivetrain in and done by weekends end. I figure if I am installing a new clutch on a Fidanza flywheel with a new surface that I might as well use new factory bolts. No worries about using 24 yr old bolts here.
 

iceman69510

Turn Right Racing
Staff member
Joined
Mar 5, 2001
Messages
10,964
Location
Michigan
Good to know. I will be ordering some Belize Green from them this summer.

Ordered some blue for my van, but the color match was not that perfect up close.
 

thomcasey

Well-known member
Joined
Sep 24, 2014
Messages
907
Location
Indianapolis, IN
Finally got around to progressing on this thing. Installed the Oil filter and filled 'er up with some cheap 10w30 dino and spun the oil pump with a drill for about 3 minutes, until all the funky sounds dissipated from the head/lifters and oil flowed freely. Set the timing (No fun cranking that motor around with a standard ratchet and high compression pistons), installed the axles, installed a new yoke on the driveshaft (old one had a slight twist 3/4 way in, so replaced it with a recall fix part) and installed the drive-shaft w/Torque Solutions carrier bearing bushings (a bit of a pain) and xfer case (with new seals). Installed Water Temp, Oil Pressure and Boost gauges in the center console above the radio in the handy-dandy GlowShift 3-gauge din mount plate (still need to connect power, ground and sensor wires.)

Just some final torquing of bolts, hoses, plugs and fluids to install and she will be ready to fire.
 

thomcasey

Well-known member
Joined
Sep 24, 2014
Messages
907
Location
Indianapolis, IN
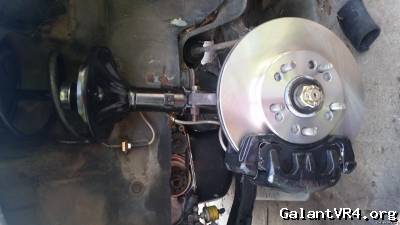
Well, I went to install my twin pot calipers and new rotors and discovered that I did not have both brake line parts from the hard line to the caliper. Also, since the calipers are 2g, I needed the banjo-bolt style. I ordered a Stop-Tech set from amazon for $27 shipped:


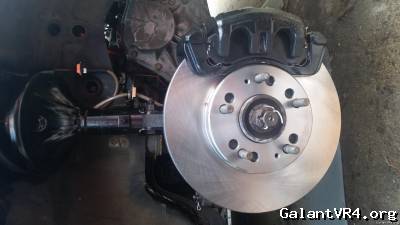
I installed them, and when bleeding the fronts, we were not getting fluid to the fronts. Seems my supposedly clean hard brake lines were not that clean, so when bleeding we pushed junk into the stainless lines. After lots of brake clean and several super-stomps, the lines cleared and they were good:


After installing the new clutch master/slave and bleeding the system, I Was verifying the shifter was adjusted correctly and discovered that 5th and Rev were non-existent, even without the cables. Soooo, seems something was broken in it. So, I took my old spare 22-spline 90 tranny to a friends to swap out the output shaft to a 23-spline. Well, it took 45 minutes of prying and hammering to get the axle out that was stuck in it. They used the wrong axle and it wedged the cir-clip in it when it broke off some of the end splines inside the open diff. Well, that compressed the center case a bit, se we decided to replace the center case. Yea, 4 bolts snapped off during dis-assembly. But, once it was opened up, we discovered a couple issues but also some good stuff. BAD: staked nut for 5th gear backed off and was only on with 2 threads, a hole in the top xfer case bolt hole (just under the speedo mount) and a chuck of metal that matched that hole. The GOOD: The gears look fantastic, especially 1 and 2, which are notorious for issues in early 90 trannys, the syncros are a little sticky (maybe oil will help hear once installed and filled) for 3/4, A little more play then we would like in the shift forks but they are still in great condition. We extended the detente springs to get some more snap in there and torqued everything down to spec. FYI, the government changed our pennies. Pre 2000 pennies happily handle 109ft/lbs without running through 5th/rev in pieces, where as 2000 and newer only handle about 70). Tranny is much happier now, and has a 23-spline output-shaft so I can use my fresh xfer case. She just needs some de-greaser and paint to go back in. Thankfully I never filled the tranny with gear oil, so it will be a quick 20 minute swap.

I also got the factory intercooler pipe routing all shored up thanks to JNAVA sending me the GVR4 j-pipe. She is soo close to being finished.

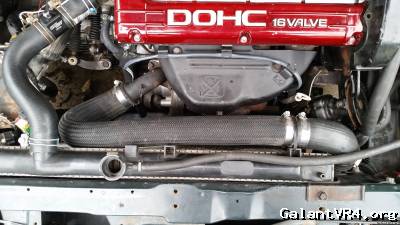
Pre-intercooler piping correction. As you can see, I really needed the stock VR4 j-pipe:


thomcasey

Well-known member
Joined
Sep 24, 2014
Messages
907
Location
Indianapolis, IN
Forgot some interior pics:


Odometer is for the car the cluster came from, not this one. I doubt the chassis itself has more than a couple thousand more than when 464/2k sold it back in 2009. It was prison raped not too long after and left to live on the streets.
 

thomcasey

Well-known member
Joined
Sep 24, 2014
Messages
907
Location
Indianapolis, IN
I already got one, thanks. Just haven't got it in there quite yet.
 

thomcasey

Well-known member
Joined
Sep 24, 2014
Messages
907
Location
Indianapolis, IN
Had to clean up a replacement transmission. Found the one I installed would not hold in reverse or 5th, something is broken inside. After going through it and cleaning it up she was ready for installation:


Swapped out the transmission and got everything bolted up.. Unfortunately it was 94 degrees and 80% humidity, so the soupy weather sucked the progress out of me in the driveway. Just need to clean up, loom and connect the wiring and juice up everything with fluids.

 
Support Vendors who Support the GVR-4 Community
Boosted Fabrication ECM Tuning ExtremePSI Fuel Injector Clinic Jacks Transmissions JNZ Tuning Kiggly Racing Morrison Fabrications RixRacing RockAuto RTM Racing STM Tuned
Top