The Top Mitsubishi Galant VR-4 Resource

Join the best E39A 1991-1992 Mitsubishi Galant VR-4 community and document your GVR4 journey.

  • Software Upgraded - Reset Your Password to Login
    In order to log in after the forum software change, you need to reset your password. If you don't have access to the email address you used to register your GVR4.org account, you won't be able to reset your password. In that case, follow the instructions here to regain access to the forum.

ECMlink boost control with stock BCS? (RESOLVED)

transparentdsm

Well-known member
Joined
Jul 27, 2011
Messages
3,690
Location
Cherry Hill, NJ
i was looking at the top portion where it says "Boost" target (based on absolute pressure). yeah you need someone who has your set-up. mine is different.
 

transparentdsm

Well-known member
Joined
Jul 27, 2011
Messages
3,690
Location
Cherry Hill, NJ
read these

click

click

click

right at the top of the first page it says ECU based boost control. 95+ dsms. all 95+ dsms had a MAP sensor on the top of the manifold. i read through it and it doesnt say anything about being able to us it like that on a 1G, but it also doesn't say you cant use it on a 1G.

then read the overview where it kinda says you need to use a MAP sensor...

im not sure, im just trying to help.
 

GSTwithPSI

Well-known member
Joined
Jan 1, 2012
Messages
3,461
Location
SoCal
Yeah, I already went through all those trying to figure this out. I really appreciate your help. Usually this is how I figure things out, after many many suggestions.

Below if what I was referring to by disabling error correction. There's no feedback to the ECU, it just adjusts the solenoid to whatever value is in the base duty cycle table for that RPM.
</font><blockquote><font class="small">Quoting ECU-based Boost Control Overview:</font><hr />
Base Duty Cycle

The Base Duty Cycle table defines the starting point for the boost control solenoid. At any given RPM and in any particular gear, the ECU references this table to get a “base” value it'll use for the boost solenoid output.

If error correction has been disabled, then this value is the final value the ECU is going to use and your turbo will build whatever boost it just happens to build for the given wastegate duty cycle. You can use this mode of operation during setup and dialin to find where you setup naturally needs to be to build the boost you're looking for.

<hr /></blockquote><font class="post">
 

transparentdsm

Well-known member
Joined
Jul 27, 2011
Messages
3,690
Location
Cherry Hill, NJ
why not try adding to the boost target and see if it boosts.
look at the first table they show in the overview and try setting it up like that.


im really sorry i cant be more help.
 

prove_it

Well-known member
Joined
Jul 3, 2008
Messages
4,201
Location
Sioux Falls, SD
I can message Thomas at ECMLINK, but I'm pretty sure you'll need the MAP sensor. It would function without the map, but the control system was designed with a MAP sensor in mind for proper control.

I'll see what I can find, but honestly, why aren't you logging a MAP sensor anyway? It makes tuning way easier and more accurate. Even if you don't run SD.

EDIT: Nevermind. Check your post on ecmlink. Thomas already answered your question.

Your "supposed" to have a MAP sensor. Running without one mean you'll have to trick the software in order to get your lock boxes open.
 
Last edited:

GSTwithPSI

Well-known member
Joined
Jan 1, 2012
Messages
3,461
Location
SoCal
Thanks for feeding me all these suggestions guys. I appreciate the help. The reason I don't have a MAP sensor is because at this point in time, it's not required. Eventually I'd like to switch the SD, and will get a MAP sensor, but right now I just want a basic way to control boost via ECMlink. I suspected there was something I wasn't doing correctly in the application, and Thomas confirmed this today with the post I've included below. I thought it pertinent to post it here, so those without ECMlink accounts can see the solution:


Quoting twdorris:
Running boost control in ECMLink without a MAP sensor requires an extra "work around" to the "lock" fields on the Boost tab. I'm not sure this is clearly documented anywhere, so I'll do it here and see if I can make some time to do a wiki article as well from the info below.

There are two lock fields below the "Assign MAP input pin & type" link. A screen grab from your log file is shown here for illustration.

attachment.php


A full explanation of both fields is in the ECMLink help file (small "?" button in the lower right hand corner of the Boost tab). Suffice to say for now that they both look to the "ECUBoost" item to determine when to lock the duty cycle.

If you do not have a MAP sensor attached to the ECU, then the ECU has no valid ECUBoost value to reference and it gets confused. By default, the "Lock at 0% below" field is set to 0 psi. But if there is no MAP sensor defined, the ECU uses a much lower value than 0 psi as its default. So the two end up working together to basically force 0% duty any time there is no MAP sensor attached.

To work around this, you need to change those lock fields. But you can see from the above screen grab that they are both disabled. They are disabled because the application is coded to assume that no MAP sensor means no need to edit those fields. But in this case, there is a reason and we need to trick the application into letting us edit them.

To do that, go into the ECU Inputs tab and set the ECU-side MAP sensor definition to something valid. It's not really important what. I've included a sample below.

attachment.php


Hit Save to ECU and then go back into the Boost tab. Now the lock fields will be enabled for editing. Use the down arrow on each both lock fields to run them down as low as they will go. The exact value will change depending on what units you have selected for air pressure, so it's easiest to just run them down to the lowest value using the down arrow button next to the field. I've included a screen shot below showing what this looks like with the default "-inHg/+psi" units.

attachment.php


This effectively disables the lock field functionality. Hit Save to ECU and then go back into the ECU Inputs tab and set the MAP sensor back to undefined as shown below.

attachment.php


Hit Save to ECU and now you should be set.

Thomas Dorris


After doing exactly what Thomas outlined, my setup works perfectly. I went out and did a few pulls to see how the system responded, and everything was working great. I eventually got the car tuned to spike up to a bit below 14 PSI, and then settle back down to 12. The accuracy of the small adjustments I was making was incredible. I was happy with the baseline I had set, and decided to leave it as is, and play with it more later.

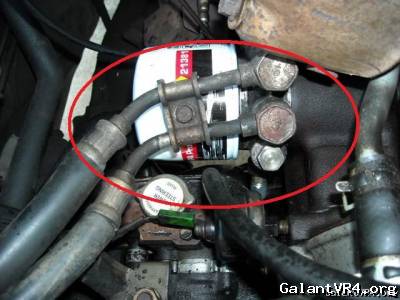
I pulled it in the garage and got out of the car. I immediately smelled hot oil as soon as I got near the front. I popped the hood and peeked underneath, and sure as sh*t the car was leaking oil. WTF?!? I pulled the stick to see what I lost and it was still between the 2 notches in the stick. I threw it up on some jack stands, and tried to find the leak. Once again, the f***ing oil filter sandwich plate is loose! This time, the filter is way too loose, and is visibly leaking oil with the car off.

This is the second time I dodged a bullet with this water cooled OFH. Last time this happened, I made sure the threads were clean and dry, I applied Red Loctite, and snugged it up to what felt like really snug. I didn't want to get too tight and crush the sandwich plate causing coolant and oil to mix internally.

At this point, I refuse to drive the car until I swap in my 90 OFH and cooler. Apparently there's only one sure fix for the water cooler housing, and don't really even want to bother: Water Cooled OFH Fix. I have everything I need for the 90 OFH swap, but am missing the hard lines the attach the soft lines to the OFH. If any of you guys have a set of these laying around, please shoot me a PM.


prove_it

Well-known member
Joined
Jul 3, 2008
Messages
4,201
Location
Sioux Falls, SD
Ah, mitsubishi fun.

Fix one thing and she'll give you another issue. Damn cold hearted beasts.

Good to hear on the Boost control. I knew it had to be simple. I never ran without a MAP so I learned something new. Thanks for posting info, I'm sure that will help others.
 

turbowop

Well-known member
Joined
Apr 29, 2001
Messages
11,972
Location
Yakima, WA
I think the FSM calls out 21ft/lbs for the hollow stud the oil cooler is held together with that the filter screws on to. Maybe a few lbs more. I can't remember off the top of my head. Hard to say what you tightened it down to without a torque wrench. Maybe it wasn't enough. /ubbthreads/images/graemlins/dunno.gif That said, some people have horrible luck with them. I like the sandwich cooler because it's compact and simple, but there's nothing wrong with going to the air cooler for peace of mind.

For what it's worth, I didn't run SD on 503, but I used a GM 3bar sensor on that car anyway. It's so nice to have boost as a data parameter when looking through logs.
 

Street Surgeon

Well-known member
Joined
Mar 3, 2004
Messages
941
Location
Omaha, Nebraska
The problem some people have with the '90 OFH's is that *some* tend to have the oil filter spin off, make a bracket to lock the filter in place /ubbthreads/images/graemlins/smile.gif
 
Support Vendors who Support the GVR-4 Community
Boosted Fabrication ECM Tuning ExtremePSI Fuel Injector Clinic Jacks Transmissions JNZ Tuning Kiggly Racing Morrison Fabrications RixRacing RockAuto RTM Racing STM Tuned
Top