The Top Mitsubishi Galant VR-4 Resource

Join the best E39A 1991-1992 Mitsubishi Galant VR-4 community and document your GVR4 journey. Login to browse without most ads.

whiteline/superpro bushings for rear subframe

Hey guys,

I am running into some problems trying to figure out which bushings is supposed to go in the rear subframe. Here is the link to all the part numbers:

https://www.galantvr4.org/ubbthreads/showflat.php?Cat=&Board=UBB11&Number=283776&fpart=&PHPSESSID=

The parts that I have:

SPF 1439K $45 Rear Hub, Front Bushing of Lower Rear Trailing Arm
SPF 2031K $50 Upper Rear Control Arm Inner Bushing
KCA365 $60 Rear Control Arm Upper Bushing (Camber Adjustable)
SPF 1438K $40 Rear Lower Inner Control Arm Bushing

I have circled 3 places on the subframe that I know needs to be replaced. But I have no idea where the 4th bushing kit is supposed to be at.
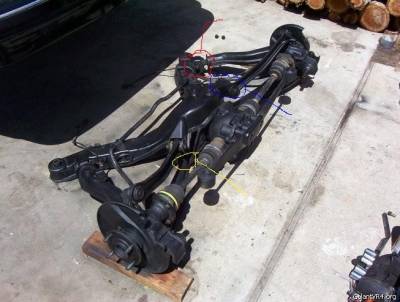


I have the KCA365 in the right place with the help of looking at this thread:
https://www.galantvr4.org/ubbthreads/showflat.php?Board=UBB11&Number=133449&page=5&fpart=1

I'd like help to know which one goes in which. Just let me know what part number goes on the colored circles.

Thanks!
 

so out of this:
SPF 1439K $45 Rear Hub, Front Bushing of Lower Rear Trailing Arm
SPF 2031K $50 Upper Rear Control Arm Inner Bushing
KCA365 $60 Rear Control Arm Upper Bushing (Camber Adjustable)
SPF 1438K $40 Rear Lower Inner Control Arm Bushing
 

Well, I am trying to see if anyone can clarify this by naming the parts for each colored circles to make it easier and helpful for me and anyone else.

I do know I have the KCA365 in the right place.
 

KT

Well-known member
Joined
Oct 20, 2003
Messages
1,243
Location
Omaha, NE
Yellow circle = lower control arm SPF 1438K
Blue circle = upper control arm SPF 2031K or KCA365 (one is adjustable, one is not)
Red circle = trailing arm SPF 1439K
 

"Blue circle = upper control arm SPF 2031K or KCA365 (one is adjustable, one is not)"

For that one, I did put both of the bushing kits in and they are pretty identical. Look at the pictures.


It seems like both of those bushing kits are adjustable.
 

Quote:
Yellow circle = lower control arm SPF 1438K
Red circle = trailing arm SPF 1439K


By the way, what did you do and use to install those two? I am thinking I might have to use hydraulic press or bench vise.
 

KT

Well-known member
Joined
Oct 20, 2003
Messages
1,243
Location
Omaha, NE


I used these for the upper rear and avoided the bushing issue all together.
 

I am wondering if I have to cut the metal bushing on the outside of the rubber bushings that I have already taken out. The metal bushings thats still on the hub control arm and the lower control arm.
 

When I put the ES rear bushings on my Galant I got them pressed out. When I did the rear bushings on my Daytona I burned them out with a propane torch. So I can't tell you how well it works on the Galant bushings, but because of how well it worked on my Daytona I would recommend just burning them out with a torch. Just heat the bushing "shell" with the torch it will start bubbling and eventually melt enough that the bushing just falls out. It is quite messy with the rubber melting on the ground, so have something under it that you can just throw away, and I think it smelled bad too, I did mine in the garage, so it couldn't have been too bad, just like you did a really big burnout. Because you are melting the rubber the inside of the shell comes out really clean.
 

I have already burned all the old bushings out. I am just trying to get them in. I am wondering if I have to get those metal sleeves pressed out?

Believe me, burning the rubber bushings out was a huge mess /ubbthreads/images/graemlins/frown.gif

I might just take it to machine shop or something to have them press them in because I am having hard time with it.
 

/ubbthreads/images/graemlins/uhh.gif You're not supposed to take out the shells.
 

I was wondering about that. I have seen it is required for other cars. I even looked at the vfaq.com: http://vfaq.com/mods/bushings.html Its in the bottom of the link. I am not sure what he meant for the tip in the bottom.

"Tips: Important All three of these bushings have thin walled metal sleeves. They need to be pressed out and discarded. I've heard stories of drilling the rubber, then hack-sawing the sleeves etc. I tried removed one trailing arm bushing in this fashion (got center out, but couldn't get the sleeve out). An automotive machine shop should have a press. My place charged me $60 for all 6 bushings. Other places quoted me significantly more, or wouldn't quote at all. Once the stockers are out, the new ones push in with a bit of muscle."

Let me know.
 

lunchbox

Well-known member
Joined
May 29, 2005
Messages
1,140
Location
Mil-walk-it-out, WI
Yes you are supposed to take out the sleves, at least with the Energy Suspension bushings.

I cut them with a torch or plasma cutter very carefully. You can also use a hacksaw, but that sucks.
 

Thats why I am asking you guys if anyone had done it with super pro or whiteline bushings. I am not sure if they are same deal as energy suspension bushings.
 

kcpaz

Well-known member
Joined
Jan 28, 2006
Messages
1,307
Location
Gilbert, AZ
Quote:


I used these for the upper rear and avoided the bushing issue all together.


Is that something you made, or is that something you can buy???
 

Well, that link you just put on your post is also on my very first post on this thread /ubbthreads/images/graemlins/smile.gif

That thread was only for one of those bushings. That is the only bushing I was able to get it on without any difficulty. As for the others, I can't get it on. I was looking at other sites like http://www.team-integra.net/sections/articles/showArticle.asp?ArticleID=1054

I thought I would need to cut those sleeves off? I wasn't sure.
 

KT

Well-known member
Joined
Oct 20, 2003
Messages
1,243
Location
Omaha, NE
Quote:
Quote:


I used these for the upper rear and avoided the bushing issue all together.


Is that something you made, or is that something you can buy???


I bought these from 3SX Performance 3SX TT Camber Arms , but they can also be made: grocery getter and SGTdave

Instead of using that metal tab to "delete" the subframe camber adjust, I had two grade 8 washers welded in place. I plan on doing the same for the active toe elim kit.
 
Support Vendors who Support the GVR-4 Community
Boosted Fabrication ECM Tuning ExtremePSI Fuel Injector Clinic Jacks Transmissions JNZ Tuning Kiggly Racing Morrison Fabrications RixRacing RockAuto RTM Racing STM Tuned

Recent Forum Posts

Recent Classifieds Listings

Top