The Top Mitsubishi Galant VR-4 Resource

Join the best E39A 1991-1992 Mitsubishi Galant VR-4 community and document your GVR4 journey.

  • Software Upgraded - Reset Your Password to Login
    In order to log in after the forum software change, you need to reset your password. If you don't have access to the email address you used to register your GVR4.org account, you won't be able to reset your password. In that case, follow the instructions here to regain access to the forum.

Update on 1280/2000

strokin4dr

Well-known member
Joined
Aug 30, 2005
Messages
2,770
Location
Savannah, GA
Well, bumpers are off and being prepped for paint, so I decided to take care of the support brackets while it was apart.

I ordered some Rust Bullet and black top coat after seeing Brett's results with the stuff.
The car is completely rust free, but the JDM bumper supports I bought years ago weren't as clean. No terrible rot, just some surface corrosion.
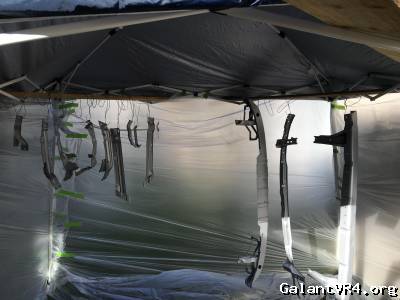
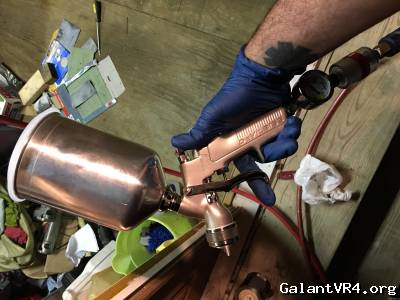
I cleaned and sanded the parts down and setup a makeshift paint booth in the back yard. I also purchase a decent spray gun to do the job. It's a DeVilbiss GFG-670. It's really a nice piece. I will also be using it to paint the bumpers when the time comes.

Back to the bumper supports.They really turned out great! Nobody will ever see these pieces behind the bumpers, but I like the peace of mind knowing rust won't be an issue.
Each piece received 2 coats of rust bullet and 2 coats of black top coat. Now I just need to order some new hardware for reassembly. /ubbthreads/images/graemlins/grin.gif
Now on to the pics:
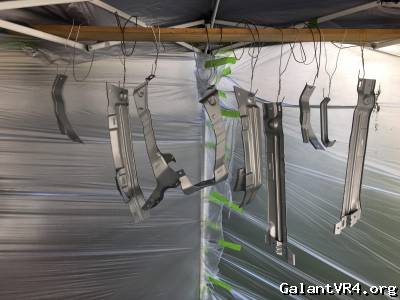
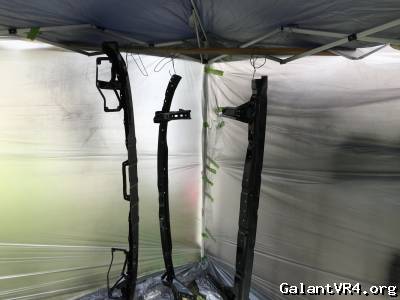
The Rust Bullet is greyish in color:


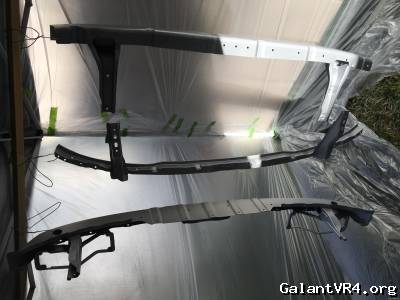
Went ahead an sprayed the front bumper support for the Cyborg while I was at it:


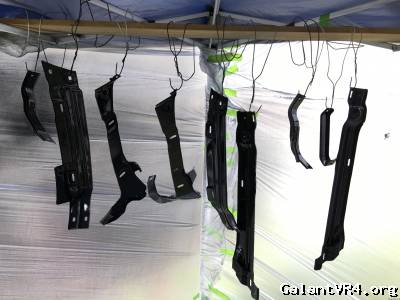
Shiny black top coat:


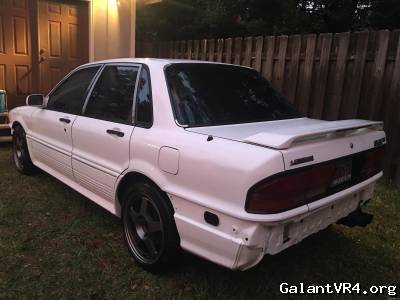
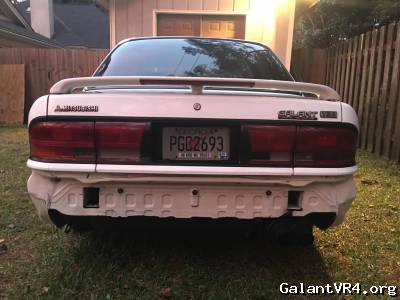
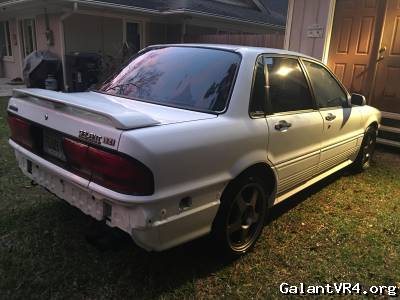
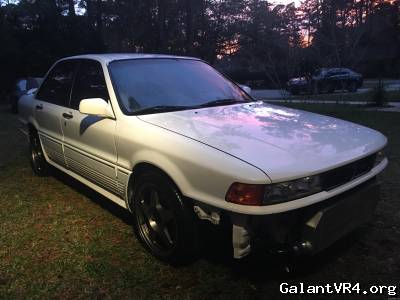
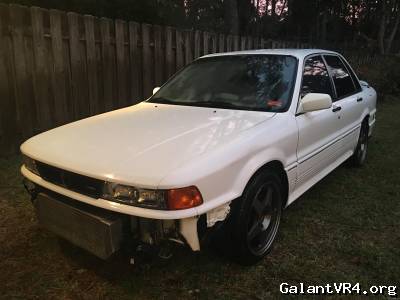
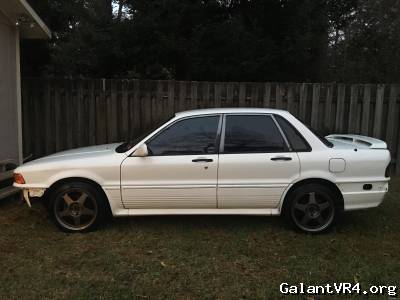
And a pic of the gun and some randoms of 1280 awaiting bumpers.


strokin4dr

Well-known member
Joined
Aug 30, 2005
Messages
2,770
Location
Savannah, GA
I finally got the '89 seatbelt trim installed and snapped some quick pics. I pulled the auto belts and had the '89 manual belt setup fitted back in early 2013. I'm been riding with no A-pillar or headliner trim installed ever since! It's one of those things that's been on the to do list, but kept getting pushed back due to life and other priorities on the car...

Anyway, today was the day. Pulled all of the trim pieces out of storage and wiped them down. I've had a couple of set of these '89 belts and trim pieces since about 2007, and have been saving them for the right car/cars. /ubbthreads/images/graemlins/devil.gif

As I've said previously, this was one of my favorite upgrades to the car. Pulling the auto-stranglers was very satisfying. The weight reduction is pretty significant too. All of the bracing under the center console for the lap belt assembly was able to be removed with this install!

The install was pretty straight forward. There were a few things that had to be modified to get everything the way I wanted it. For starters, the upper hole on the B-pillar does not match up exactly to where it would normally bolt up of an '89 model car. You have a few choices here. Some people bolt the belts to one of the existing bolt holes left over from the auto belts. The problem with this is that now the trim piece doesn't line up correctly and the belt is either too high or too low from ideal. My solution was to bring the car into the race shop I used to work for and have the owner weld in some nuts and reinforcement to the ideal spot on the B-pillar.
It was a little more work but turned out great. He has built cages for many types of race cars for 30+ years so he was definitely the man for the job. Once that was taken care of, the belts bolted straight in with no issue.

BTW, I also installed a headliner from an '89 car to prevent having any gaps left showing on the sides above the trim pieces. This was the best option in my opinion because the '89 moldings are much thinner than the ones used to cover up the stock belt assembly. With the '91 headliner in place, it looked like something was missing... All good now!!!
On to some pics.

Intact headliner pieces in correct color (before cleaning 9 years of dust off): /ubbthreads/images/graemlins/grin.gif


Backside with clips in place:


Close up of some part numbers while everything is off the car:


Finished install with some holy headrests too!:


You can also see the VR6Eater shiftboot & evo 8 knob that I installed with the JNZ short throw shifter as well as the redundant AC controls...The 3g AC controls are from my previous vr4. Not sure if I want to remove the factory controls to install gauges in this one yet. I'm kind of liking the stockish feel of the interior currently without any obvious gauges present, so the 3g controls may end up coming back out. Decisions, desicions:


The last few pics aren't great since it was getting dark when I was finishing up. Oh well.

Other items to finish off this round of interior upgrades were an '89 underdash piece with pocket & air vent, '89 glovebox and a set of leather headrests from an '89 Starion. 1989 seemed to have all the cool stuff. /ubbthreads/images/graemlins/dunno.gif /ubbthreads/images/graemlins/rofl.gif

Too dark out to get anymore installed pics /ubbthreads/images/graemlins/bawling.gif
 
Last edited:

G

Staff member
Joined
Feb 24, 2004
Messages
8,896
Location
zompton
Looks great man, love the attention to detail.
 

iceman69510

Turn Right Racing
Staff member
Joined
Mar 5, 2001
Messages
10,964
Location
Michigan
If you have some spare pieces, keep them for me. I hope to do my 89 belt install this next spring/summer, but not sure if I have all the interior trim or not.
 

GSTwithPSI

Well-known member
Joined
Jan 1, 2012
Messages
3,461
Location
SoCal
I'm not sure if I've ever seen the manual belt conversion done right...Until now. Nice job, Ryan.

How did the lower portion turn out where the retractors are?
 

strokin4dr

Well-known member
Joined
Aug 30, 2005
Messages
2,770
Location
Savannah, GA
Thanks guys.

Brett,
The lower portion of the B-pillar is a little bit different than the '89 model, but everything still bolts up correctly down there. The provisions are in the exact right place they need to be. Angle of the retractor ends up being perfect and the belts operate the way they should.
Being that the belts were over 25 years old when I installed them, they definitely needed some cleaning and freshening up. I disassembled most of the setup and gave the belt a good cleaning with woolite (the same way I did my Recaro seats for the Cyborg in my other thread).
I have taken the belts apart in my jeep and civic in the past when they start retracting slowly and have ended up with great results on both. I knew it would be a good idea to do it on the vr4 to prevent having to do the job twice.

The only tell-tale sign that the belts aren't original to the car are the holes left behind in the carpet near the B-pillar behind the front seats and the slits in the center console where the old shoulder belts originated. You really don't notice it unless you go looking for it though. Maybe one day I'll cut some carpet out of a Mitsu in the bone yard and make a patch to go under the carpet. Hasn't bothered me enough in 3 years to even think about it though until now when I'm writing a review to give you guys an accurate description of what's involved. Will probably remain as is /ubbthreads/images/graemlins/grin.gif
 

strokin4dr

Well-known member
Joined
Aug 30, 2005
Messages
2,770
Location
Savannah, GA
Quoting iceman69510:
If you have some spare pieces, keep them for me. I hope to do my 89 belt install this next spring/summer, but not sure if I have all the interior trim or not.


I'll have to pull out my other set to see what extra stuff I really have. I know I don't have another set of the headliner trim pieces unfortunately. I have broke quite a few of these trying to remove them from scrapped cars. Very brittle 90% of the time.
 

strokin4dr

Well-known member
Joined
Aug 30, 2005
Messages
2,770
Location
Savannah, GA
Up next is the wideband install. I went with the Innovate LC-1 for a few reasons. I have used a few different widebands over the years and have installed all different brands in customers cars. I've had more luck with these Innovate units over others that like to eat sensors, etc. The second reason was that the Innovate LC-1 with DB gauge is now available with a green LED display. /ubbthreads/images/graemlins/devil.gif


I replaced the aftermarket head unit that came in the car with one from an Evo 9. It's a very basic CD player, but most importantly looks factory (because it is!) and fits my needs for the car.
Seeing that this radio (like every other radio out there beside the stock unit from '91) has a clock display on it, the factory clock on the dash was a bit redundant.

Being a bit OCD, we can't have that!

Soooo, lets pull the clock out, open it up, remove the guts, and then stuff the DB gauge from the wideband inside. Thanks to a thread from a few years back for putting these thoughts in my head. /ubbthreads/images/graemlins/bawling.gif /ubbthreads/images/graemlins/grin.gif

Here we have the clock and DB gauge both disassembled:


Next I started cutting the rear of the clock housing until the gauge fit nice and flush up against the front display window of the clock. This was a trial and error process that took some time to get perfect.


Test fitting the new display:


Now to trim up the back housing of the clock so it will snap back into place and hold the DB gauge tightly:


Nice and snug in its new home with plenty of room for the wiring harness to plug in:


Bench testing with a 12v adapter made for just such purposes: /ubbthreads/images/graemlins/tongue.gif


Installed and looking good:


The green Innovate gauge is really a spot on match for the stock vr4 dash lighting. I couldn't be happier with the way it turned out.
I do often get the "what's up with your clock?" question from clueless passengers but some don't even notice anything funny going on. Car guys love it when they notice it and I've had a few want details on how I programmed an old clock to do that. /ubbthreads/images/graemlins/wink.gif
 

strokin4dr

Well-known member
Joined
Aug 30, 2005
Messages
2,770
Location
Savannah, GA
Looks like Brett and I are on the same page.

I spent some time over the weekend installed some fresh parts. Finally had time to install the FP HTA68 I picked up last fall. I gasket matched and ported the turbo, manifold and O2 housing a couple weeks back and have just been waiting on some install parts from JNZ.


New lower heat shield and lower radiator hose:


Coolant return line from turbo:


Copper washers, etc:


'90 turbo waterpipe is NLA. Even though this one is in great shape, I coated it with Rust Bullet to make sure it stays that way:


Noticed something on this ported 2g O2 housing I've had for a while:


Looks like it was ported back in '97. /ubbthreads/images/graemlins/rofl.gif Nice port job and lots of miles on it. No sign of cracks, etc. Still good to go!

The reason for all the work. The little FP HTA68:


O2 housing, lines, and heat shield installed. Did require a slight trim on the heat shield due to minor case differences in the FP exhaust housing compared to the MHI unit:


This is as far as I got with it last night.


Noticed that one of the manifold to head studs is pulling out of the head so I will have to repair that before it goes back together.

Hope to get it all buttoned up next weekend and start tuning. I'm interested to see how this setup compares to the bastard 20g I've been running.
 

strokin4dr

Well-known member
Joined
Aug 30, 2005
Messages
2,770
Location
Savannah, GA
Just some quick pics of the Walbro 450 install. Sending unit came out with no issue. Was a little dirty on top of the tank, but the lack of rust made it a quick and easy job.

Old Walbro 255HP. Was still running just fine, but the new pump is sealed and designed for running E85.


26 year old sender still in great shape!


Tank is nice and tidy too:


Walbro 450. Didn't snap an installed pic apparently. Had to get a little creative with the mounting but still a pretty straightforward install.


And the only casualty of the whole ordeal. Had it all back together and buttoned up, then noticed I forgot to put the small clamp back on the vent line. Trying to force the new hose back off I ended up snapping the nipple off this valve.


BTW, the HTA68 is up and running great. First impressions on 93 oct: very similar to my bastard td05 20g, but has quite a bit more top end. Spool seems about the same, possibly a tad slower. Still need to compare logs side by side.
The HTA68 is capable of slightly higher max boost. Was 33ish psi for the 20g and almost 36 psi for the 68. /ubbthreads/images/graemlins/devil.gif

Up next is to max it out on E85. /ubbthreads/images/graemlins/grin.gif Stay Tuned!
 

strokin4dr

Well-known member
Joined
Aug 30, 2005
Messages
2,770
Location
Savannah, GA
Wow, it's been a year since an update! Not much has changed until recently. I have some refreshing projects underway that I will elaborate on in the coming weeks. Slow progress, but still making time for it!

Decided to pull the engine after thinking I hurt the engine one night last fall. I was working on my 93 oct tune after being on E85 primarily for a while and doing some pulls. Something let loose and sounded like a spun rod bearing. After dropping the pan and inspecting, everything seemed fine down there, but I noticed the timing belt was off 2 teeth and compression was down. Anyway, finally pulled the engine and found some bent valves, etc, but the bottom end looks pretty good. My plan was to throw a new head on and tidy up the bay a bit and be back in action.

After talking with the wife, she decided that she may want to drive the Mirage a bit once it gets put back together. I've had big plans for that car for a while. 2.3 block on the stand, worked 2g head, kelfords, FP 35R, etc, etc. Well, after thinking it over and now having both cars in pieces, I decided build the 2.3/Kelford cams/35R setup for the VR4 and just use the built 2.0 w/ 2g head & 68HTA for the Mirage /ubbthreads/images/graemlins/grin.gif /ubbthreads/images/graemlins/devil.gif

So, big change of plans for the car overall and a blank canvas to start with.

Couple teaser pics until I get some more time to do work.

Before:


After:


It was my first time laying base/clear, and it turned out pretty well for a driveway job. I took Brett's advice and used some rust bullet in the old battery area, and some behind the fenders even though it was spotless back there /ubbthreads/images/graemlins/hsugh.gif Rust free southern car FTW! More to come soon.
 

strokin4dr

Well-known member
Joined
Aug 30, 2005
Messages
2,770
Location
Savannah, GA
Made a little progress in the last couple weeks.

Painted the block, installed new freeze plugs and test fitted the head:


Oil pump/ front case ready to go:


Progress:


Cams:


Decided to save the red cam gears for the Cyborg /ubbthreads/images/graemlins/devil.gif Finally putting these adjustables to good use. Degreeing the Kelford 272s.


Freshened up the trans a bit while it was out.
Before:


Much better!
After!


New heart in its home, and test fitting the FP 35R setup.
Very happy with the way the engine bay paint turned out:


Keeping the guys at JNZ tuning on their toes!


Making progress just about daily so I'll try to take some more pics and keep this updated.
 

4Grim

Well-known member
Joined
Sep 30, 2004
Messages
2,515
Location
Orlando FL
Amazing progress man! /ubbthreads/images/graemlins/applause.gif
 

strokin4dr

Well-known member
Joined
Aug 30, 2005
Messages
2,770
Location
Savannah, GA
Plans have changed a bit since the wife decided she wants to drive the Cyborg a bit once I put it back together. So it's getting the 68HTA along with the built 2.0L from the VR4 and a new 2g head with evo III intake mani. This 2.3L & 35R setup was originally for the Cyborg. When parts sit too long waiting to be assembled it's easy to change your mind about what goes where! /ubbthreads/images/graemlins/crazy.gif
 
Support Vendors who Support the GVR-4 Community
Boosted Fabrication ECM Tuning ExtremePSI Fuel Injector Clinic Jacks Transmissions JNZ Tuning Kiggly Racing Morrison Fabrications RixRacing RockAuto RTM Racing STM Tuned
Top