DR1665
Well-known member
I was inspired by my friend, azdave, who has something like 1000 LEDs installed in his 2G Eclipse.
This isn't going to be the most detailed write up in the world. I don't have time tonight to post all the pictures, but believe me when I tell you, if you've got a Dremel and just a little bit of patience, this will be more intuitive than installing a new CD player. Seriously.
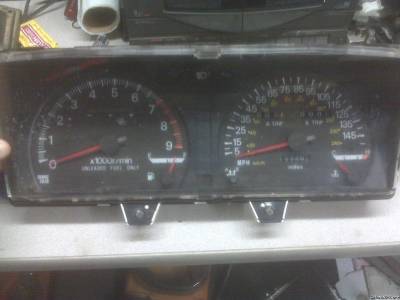
Remove the gauge cluster. First thing's first, unscrew the odometer reset button and put it in a safe place so you don't lose it. You need a Philips screwdriver for the rest. (2) screws for the bezel and (4) for the cluster itself. Lower the steering wheel, then pop the cluster towards you to disengage it from the connectors and speedo cable. Rotate the top towards you so the cluster faces down and ease it towards the steering wheel a bit while you slip it out to your right. Comes right out.
The clear lens pops off the cluster with a little gentle prying. The plastic is old, so don't try to force anything. It's just recessed clips along the sides, depress them a bit and push them back through the slots. (This will make sense when you're holding the unit in your hands. UNDERTONES.) Mark the position of the needles with bits of tape so you can put things right back where they belong. Use a fork or otherwise *gently* pry the needles *straight up.* You don't want to bend the stepper motor output shafts.
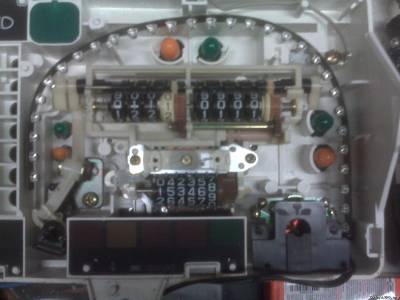
The gauge faces are held on by (4) tiny Philips screws each. Don't lose these. I bet they're the only ones this size on the whole damn car. Now you can slip the gauge faces upwards and lift them off the cluster. Watch out for the little peg on the speedo. Might want to pull it out and keep it with the screws and whatnot.
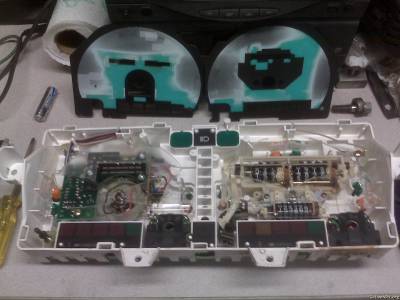
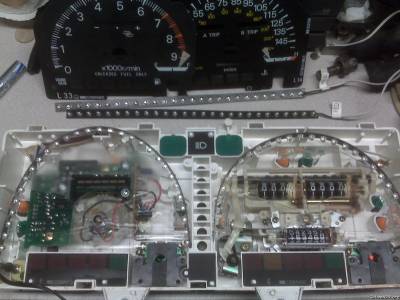
The clear "light pipes" as I'm gonna call 'em lift off just like the faces. Upwards and off. Note that they're different and that they have little alignment nibs on them near the speedo and tach hubs.
Now we get to the goods. I got my LEDs from azdave, but you can find them all over the place on Ebay and they're not expensive. You're looking for 12VDC LED strips. For me, the white ones have 30 LEDs per strip and the reds have 27. They are ready to go. Just connect them to 12VDC and they work.
These strips are fairly flexible, but they're not THAT flexible. I managed to snap one off trying to test fit things. Fortunately, Dave just swapped me over for a good one (he's got all kinds of LEDs around his place and can 100% salvage this strip). If you DO snap a strip, you just connect the pieces together with jumper wires. There's a total of (3) traces to connect and it's pretty straight forward. My soldering iron was just too hot to do the repair and I was lifting traces, so I met with Dave.
That "CHANGE COLOR" button on our clusters is pretty damn cool. I went with (2) red LED strips and (2) white strips. You might want to go blue or something. It also occurred to me tonight that you could maybe do white or blue on both sides, but just do red on the speedo for track nights. You could roll with the white or whatever around town, but on the track, switch to red and less distraction. Just a thought.
Anyway, start laying out your strips to get an idea where you will need to bust out the Dremel to remove material. It's mostly the vertical uprights along the perimeter of the housing, but there will be a couple spots on those clear light pipe deal, particularly on the outside edge of the speedo. Note: You can lift the clear pieces and slip the strip past on the side, then lower the clear piece into place. Keep your wire leads on the outside edges for later assembly.
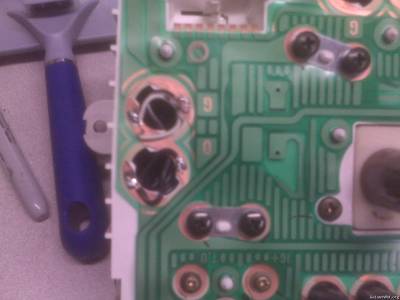
TACH SIDE DETAIL
You can see the spots where you're going to have to remove material from the housing. I started with a Dremel cut off wheel, but it was too large to get in there. I ended up using a smaller drill bit in the chuck and using it like a router bit. The plastic cuts like butter and this is never going to be seen, so only the perfectionist will obsess about the cleanliness of the cuts.
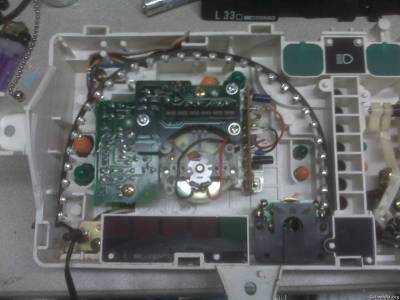
Also worth mentioning, you will want to loosen and reposition those wires at the top. Slip them around the retainer and then tuck them under that screw tab looking thing on the left to give your LEDs room to sit.
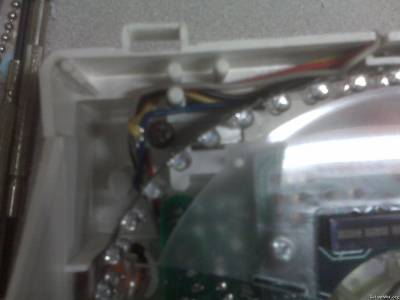
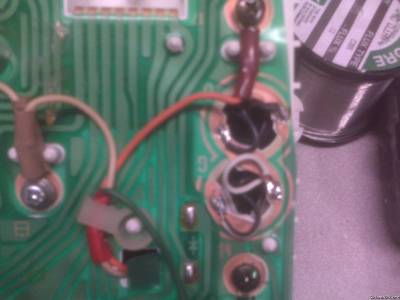
SPEEDO DETAIL
This side seemed a bit easier to work with. Still some clearancing needed along the perimeter, but it didn't need to be as aggressive. A WARNING: The lower right part of the light pipe gets in the way here, so trying to snake the LEDs between it then make your bends around the top can put some tension on the strip. Once I had my strip tucked in on the bottom right corner, it was in there, so trying to make the odd curve around the odometer reset lever was where I snapped the strip. Don't force anything. Dremel that sh*t if you need more room to work.
The two color action is really simple. You've no doubt noticed all those orange and green bulbs in this thing. Once you've got your first color tucked into place, slip the second strip in there right next to it. You can sort of overlap them. Slide the second strip down into place, getting the circuit "board" to tuck right behind the first one. The LEDs will rest on the edge of the first strip. This is about as compact as you get things. Again, remember to keep your wires all going in the same place.
Each time you tuck an LED strip into place, try putting the clear light pipe deal where it goes (remember, it's got alignment nibs on it). You want to be sure this will sit in place right before you go putting things together again. It's okay if the LEDs push these pieces up a bit, as the lens assembly has trim that will help to flatten things back out like they should be.
Now bust out the 400 grit sand paper and some TAPE. Set your gauge faces face down on something soft so you don't scratch them up and have janky ass gauges that light up all cool and stuff. PRO TIP: See those warning lights? That's a nice, clear lens right there. Same goes for the "boost" gauge. Just cover these areas with some tape and you'll thank me later. My "boost" gauge is now cloudy as hell because I didn't notice it in time. FAIL.
A little pressure with the 400 grit will do you right and your faces will look like this. Hold them up to a white light in the garage to make sure you clean the backs off evenly. It's not that big of a deal, considering how many LEDs are going to back here, but a little thought goes a long way. Once you're happy with the sanding, wipe them down and lose the tape.
Now, once you're happy with the way the LEDs tuck into place, pull the orange and green bulbs and snake the leads out through the holes. The bulbs on those outer edges are bigger and have bigger holes, making this easier. (See the method to my madness?) Make sure you know which strip is which color. /ubbthreads/images/graemlins/wink.gif Put your clear thingies in place, line them up, and then screw the gauge faces back on. LEAVE THE LENS OFF FOR NOW.
No need to cut the leads short. You can tuck as much slack as you need back into the cluster (which is nice, should you decide to remove this or re-do it in the future). Using your soldering iron, tin a couple spots for each lead. Between the larger bulb holes is a common 12VDC supply trace. You'll tack your positive leads to this trace. The smaller, outer traces are the ground and you'll tack your grounds to those.
PRO TIP: If you're like me, you've been keeping things symmetrical throughout this process. The white strips go in, then the red. Whatever. Then you slip the white leads through the bottom bulb hole and the reds through the upper one on each side, right? SURPRISE! When you power it up, you now have one color for your tach and the other for your speedo. Hit the color change button fast enough and it's like having a police cruiser in your face. #facepalm
However you decide to put them in, note that the bulb locations are labelled O (orange) and G (green). This sounds more complicated than it really is, but you basically want to swap your wires coming through the holes is all. If your white is coming through the lower hole on the left, you want to bring it through the upper on the right. Just make sure whatever color you solder to O on the one side gets soldered to the O on the other.
THIS IS A GREAT TIME TO TEST THINGS OUT AND GET EVEN MORE EXCITED ABOUT WHAT YOU'RE UP TO IN THE SHOP TODAY. Pull the rest of the green and orange bulbs, laugh at the little bulb condoms, make sure your wires are all tucked down tidy into the holes, slip the exposed cluster into place, and turn on your parking lights.
BOO YAH!
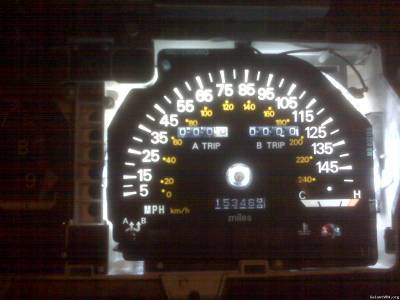
I kinda cheated and tested things out when I just had the speedo wired up. I wasn't entirely sure about the traces, so I wanted to be sure before I soldered everything up all nice and tight. Once you verify that all your strips are working - everything lights up the one color, then changes to the other when you push the color change button, you're ready to pull it out and put things back together.
Did you repaint your needles? Did you screw them up like I did? Who cares? Your gauges are gonna look super bitchin once this is all back together again. Put everything back together and cover the open bulb holes on the back of the cluster with some tape. You're ready for your final installation!
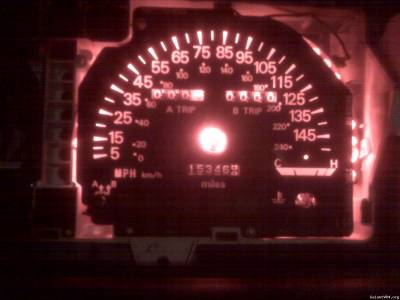
Shitty camera phone pictures don't do the red justice, here. It's really a deep, ruby red and I love it. The illumination is very even and consistent, despite how these pictures came out. They're a little bright, so I might try a resistor inline to dim them a bit or maybe even tint the lens, but I'm happy with them for now and look forward to installing them in 195 once the interior goes back in. (These test shots taken in 464/1000, my daily driver.)
All in all, this project takes more time than money or actual effort. You'll get a bit messy from all the plastic shavings during Dremel time, but the finished results are SO worth it, imo. Start to finish, I'd say this project is about four hours start to finish. Hope this inspires someone.
This isn't going to be the most detailed write up in the world. I don't have time tonight to post all the pictures, but believe me when I tell you, if you've got a Dremel and just a little bit of patience, this will be more intuitive than installing a new CD player. Seriously.
Remove the gauge cluster. First thing's first, unscrew the odometer reset button and put it in a safe place so you don't lose it. You need a Philips screwdriver for the rest. (2) screws for the bezel and (4) for the cluster itself. Lower the steering wheel, then pop the cluster towards you to disengage it from the connectors and speedo cable. Rotate the top towards you so the cluster faces down and ease it towards the steering wheel a bit while you slip it out to your right. Comes right out.
The clear lens pops off the cluster with a little gentle prying. The plastic is old, so don't try to force anything. It's just recessed clips along the sides, depress them a bit and push them back through the slots. (This will make sense when you're holding the unit in your hands. UNDERTONES.) Mark the position of the needles with bits of tape so you can put things right back where they belong. Use a fork or otherwise *gently* pry the needles *straight up.* You don't want to bend the stepper motor output shafts.
The gauge faces are held on by (4) tiny Philips screws each. Don't lose these. I bet they're the only ones this size on the whole damn car. Now you can slip the gauge faces upwards and lift them off the cluster. Watch out for the little peg on the speedo. Might want to pull it out and keep it with the screws and whatnot.
The clear "light pipes" as I'm gonna call 'em lift off just like the faces. Upwards and off. Note that they're different and that they have little alignment nibs on them near the speedo and tach hubs.
Now we get to the goods. I got my LEDs from azdave, but you can find them all over the place on Ebay and they're not expensive. You're looking for 12VDC LED strips. For me, the white ones have 30 LEDs per strip and the reds have 27. They are ready to go. Just connect them to 12VDC and they work.
These strips are fairly flexible, but they're not THAT flexible. I managed to snap one off trying to test fit things. Fortunately, Dave just swapped me over for a good one (he's got all kinds of LEDs around his place and can 100% salvage this strip). If you DO snap a strip, you just connect the pieces together with jumper wires. There's a total of (3) traces to connect and it's pretty straight forward. My soldering iron was just too hot to do the repair and I was lifting traces, so I met with Dave.
That "CHANGE COLOR" button on our clusters is pretty damn cool. I went with (2) red LED strips and (2) white strips. You might want to go blue or something. It also occurred to me tonight that you could maybe do white or blue on both sides, but just do red on the speedo for track nights. You could roll with the white or whatever around town, but on the track, switch to red and less distraction. Just a thought.
Anyway, start laying out your strips to get an idea where you will need to bust out the Dremel to remove material. It's mostly the vertical uprights along the perimeter of the housing, but there will be a couple spots on those clear light pipe deal, particularly on the outside edge of the speedo. Note: You can lift the clear pieces and slip the strip past on the side, then lower the clear piece into place. Keep your wire leads on the outside edges for later assembly.
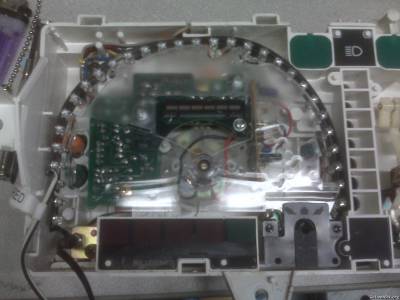
TACH SIDE DETAIL
You can see the spots where you're going to have to remove material from the housing. I started with a Dremel cut off wheel, but it was too large to get in there. I ended up using a smaller drill bit in the chuck and using it like a router bit. The plastic cuts like butter and this is never going to be seen, so only the perfectionist will obsess about the cleanliness of the cuts.
Also worth mentioning, you will want to loosen and reposition those wires at the top. Slip them around the retainer and then tuck them under that screw tab looking thing on the left to give your LEDs room to sit.
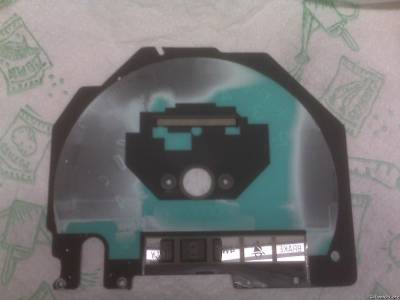
SPEEDO DETAIL
This side seemed a bit easier to work with. Still some clearancing needed along the perimeter, but it didn't need to be as aggressive. A WARNING: The lower right part of the light pipe gets in the way here, so trying to snake the LEDs between it then make your bends around the top can put some tension on the strip. Once I had my strip tucked in on the bottom right corner, it was in there, so trying to make the odd curve around the odometer reset lever was where I snapped the strip. Don't force anything. Dremel that sh*t if you need more room to work.
The two color action is really simple. You've no doubt noticed all those orange and green bulbs in this thing. Once you've got your first color tucked into place, slip the second strip in there right next to it. You can sort of overlap them. Slide the second strip down into place, getting the circuit "board" to tuck right behind the first one. The LEDs will rest on the edge of the first strip. This is about as compact as you get things. Again, remember to keep your wires all going in the same place.
Each time you tuck an LED strip into place, try putting the clear light pipe deal where it goes (remember, it's got alignment nibs on it). You want to be sure this will sit in place right before you go putting things together again. It's okay if the LEDs push these pieces up a bit, as the lens assembly has trim that will help to flatten things back out like they should be.
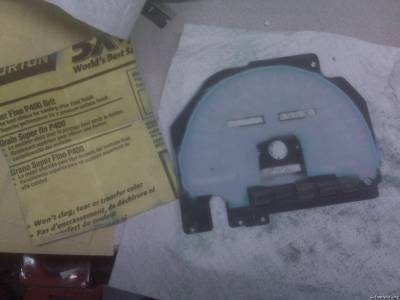
Now bust out the 400 grit sand paper and some TAPE. Set your gauge faces face down on something soft so you don't scratch them up and have janky ass gauges that light up all cool and stuff. PRO TIP: See those warning lights? That's a nice, clear lens right there. Same goes for the "boost" gauge. Just cover these areas with some tape and you'll thank me later. My "boost" gauge is now cloudy as hell because I didn't notice it in time. FAIL.
A little pressure with the 400 grit will do you right and your faces will look like this. Hold them up to a white light in the garage to make sure you clean the backs off evenly. It's not that big of a deal, considering how many LEDs are going to back here, but a little thought goes a long way. Once you're happy with the sanding, wipe them down and lose the tape.
Now, once you're happy with the way the LEDs tuck into place, pull the orange and green bulbs and snake the leads out through the holes. The bulbs on those outer edges are bigger and have bigger holes, making this easier. (See the method to my madness?) Make sure you know which strip is which color. /ubbthreads/images/graemlins/wink.gif Put your clear thingies in place, line them up, and then screw the gauge faces back on. LEAVE THE LENS OFF FOR NOW.
No need to cut the leads short. You can tuck as much slack as you need back into the cluster (which is nice, should you decide to remove this or re-do it in the future). Using your soldering iron, tin a couple spots for each lead. Between the larger bulb holes is a common 12VDC supply trace. You'll tack your positive leads to this trace. The smaller, outer traces are the ground and you'll tack your grounds to those.
PRO TIP: If you're like me, you've been keeping things symmetrical throughout this process. The white strips go in, then the red. Whatever. Then you slip the white leads through the bottom bulb hole and the reds through the upper one on each side, right? SURPRISE! When you power it up, you now have one color for your tach and the other for your speedo. Hit the color change button fast enough and it's like having a police cruiser in your face. #facepalm
However you decide to put them in, note that the bulb locations are labelled O (orange) and G (green). This sounds more complicated than it really is, but you basically want to swap your wires coming through the holes is all. If your white is coming through the lower hole on the left, you want to bring it through the upper on the right. Just make sure whatever color you solder to O on the one side gets soldered to the O on the other.
THIS IS A GREAT TIME TO TEST THINGS OUT AND GET EVEN MORE EXCITED ABOUT WHAT YOU'RE UP TO IN THE SHOP TODAY. Pull the rest of the green and orange bulbs, laugh at the little bulb condoms, make sure your wires are all tucked down tidy into the holes, slip the exposed cluster into place, and turn on your parking lights.
BOO YAH!
I kinda cheated and tested things out when I just had the speedo wired up. I wasn't entirely sure about the traces, so I wanted to be sure before I soldered everything up all nice and tight. Once you verify that all your strips are working - everything lights up the one color, then changes to the other when you push the color change button, you're ready to pull it out and put things back together.
Did you repaint your needles? Did you screw them up like I did? Who cares? Your gauges are gonna look super bitchin once this is all back together again. Put everything back together and cover the open bulb holes on the back of the cluster with some tape. You're ready for your final installation!
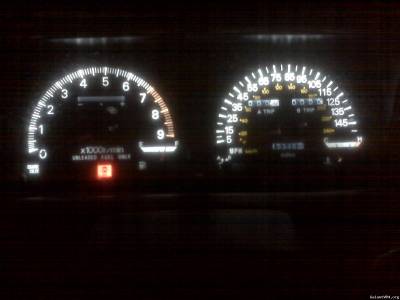
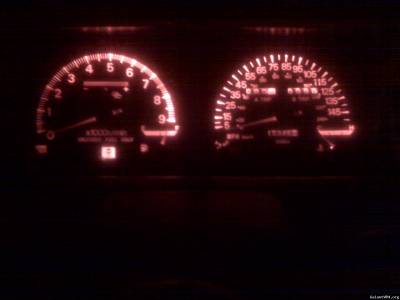
Shitty camera phone pictures don't do the red justice, here. It's really a deep, ruby red and I love it. The illumination is very even and consistent, despite how these pictures came out. They're a little bright, so I might try a resistor inline to dim them a bit or maybe even tint the lens, but I'm happy with them for now and look forward to installing them in 195 once the interior goes back in. (These test shots taken in 464/1000, my daily driver.)
All in all, this project takes more time than money or actual effort. You'll get a bit messy from all the plastic shavings during Dremel time, but the finished results are SO worth it, imo. Start to finish, I'd say this project is about four hours start to finish. Hope this inspires someone.

