The Top Mitsubishi Galant VR-4 Resource

Join the best E39A 1991-1992 Mitsubishi Galant VR-4 community and document your GVR4 journey.

  • Software Upgraded - Reset Your Password to Login
    In order to log in after the forum software change, you need to reset your password. If you don't have access to the email address you used to register your GVR4.org account, you won't be able to reset your password. In that case, follow the instructions here to regain access to the forum.

About to tackle first timing belt replacement

Barnes

Well-known member
Joined
Feb 9, 2003
Messages
6,249
Location
Richland, WA
That sounds like way too much, gimme a moment.
 

Barnes

Well-known member
Joined
Feb 9, 2003
Messages
6,249
Location
Richland, WA
14-20 ft-lbs for the tensioner bolts
 

dammitjim

Well-known member
Joined
Oct 11, 2011
Messages
312
Location
WI
Vfaq says to position the pinholes to the left of the center bolt but the diagram shows one almost at 12 o'clock like I have it set in the pic. Not sure if this is correct.

photo-739297.JPG
 

Barnes

Well-known member
Joined
Feb 9, 2003
Messages
6,249
Location
Richland, WA
You will want to leave the tensioner pulley bolt loose enough that you can rotate the pulley to set the tension, but in the end, the holes will be very close to that position.
 

dammitjim

Well-known member
Joined
Oct 11, 2011
Messages
312
Location
WI
Thank you sir. I checked them with a t wrench and my guess was more than 14 and less than 20. Rockstar torquing.
 

dammitjim

Well-known member
Joined
Oct 11, 2011
Messages
312
Location
WI
Zip ties are the bomb. Newb observation here- if I hadnt transferred the marks to the new timing belt it would have been very difficult to determine the distance between these two. With the Outside marks lined up to the belt the inside marks looked a tooth off. The pulleys needed to be shifted over to line everything up. Probably old news to guys that have done this but it freaked me out at fIrst

So I wish I had counted teeth between the outside marks before removal as a triple check. I compared both marked belts and the current install and go 39 teeth on the belt including the marked tooth on the right.

Hopefully Some of you guys stick with me a little longer. I expect I'll have questions in a few regarding setting the tension

photo-786687.JPG
 
Last edited:

pauleyman

Well-known member
Joined
Feb 27, 2011
Messages
91
Location
Oklahoma City, OK
I doubt that's where the tensioner ends up.....Doesn't really matter where it ends up anyway. The instructions are clear on how the factory wants it done but few people own a beam style inch pound torque wrench. Only thing that really matters in the end is that the protrusion of the hydraulic tensioner is in the correct range. Do NOT measure it until you've rotated the engine around. They tell you to go around 6 times because that's how many times it takes to get all the marks to line up again. In your case probably fewer but I'd still go 6. The issue is the idle side of the belt can have slack in it and the belt could be a little off center on the pulleys. Rotate it around and it's all lined up, centers and there is no slack on the idle side. Then you can check the protrusion of the hydraulic tensioner. It's either in range or it isn't. If it's wrong you recompress and retension. There is no other way. With practice you no longer have to measure it. Done juuuuuuust right the pin will go back in the hole perfectly. Don't forget to loosen the adjuster bolt first assuming you used one. I lost count of timing belts after about 50 of them.
 

dammitjim

Well-known member
Joined
Oct 11, 2011
Messages
312
Location
WI
So satisfying when the belt finally goes over the tensiOner. Looks to me like everything is still at TDC and the marks are lined up. Stop me if you see anything screwed up. I wedged some mat foam under the belt near the crank to hold it so I could work on the tensioner part from the top

photo%2B1-757133.JPG


photo%2B2-757907.JPG
 

dammitjim

Well-known member
Joined
Oct 11, 2011
Messages
312
Location
WI
Quoting pauleyman:
Don't forget to loosen the adjuster bolt first assuming you used one. I lost count of timing belts after about 50 of them.


Great info thank you

I didn't use an adjuster bolt.
 

pauleyman

Well-known member
Joined
Feb 27, 2011
Messages
91
Location
Oklahoma City, OK
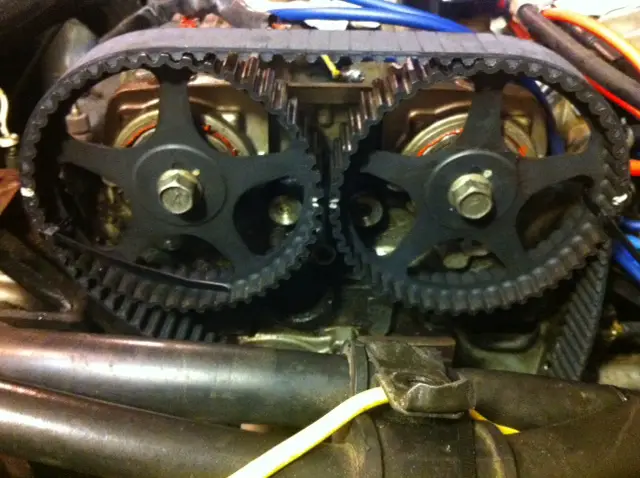
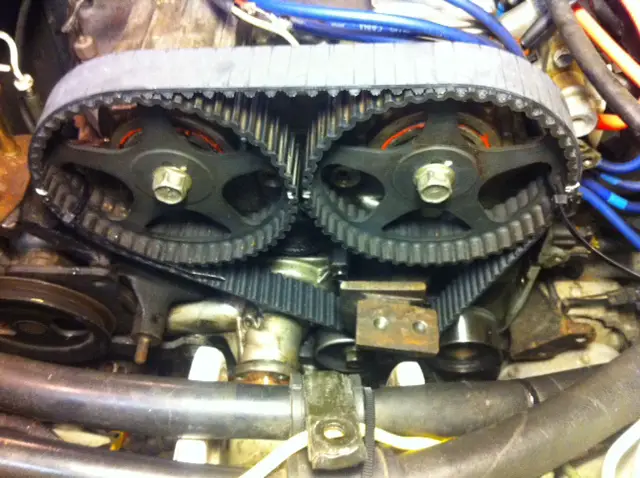
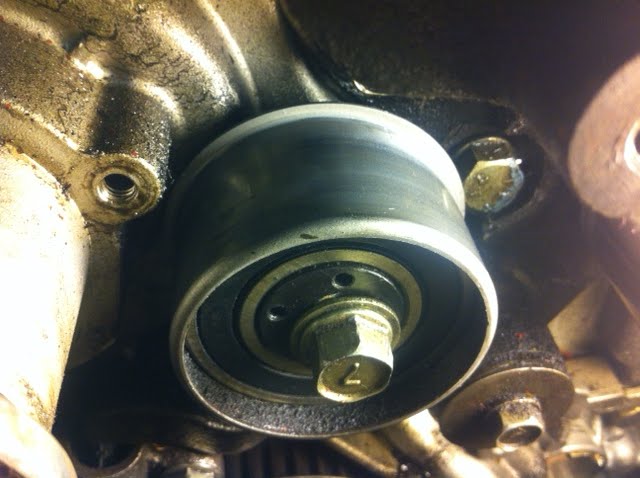
Here is where I see the most mistakes. The back side (idle side) needs to be taut. Not tight, taut. No slack. I have seen alot of people think they have the marks lined up but they don't. I don't think you're one of those. Yours looks right. Anyway what I'm getting at is once the belt is on turn the crank just a few degrees before you tension it. Takes all the slack out of the back side. Then you tension, then you rotate, then you check protrusion. Done correctly it's cake. The first time I did one I had no vfaq (didn't exist yet). All I had was the book. Took me about 3 tries before I got it. Either the teeth would be off, or the tension wouldn't be right after I thought it was. Like I said, in the end all that matters is the protrustion....and the marks of course but I think we all understand that one.
 

dammitjim

Well-known member
Joined
Oct 11, 2011
Messages
312
Location
WI
Palmface.gif. If I had set the pinholes further left the belt would have gone on easier.
 

dammitjim

Well-known member
Joined
Oct 11, 2011
Messages
312
Location
WI
Quoting pauleyman:

turn the crank just a few degrees before you tension it. Takes all the slack out of the back side.

Then you tension,

then you rotate,

then you check protrusion.

in the end all that matters is the protrustion


I'm doing this next. Protrusion is the protrusion/gap at the tensioner piston, correct?
 

dammitjim

Well-known member
Joined
Oct 11, 2011
Messages
312
Location
WI
I need to put this down until the am. I don't have a long enough threaded rod and I'm not see how the tension can be set correctly without it.
 

dammitjim

Well-known member
Joined
Oct 11, 2011
Messages
312
Location
WI
Initially I wasn't going to replace the tensioner because it only has about 10k on it, however the date stamped on the side is 2001 and I'm not feeling good about trusting a 10 year old hydraulic part here. It's going to take a day to get one from the dealer so finishing this is pushed out again. I guess it's officially JSBing now /ubbthreads/images/graemlins/frown.gif

Here's a pic of the the tensioner compression tool I built. The center nuts were to capture a box end ratcheting wrench for backing it out, but I think I'm going to just locktite a couple nuts on the end instead. I figure that should hold for removal. The rod is 8mmx1.25. You can also modify a battery hold down bolt as shown here - click I don't have a tap and die set so that didn't work for me.

I had to buy a long piece of threaded rod for this and have enough to make some extra if anyone needs one of these. I could do them for $12 shipped either as pictured or with two nuts locktited on the end.

photo-727389.JPG
 

EgonOlsen

Well-known member
Joined
May 4, 2010
Messages
333
Location
Denmark, Europe.
Nice work mate.

On the tensioner tool and the cam tool you can get both here for 40 or tensioner for 15. /ubbthreads/images/graemlins/smile.gif
click
 

pauleyman

Well-known member
Joined
Feb 27, 2011
Messages
91
Location
Oklahoma City, OK
aren't you done yet?
Practice a whole bunch and the you can knock one out before lunch on a saturday. Remodeled my kitchen that way.
 

dammitjim

Well-known member
Joined
Oct 11, 2011
Messages
312
Location
WI
I could go finish it right now if I wanted to use a 10 year old tensioner. /ubbthreads/images/graemlins/uhh.gif
 

dammitjim

Well-known member
Joined
Oct 11, 2011
Messages
312
Location
WI
Is there a page where I can find torque values for the pulleys (tensioner, WP, 4x crank bolts)? I don't see them on the vfaq. If not can someone post those torque settings? I'll add them to the first post so other guys will have them in the future.

Hoping to finish this tonight.
 

fuel

Well-known member
Joined
Feb 23, 2009
Messages
2,165
Location
Toronto, ON, Canada
Support Vendors who Support the GVR-4 Community
Boosted Fabrication ECM Tuning ExtremePSI Fuel Injector Clinic Jacks Transmissions JNZ Tuning Kiggly Racing Morrison Fabrications RixRacing RockAuto RTM Racing STM Tuned
Top