The Top Mitsubishi Galant VR-4 Resource

Join the best E39A 1991-1992 Mitsubishi Galant VR-4 community and document your GVR4 journey.

  • Software Upgraded - Reset Your Password to Login
    In order to log in after the forum software change, you need to reset your password. If you don't have access to the email address you used to register your GVR4.org account, you won't be able to reset your password. In that case, follow the instructions here to regain access to the forum.

Coil Packs and Dwell Time

curtis

Well-known member
Joined
May 4, 2003
Messages
11,892
Location
Clarksville TN
Well as for gap I always say .024 but Nelson found .014 or .018 lights up his car on big boost without being blown out. This also brings up the spark plug types being protruded or not and resistivity in them. That I'm sure could be a thread on its own. I really bet being built as well as it should be and a M&W /HKS /Dynatech box on the cars .052 on big boost wouldn't run do to the flame being blown out by the fuel air mix in a crazy pressurized environment.
 

TrevorS

Well-known member
Joined
Jul 26, 2012
Messages
49
Location
Newark, DE
To be fair -- from what I see with the Intrepid/300M plug conditions, we're talking resistor plugs and non-turbo. I just meant that the Intrepid/300M coils are capable of significant spark energy in their native environment.
 
Last edited:

TrevorS

Well-known member
Joined
Jul 26, 2012
Messages
49
Location
Newark, DE
Quoting TrevorS:
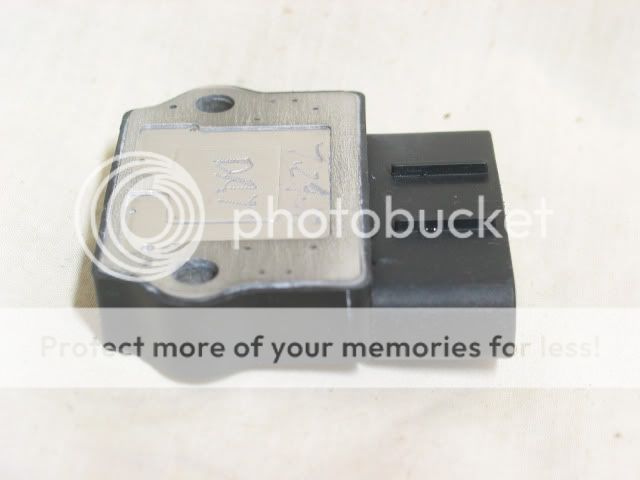
it's been suggested I should proceed with leveling the heat dissipation surfaces of the transistor power packs. As I mentioned, I tried that manually with 600 grit and accomplished little. Do you by any chance know if this is practical? I can't afford to damage the packs (cost me over $20 apiece), but if it should be safe, I could touch them to my belt sander and then apply progressive hand sanding methods. I'm not used to electronic devices having such a terribly uneven surface, makes me think the design engineers had little concern about heat dissipation (perhaps justified?)


Went ahead and sanded those surfaces flat and the difference from original is huge. I don't see much point in applying compound to the center raised area, it's still near a millimeter from the mounting surface, like you said John (Jon?), it has to be deliberate.

EclipseCOPignition_3.jpg
 
Last edited:

TrevorS

Well-known member
Joined
Jul 26, 2012
Messages
49
Location
Newark, DE
Quoting toybreaker:
Please keep the thread updated with your progress!


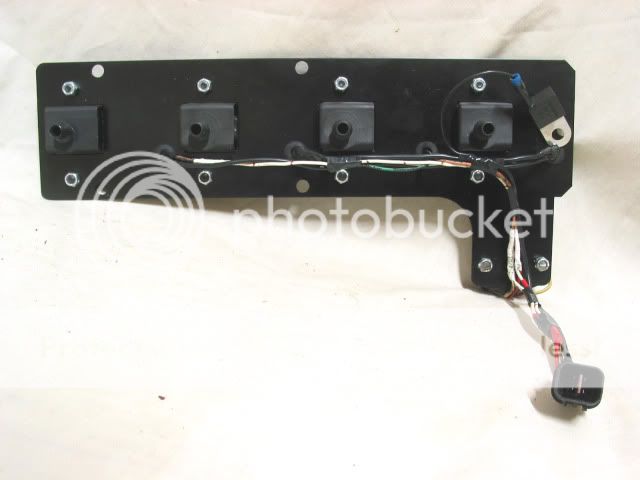
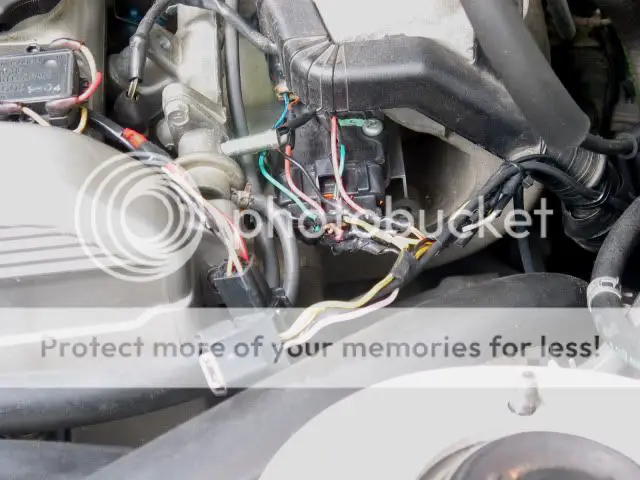
Just an update on wiring progress. I originally purchased a pre-wired COP assembly and have made modifications to that, plus I've finished the harness mods. However, I don't have the needed harness wrap tape yet, so hopefully this weekend. I plan to fire up the engine before wrapping, so I just need to build my courage /ubbthreads/images/graemlins/smile.gif!

EclipseCOPignition_4.jpg

EclipseCOPignition_5.jpg


As you can see, I haven't rewired everything, just some things.
 
Last edited:

JNR

Well-known member
Joined
Apr 23, 2004
Messages
9,814
Location
ca
Wow, curtis that is a crazy tight gap! Do you think that has more to do with his particular setup, or is this something we should consider (closing the gap even more when going COP)? The nice thing I suppose is less 'work' for the coils and probably would add to the service life then.
 

TrevorS

Well-known member
Joined
Jul 26, 2012
Messages
49
Location
Newark, DE
Seems like the downside is the physically smaller the spark, the less uniform the combustion (resulting in more uncombusted gasses). A larger spark is likely to achieve better combustion, however, it's also more likely to be extinguished under high compression /ubbthreads/images/graemlins/frown.gif!
 

TrevorS

Well-known member
Joined
Jul 26, 2012
Messages
49
Location
Newark, DE
Quoting toybreaker:

... please be sure to insulate that female terminal/connector where it plugs onto the condensor body well!
A little heat shrink over the whole terminal will do the trick.


Stopped by Home Depot for some heat shrink today (couldn't find my old /ubbthreads/images/graemlins/frown.gif) and applied a little to the capacitor and relay connectors. Great suggestion, provides a more professional appearance as well as insulates the 12V lines.
 
Last edited:

TrevorS

Well-known member
Joined
Jul 26, 2012
Messages
49
Location
Newark, DE
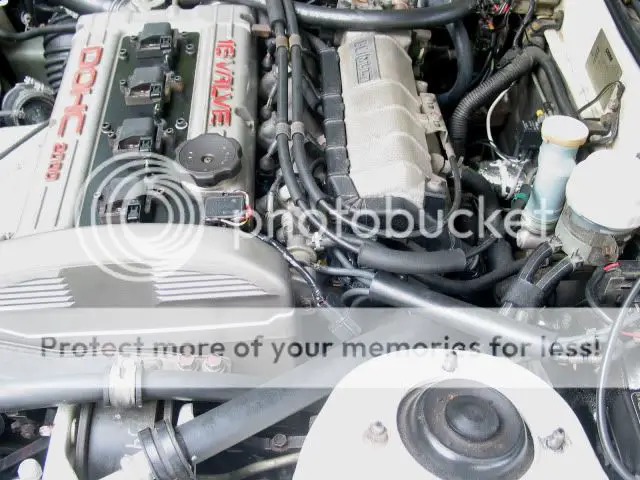
Wrapped the harnesses, put everything together, and fired it up. Started immediately (after I remembered to connect the battery ground /ubbthreads/images/graemlins/smile.gif) and took if for a brief spin -- no problems.

EclipseCOPignition_6.jpg

EclipseCOPignition_7.jpg


Frankly, my initial impression regarding performance, COP doesn't appear to buy anything -- it's either for looks or a solution if you change your intake manifold. Now, it's been two weeks since I drove the car and the seat felt a notch too far back for comfort with the pedals, but if anything, it seemed a little less responsive to the throttle, not more -- but since I was primarily concerned with whether the new ignition was functioning properly, not about to quit, that may have just been me. I tried the turbo on a couple hills and there was no sign of hesitation or misfire.

I need to run the engine with each transistor pack individually to make sure they're both functioning properly, but the engine has to do some cooling before I can proceed with that. Perhaps the engine is a little smoother with COP, but since it was pretty smooth already with the OE coil system (I certainly had no complaints) I'm once again not certain. FWIW -- my plugs are Bosch Platinum gaped to .032" (for some reason, the car just doesn't like NGK copper), base idle is 5*BTDC, and idle is about 650-700 rpm. Don't have a boost gauge, but pretty much followed the standard mod list for a neighborhood 300 crank HP ('90 GSX OE was 195).
 
Last edited:

TrevorS

Well-known member
Joined
Jul 26, 2012
Messages
49
Location
Newark, DE
Well, that's fun, just did some troubleshooting and it turns out the rear transistor pack doesn't work. I ohm'd out the harness contacts and the problem is definitely the pack. So, it appears my impressions above are specific to a single transistor pack, not two in parallel. Does anybody by any chance have a know good J722T power transistor pack they can let me have? How about please /ubbthreads/images/graemlins/smile.gif?

PS. Sent a replacement request to the Ebay seller and ordered one with a sixty day warranty for $20 shipped. Hopefully I'll end up with a spare.
 
Last edited:

TrevorS

Well-known member
Joined
Jul 26, 2012
Messages
49
Location
Newark, DE
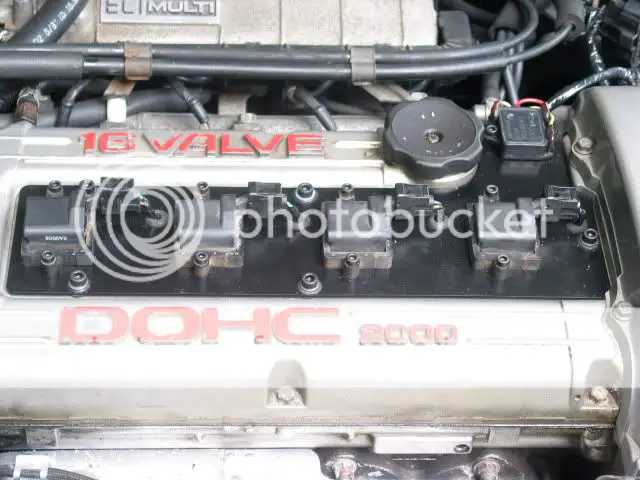
Am considering installing grommets, perhaps with inner sleeves, in the COP plate mounting holes. Purpose being to allow a little air flow under the edges of the plate (otherwise ventilated only via the cable opening at the timing cover). Just thinking it would help with cooling the underside of the coils as well as the ignition capacitor. Any thoughts?
 

JNR

Well-known member
Joined
Apr 23, 2004
Messages
9,814
Location
ca
I had thought about putting some ventilation holes, or using perforated plate at one time, but figured most coils are mounted right on the valve covers without issues, per se, and didn't like the idea of water, etc. being trapped in there, say I was to clean my engine or water (PITA to get it out), although suppose could just cover that area. I know it would be good for the hot air to escape naturally thru holes, but without some sort of airflow, not sure it would really work all that well?
 

TrevorS

Well-known member
Joined
Jul 26, 2012
Messages
49
Location
Newark, DE
I'm thinking there normally is airflow over the engine from the radiator (except with vehicle stopped), end so if there's an opening along the plate, otherwise trapped heat (pretty much like in an oven) will probably escape at the rear and be replaced by cooler air from the front. With the vehicle stopped, then convection could still carry heat out the edges with cooler air entering from the cable opening by the timing cover. My concern is in trying to increase coil current, I'm also increasing coil heat, plus I'm not entirely comfortable with mounting the ignition capacitor in an oven -- could have mounted it on top like the Intrepid (and drilled a hole for the wire), but don't really like the look /ubbthreads/images/graemlins/smile.gif!
 

JNR

Well-known member
Joined
Apr 23, 2004
Messages
9,814
Location
ca
I didn't run my wiring in-between as I didn't like the heat part of it, but the coils themselves wasn't too worried about since they are on the top and pretty much designed to run right on the covers. Perhaps there could be some benefit to keeping them coiler I suppose and something I wanted to do on my LS2's was to mount them off to the side (not quite a COP, but rather an individual coil per cylinder with a small wire to the plug)
 

TrevorS

Well-known member
Joined
Jul 26, 2012
Messages
49
Location
Newark, DE
True, the laminates are on top, but a good hunk of the wire is actually underneath. On the Intrepid, it really is entirely on the top surface (that being the valve cover), the 4G63 top plates I've seen instead have cutouts of varying depth. Thinking of the wires, the OE design also sandwiches the cables (HT), but I don't know whether that materially hurts their service life. Lots of choices.

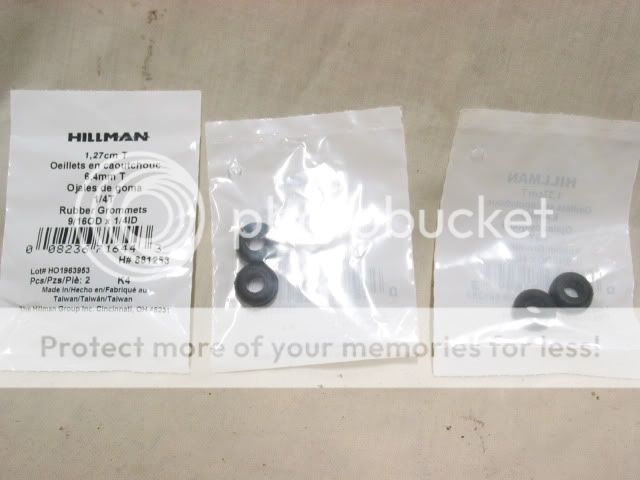
In case anyone's interested in fooling with the grommet approach, these work. Tightening them to 1/16" thickness top and bottom gives a 1/16" gap around the plate (no space for an inner sleeve). I'm expecting that's enough to be helpful for what I'm trying do.

EclipseCOPignition_8.jpg

EclipseCOPignition_9.jpg
 
Last edited:

TrevorS

Well-known member
Joined
Jul 26, 2012
Messages
49
Location
Newark, DE
Just ran across an interesting Wikipedia article on wasted spark.

</font><blockquote><font class="small">Quoting Wikipedia:</font><hr />
The wasted spark system is an ignition system used with some four-stroke cycle internal combustion engines. In a wasted spark system, the spark plugs fire in pairs even though one is on its compression stroke and one is on its exhaust stroke. The extra spark on the exhaust stroke has no effect and is thus "wasted".

This design halves the number of components in a typical ignition system, while the extra spark, against much reduced dielectric resistance, barely impacts on the lifespan of modern ignition components. <b>In a typical engine, it requires only about 2 to 3kV to fire the cylinder on the exhaust strokes. The remaining coil energy is available to fire the spark plug under compression (typically about 8 to 12kV).</b>

<hr /></blockquote><font class="post">
I wasn't aware it's so much easier to fire a plug during exhaust.

click

Here's an interesting article dealing with spark plug construction and heat behavior.

</font><blockquote><font class="small">Quoting Wikipedia:</font><hr />
The central electrode is usually the one designed to eject the electrons (the cathode) because it is the hottest (normally) part of the plug; it is easier to emit electrons from a hot surface, because of the same physical laws that increase emissions of vapor from hot surfaces (see thermionic emission). In addition, electrons are emitted where the electrical field strength is greatest; this is from wherever the radius of curvature of the surface is smallest, from a sharp point or edge rather than a flat surface (see corona discharge). It would be easiest to pull electrons from a pointed electrode but a pointed electrode would erode after only a few seconds. Instead, the electrons emit from the sharp edges of the end of the electrode; as these edges erode, the spark becomes weaker and less reliable.

&lt;snip&gt;

The development of noble metal high temperature electrodes (using metals such as yttrium, iridium, tungsten, or palladium, as well as the relatively high value platinum, silver or gold) allows the use of a smaller center wire, which has sharper edges but will not melt or corrode away. These materials are used because of their high melting points and durability, not because of their electrical conductivity (which is irrelevant in series with the plug resistor or wires). The smaller electrode also absorbs less heat from the spark and initial flame energy. At one point, Firestone marketed plugs with polonium in the tip, under the (questionable) theory that the radioactivity would ionize the air in the gap, easing spark formation.

<hr /></blockquote><font class="post">
click

Some interesting items from an autoclub.atilim.edu.tr publication.

</font><blockquote><font class="small">Quoting p241:</font><hr />
The ignition coil supplies much more secondary voltage than the average engine requires. The peak voltage that a coil produces is called its available voltage.
&lt;snip&gt;
Generally, a primary circuit voltage loss of one volt may decrease available voltage by 10,000 volts.
&lt;snip&gt;
When there is a spark plug in the secondary circuit, the coil voltage creates an arc across the plug air gap to complete the circuit. Figure 11-31 compares typical no-load oscillation to a typical secondary firing voltage oscillation. At about 15,000 volts, the spark plug air gap ionizes and becomes conductive. This is the ionization voltage level, also called the firing voltage, or required voltage. As soon as a spark has formed, less voltage is required to maintain the arc across the air gap. This reduces the energy demands of the spark causing the secondary voltage to drop to the much lower spark voltage level. This is the inductive portion of the spark. Spark voltage is usually about one-fourth of the firing voltage level.
&lt;snip&gt;
The spark duration or burn time of the trace indicates the amount of resistance and efficiency of the spark voltage. Burn time on most ignition systems is between 1.6 and 1.8 milliseconds.

<hr /></blockquote><font class="post">
</font><blockquote><font class="small">Quoting p243:</font><hr />
The firing voltage on the spark plug of 0.035 inch is about 6 to 8 kV; 0.045-inch air gap is 8 to 10 kV; and 0.060 air gap is 10 to 12kV.

<hr /></blockquote><font class="post">
</font><blockquote><font class="small">Quoting p244:</font><hr />
Voltage reserve is the amount of coil voltage available in excess of the voltage required. Under certain poor circuit conditions, there may be no voltage reserve. At these times, some spark plugs do not fire and the engine runs poorly or not at all. Ignition systems must be properly maintained to ensure that there is always some voltage reserve. Typically, an ignition system should have a voltage reserve of about 60 percent of available voltage under most operating conditions.

<hr /></blockquote><font class="post">
</font><blockquote><font class="small">Quoting p245:</font><hr />
In any system, the connections to the primary winding must be made correctly. If spark plug polarity is reversed, greater voltage is required to fire the plug. Plug polarity is established by the ignition coil connections.

One end of the coil secondary winding is connected to the primary winding, Figure 11-41, so the secondary circuit is grounded through the ignition primary circuit. When the coil terminals are properly connected to the battery, the grounded end of the secondary circuit is electrically positive. The other end of the secondary circuit, which is the center electrode of the spark plug, is electrically negative. Whether the secondary winding is grounded to the primary + or [-] terminal depends on whether the windings are wound clockwise or counterclockwise.

The secondary circuit must have negative polarity, or positive ground, for two main reasons. First, electrons flow more easily from negative to positive than they do in the opposite direction. Second, high temperatures of the spark plug center electrode increase the rate of electron movement, or current. The center electrode is much hotter than the side electrode because it cannot transfer heat to the cylinder head as easily. The electrons move quickly and easily to the side electrode when the air-fuel mixture is ignited. Although the secondary operates with negative polarity, it is a positive ground circuit.

If the coil connections are reversed, Figure 11-42, spark plug polarity is reversed. The grounded end of the secondary circuit is electrically negative. The plug center electrode is electrically positive, and the side electrode is negative. <b>When plug polarity is reversed, 20 to 40 percent more secondary voltage is required to fire the spark plug.</b>

<hr /></blockquote><font class="post">
</font><blockquote><font class="small">Quoting p251:</font><hr />
The arc of current across a spark plug air gap providestwo types of discharge:
• Capacitive
• Inductive
When a high-voltage surge is first delivered to the spark plug center electrode, the air-fuel mixture in the air gap cannot conduct an arc. The spark plug acts as a capacitor, with the center electrode storing a negative charge and the grounded side electrode storing a positive charge. The air gap between the electrodes acts as a dielectric insulator. This is the opposite of the normal negative ground polarity, and results from the polarity of the coil secondary winding.

Secondary voltage increases, and the charges in the spark plug strengthen until the difference in potential between the electrodes is great enough to ionize the spark plug air gap. That is, the air-fuel mixture in the gap is changed from a nonconductor to a conductor by the positive and negative charges of the two electrodes. The dielectric resistance of the air gap breaks down and current travels between the electrodes. The voltage level at this instant is called ionization voltage. The current across the spark plug air gap at the instant of ionization is the capacitive portion of the spark. It flows from negative to positive and uses the energy stored in the plug itself when the plug was acting as a capacitor, before ionization. This is the portion of the spark that starts the combustion process within the engine.

The ionization voltage level is usually less than the total voltage produced in the coil secondary winding. The remainder of the secondary voltage (voltage not needed to force ionization) is dissipated as current across the spark plug air gap. This is the inductive portion of the spark discharge, which causes the visible flash or arc at the plug. It contributes nothing to the combustion of the air-fuel mixture, but is the cause of electrical interference and severe electrode erosion. High-resistance cables and spark plugs suppress this inductive portion of the spark discharge and reduce wear.

<hr /></blockquote><font class="post">
</font><blockquote><font class="small">Quoting p252:</font><hr />
The heat range of a spark plug determines its ability to dissipate heat from the firing end. The length of the lower insulator and conductivity of the center electrode are design features that primarily control the rate of heat transfer, Figure 11-54. A “cold” spark plug has a short insulator tip that provides a short path for heat to travel, and permits the heat to rapidly dissipate to maintain a lower firing tip temperature.

A“hot” spark plug has a long insulator tip that creates a longer path for heat to travel. This slower heat transfer maintains a higher firing tip temperature. Engine manufacturers choose a spark plug with the appropriate heat range required for the normal or expected service for which the engine was designed. Proper heat range is an extremely important factor because the firing end of the spark plug must run hot enough to burn away fouling deposits at idle, but must also remain cool enough at highway speeds to avoid pre-ignition. It is also an important factor in the amount of emissions an engine will produce.

<hr /></blockquote><font class="post">
click
 
Last edited:

TrevorS

Well-known member
Joined
Jul 26, 2012
Messages
49
Location
Newark, DE
Quoting JNR:
I didn't run my wiring in-between as I didn't like the heat part of it, but the coils themselves wasn't too worried about since they are on the top and pretty much designed to run right on the covers. Perhaps there could be some benefit to keeping them cooler I suppose and something I wanted to do on my LS2's was to mount them off to the side (not quite a COP, but rather an individual coil per cylinder with a small wire to the plug)


Interesting, from earlier reading I understand that might be called coil-near-plug /ubbthreads/images/graemlins/smile.gif! Not sure how you'd get away with a small wire since that's really back to the HT lead scenario. Where might you locate the coils?
 

JNR

Well-known member
Joined
Apr 23, 2004
Messages
9,814
Location
ca
Definitely not quite a COP, but close...I mean the wires are pretty short and direct and don't need to cross over each other (like with a distributor setup). I no longer have either car, but what I was thinking about doing was mounting them several inches to the right (or left) of the engine and have the wires connect...sounds crude, but could've worked. However, not so sure it would've been worth the effort, as I really didn't hear of coil failures from heat. The other thing it would've done was clean up the valve cover, but there are other ways to do that with coils in oem positions.
 

TrevorS

Well-known member
Joined
Jul 26, 2012
Messages
49
Location
Newark, DE
Guess it can be hard to visualize this stuff, but I would've been interested in what you came up with /ubbthreads/images/graemlins/smile.gif! My concern over coil heat may be misplaced, but given I'm trying to ramp up the current by some 25%, seems to me like it's not out of order. I'm thinking this is one of those situations where only time-will-tell /ubbthreads/images/graemlins/frown.gif! Hopefully, the new transistor power pack will arrive tomorrow. The Ebay seller of my defective pack has requested I return it, so here's hoping that results in a functional replacement /ubbthreads/images/graemlins/smile.gif!
 
Last edited:

TrevorS

Well-known member
Joined
Jul 26, 2012
Messages
49
Location
Newark, DE
Power Transistor pack arrived today -- had a much better quality sanding result this time. Earlier I used all of vertical (mounting hole-to-mounting hole), horizontal, and circular strokes of the pack against stationary sandpaper -- this time I used only vertical. So if you sand yours, I suggest using only vertical strokes -- this prevents the slight rounding of all the outer edges visible in my earlier photo.

EclipseCOPignition_10.jpg
 

TrevorS

Well-known member
Joined
Jul 26, 2012
Messages
49
Location
Newark, DE
Just an update! I've so far purchased three "J722T" transistor power packs via Ebay, and including the one I just received today (which turned out to be actually a J702T /ubbthreads/images/graemlins/frown.gif), I've exactly one that does the job. Seems pretty clear it's going to be about a week before I can hope to have another good J722T, so I've given up on quick verification and have decided I might as well replace my reworked 1/4" aluminum heat sink with something more dimensionally tailored to the J722T. Ordered an appropriate piece of aluminum this evening. I'll be back to this thread when I've something to report /ubbthreads/images/graemlins/smile.gif! In the meantime, I advise being careful with Ebay used electronics sellers /ubbthreads/images/graemlins/frown.gif!

PS. I'm taking the opportunity to re-sand my one-and-only good J722T transistor pack (I appreciate whatever graces come my way /ubbthreads/images/graemlins/smile.gif)!
 
Last edited:
Support Vendors who Support the GVR-4 Community
Boosted Fabrication ECM Tuning ExtremePSI Fuel Injector Clinic Jacks Transmissions JNZ Tuning Kiggly Racing Morrison Fabrications RixRacing RockAuto RTM Racing STM Tuned
Top