- Software Upgraded - Reset Your Password to Login
In order to log in after the forum software change, you need to reset your password. If you don't have access to the email address you used to register your GVR4.org account, you won't be able to reset your password. In that case, follow the instructions here to regain access to the forum.
You are using an out of date browser. It may not display this or other websites correctly.
You should upgrade or use an alternative browser.
You should upgrade or use an alternative browser.
1988 Dynamic 4 restoration / VR4 conversion (pictures)
- Thread starterr4pt0x
- Start date
4g63mightymax
Well-known member
Fantastic work, I love seeing people fix rusty cars! The floor shaping is especially terrific. I'm anxious to see what you coat the interior floor with, because I will be doing some similar work to mine shortly. Keep up the great work!
r4pt0x
Well-known member
I just got back my rear viscous diff from machining. Now the smaller crown wheel for long ratio fits onto the viscous unit and i can keep 4WS ")
I'll post pictures when I put it back into the housing.
For the next few evenings i think i'll be busy studying all the VR4 group A homologation papers that just surfaced here /ubbthreads/images/graemlins/grin.gif
I'll post pictures when I put it back into the housing.
For the next few evenings i think i'll be busy studying all the VR4 group A homologation papers that just surfaced here /ubbthreads/images/graemlins/grin.gif
FlyingEagle
Staff member
All the repair work you are doing now, was 3-5 times as bad in another shell that popped up here not too long ago.
I gave the owner a friendly nudge to stop DEAD in his tracks, with thoughts of it being road worthy.
Your shell is more than salvageable but man, those are some long hours you are putting in. You will love it when you are finished though!
Congrats on modifying your drivetrain too!
I gave the owner a friendly nudge to stop DEAD in his tracks, with thoughts of it being road worthy.
Your shell is more than salvageable but man, those are some long hours you are putting in. You will love it when you are finished though!
Congrats on modifying your drivetrain too!
curtis
Well-known member
Mad skills /ubbthreads/images/graemlins/applause.gif
BluFalcon
Well-known member
I am impressed. You're showing a lot of dedication and skill getting this thing fixed. Mods: I think he deserves a new user title. /ubbthreads/images/graemlins/grin.gif
transparentdsm
Well-known member
car is coming along great, it really is gonna be something special when your done.
r4pt0x
Well-known member
Update:
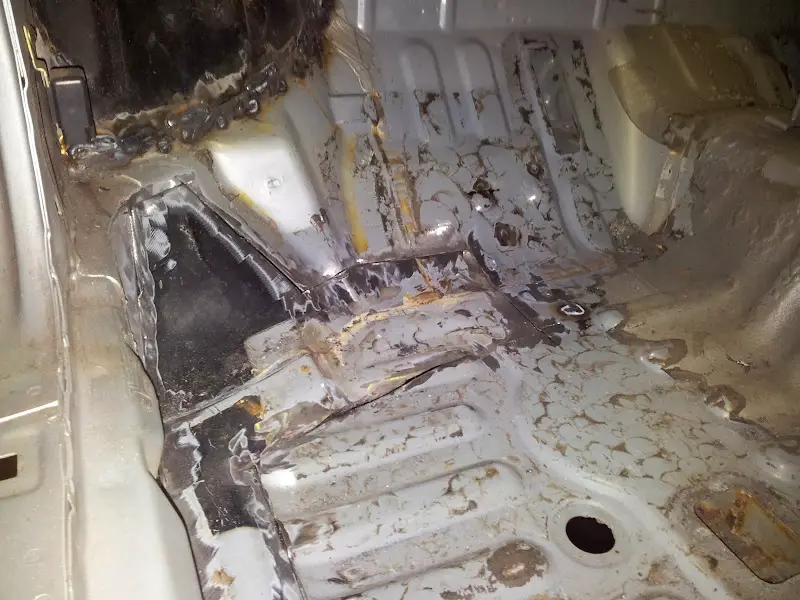
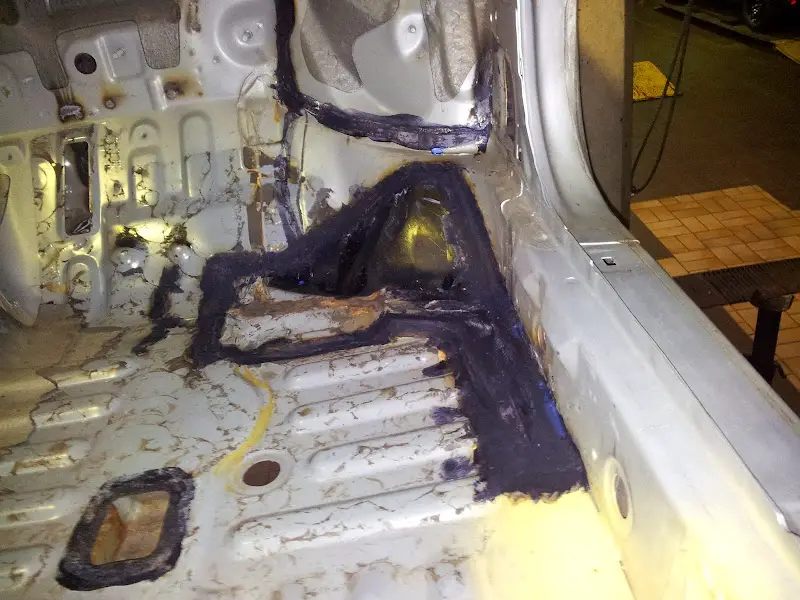
I just finished the passengers side floor panels today. As on the drivers side, I replaced the whole part on the outside as well as some parts above the crossmembers where the rust already came through.
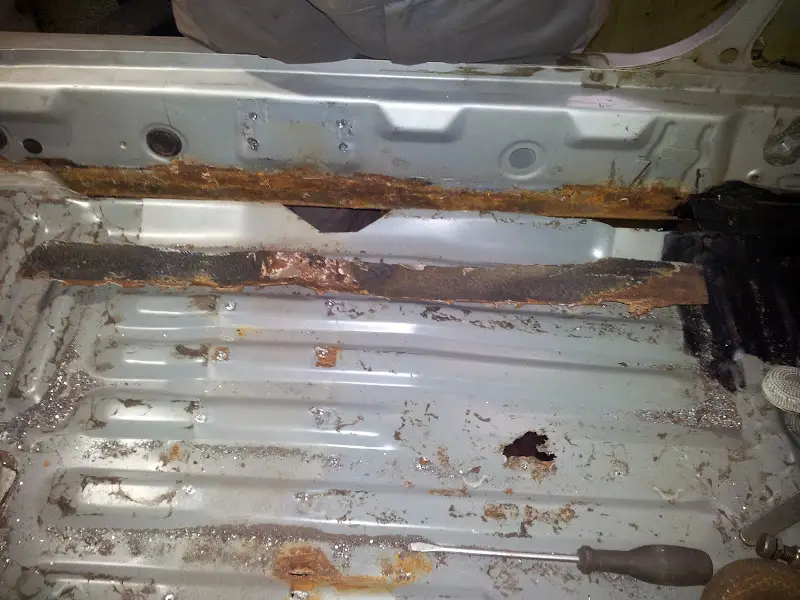
The rear part of the floorpanel was finished last weekend - it was quite tricky to reshape that part, but i'm happy with the result.
on the outside i had to remove the outer layer of the fold, as the sheet between the outer parts of the sill was quite rusty and I had to restore some parts of it. The rest had been treated with rust-converter and now i have shiny new metal from inside and out:
Both folds have been treated with Owatrol oil, that's why I haven't coated those parts with primer yet.
I recieved some 200 EUR of rust-converter, cavity protection (fluid film), underbody coating etc last week, so I also started to paint the rear axle with owatrol oil - really great stuff!
Sorry for the bad quality of the last 3 pictures - the crappy samsung phone did not focus properly and crashed when I tried to take a picture of the rear axle...
I just finished the passengers side floor panels today. As on the drivers side, I replaced the whole part on the outside as well as some parts above the crossmembers where the rust already came through.
The rear part of the floorpanel was finished last weekend - it was quite tricky to reshape that part, but i'm happy with the result.
on the outside i had to remove the outer layer of the fold, as the sheet between the outer parts of the sill was quite rusty and I had to restore some parts of it. The rest had been treated with rust-converter and now i have shiny new metal from inside and out:
Both folds have been treated with Owatrol oil, that's why I haven't coated those parts with primer yet.
I recieved some 200 EUR of rust-converter, cavity protection (fluid film), underbody coating etc last week, so I also started to paint the rear axle with owatrol oil - really great stuff!
Sorry for the bad quality of the last 3 pictures - the crappy samsung phone did not focus properly and crashed when I tried to take a picture of the rear axle...
r4pt0x
Well-known member
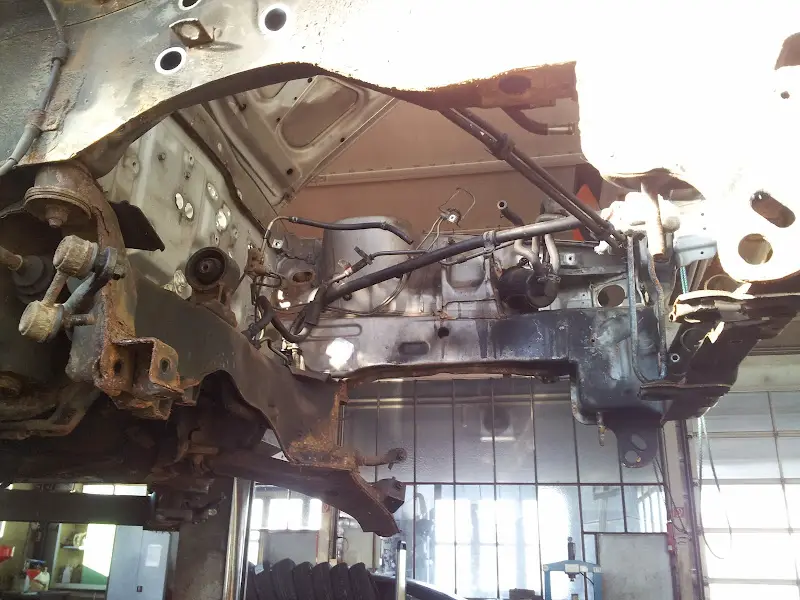
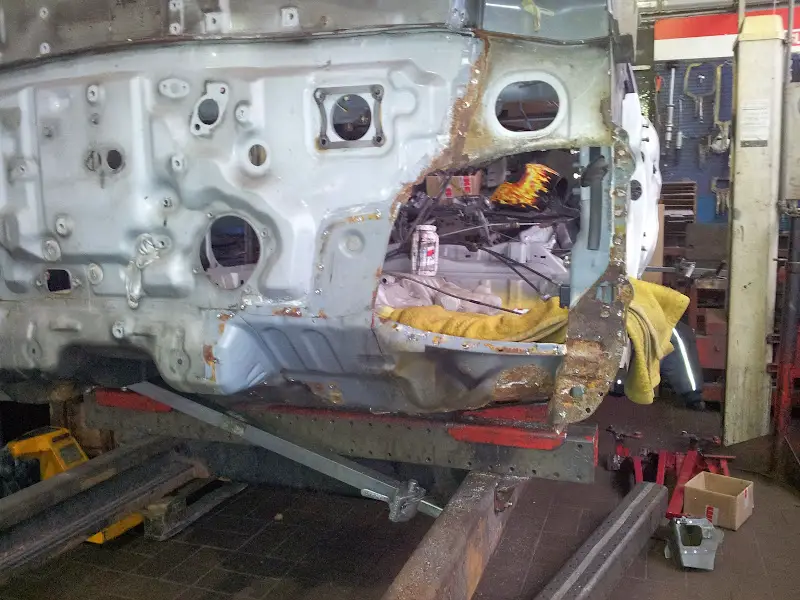
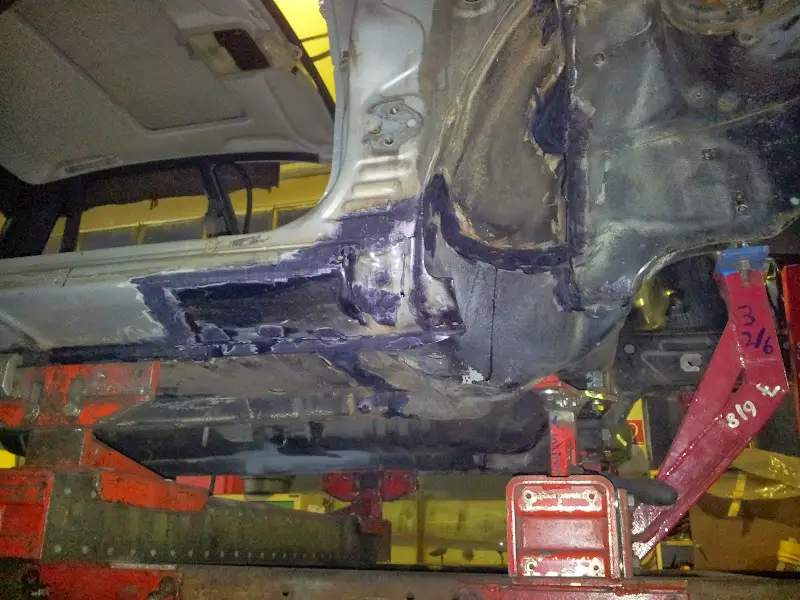
Today I removed the engine and stripped the whole front excet front axle and steering - I want to keep the front axle support on until the car has been fixated on the car bench as it adds some strength to the shell.
Both front suspension struts were sent to the trash - I'll use evo 7/8 ones + Eibach springs and FWD front knuckles, as they have a sligtly lower steering arm, so the steering links will remain in roughly the same angle. Brakes will be taken over from my FWD - 296mm with 2-pot calipers (=evo4 gravel spec).
As I found a nearly rust-free front axle support i'll also dump the one after removing it. All bolts and bushings will also be replaced.
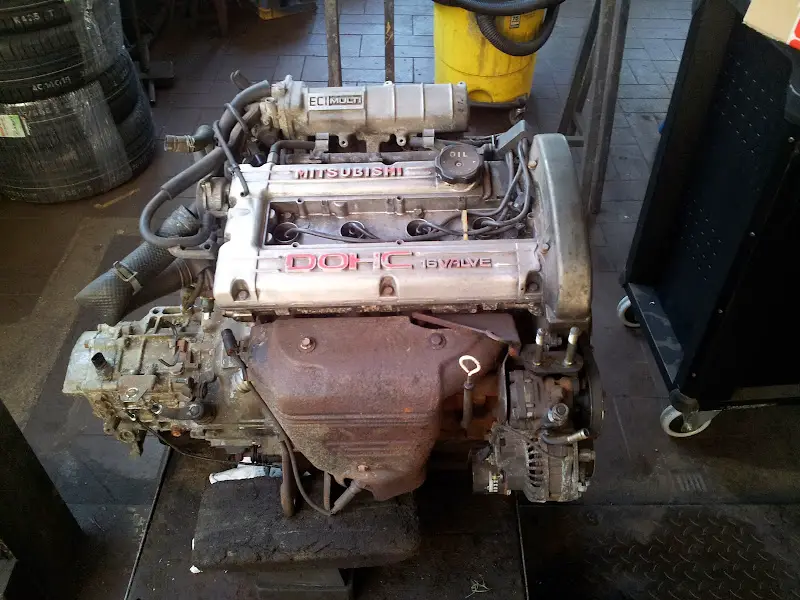
I also changed my mind about the engine I'll use - found a much more economical solution:
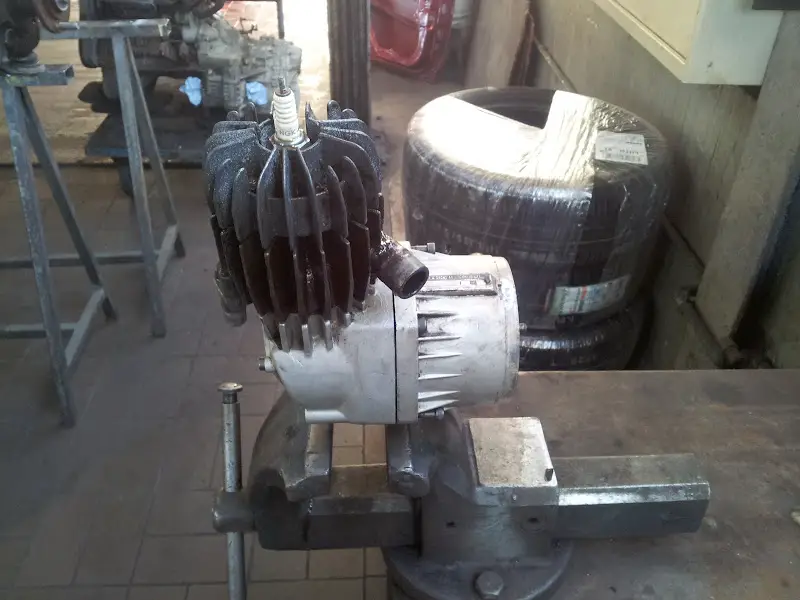
It's a 1970 fichtel & sachs 47cc 2-stroke. No timing belts, no turbo - much more reliable and dirt-cheap services /ubbthreads/images/graemlins/rofl.gif
Well, actually it's for my DKW motorbike which is my daily-driver for driving to work and shopping. As I finally got the last seals and bearings 2 weeks ago, I rebuilt the engine over the last 2 Weekends.
Both front suspension struts were sent to the trash - I'll use evo 7/8 ones + Eibach springs and FWD front knuckles, as they have a sligtly lower steering arm, so the steering links will remain in roughly the same angle. Brakes will be taken over from my FWD - 296mm with 2-pot calipers (=evo4 gravel spec).
As I found a nearly rust-free front axle support i'll also dump the one after removing it. All bolts and bushings will also be replaced.
I also changed my mind about the engine I'll use - found a much more economical solution:
It's a 1970 fichtel & sachs 47cc 2-stroke. No timing belts, no turbo - much more reliable and dirt-cheap services /ubbthreads/images/graemlins/rofl.gif
Well, actually it's for my DKW motorbike which is my daily-driver for driving to work and shopping. As I finally got the last seals and bearings 2 weeks ago, I rebuilt the engine over the last 2 Weekends.
Last edited:
BENE38A
Well-known member
wow man your doing a great job, making good progress. i see this and i want to go down to the shed and pull my car apart!
r4pt0x
Well-known member
A little preview on what's going on /ubbthreads/images/graemlins/wink.gif
r4pt0x
Well-known member
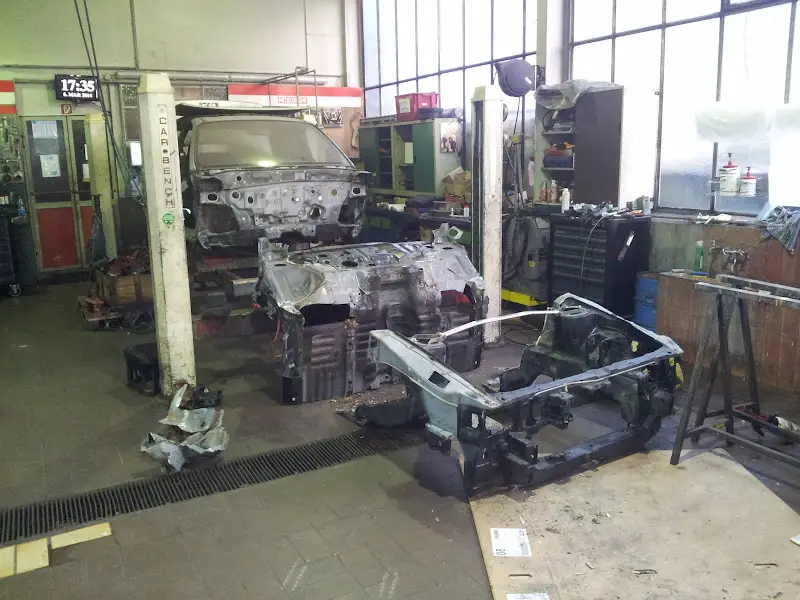
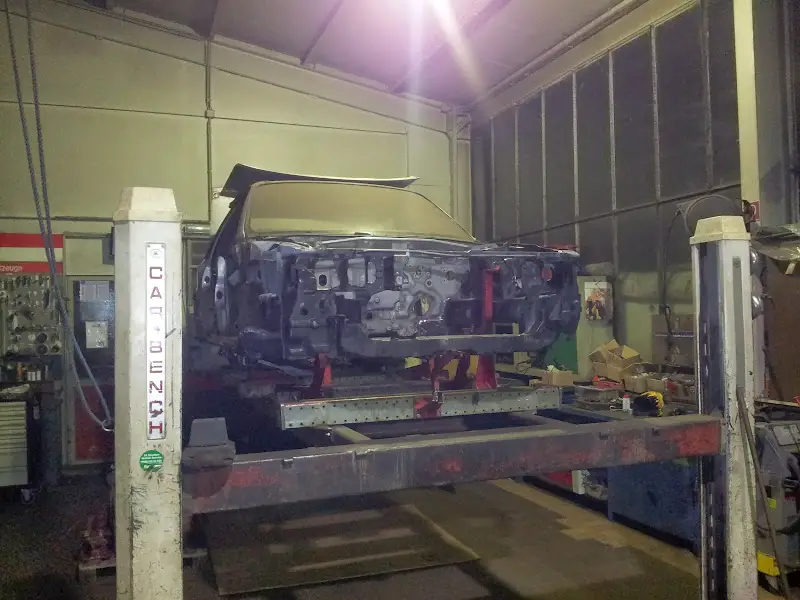
Well, finally I fount a little time for an update. I took a few days off to make some progress with the car.
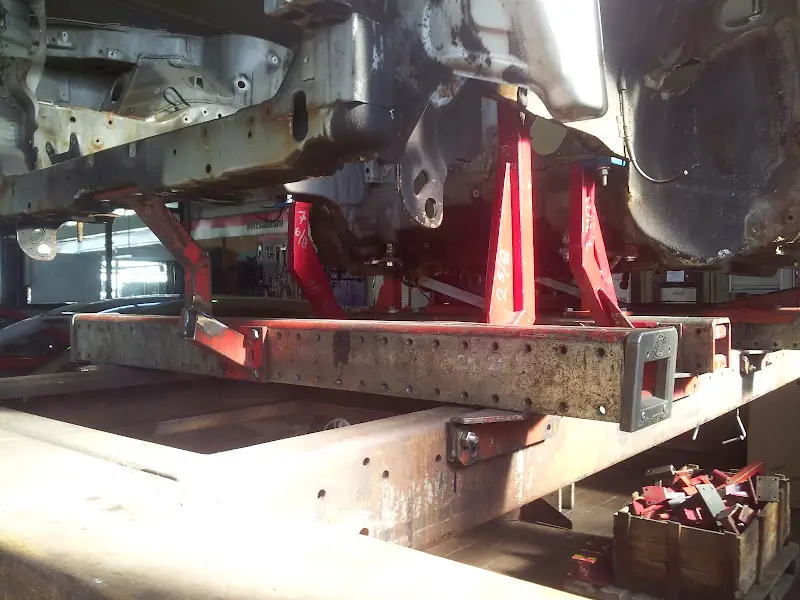
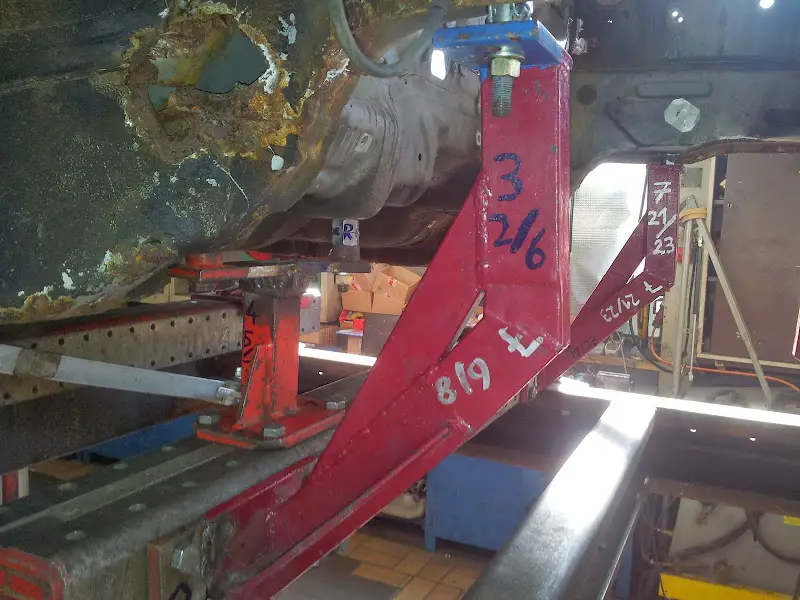
Last weekend I mounted the body on the car bench and built a toolset for the front. I had an Evo 9 set and lots of old opel ascona/manta supports to modify - surprisingly the evo9 set nearly matched the necessary points. I'ts really not like they've developed a whole new car but it looks more like they've just improved and altered the initial design.
The shiny red painted supports are the evo9 ones - only modified by adding plates on the side so I didn't had to alter the mountig holes. These parts are now suitable for E39 and CT9 /ubbthreads/images/graemlins/wink.gif

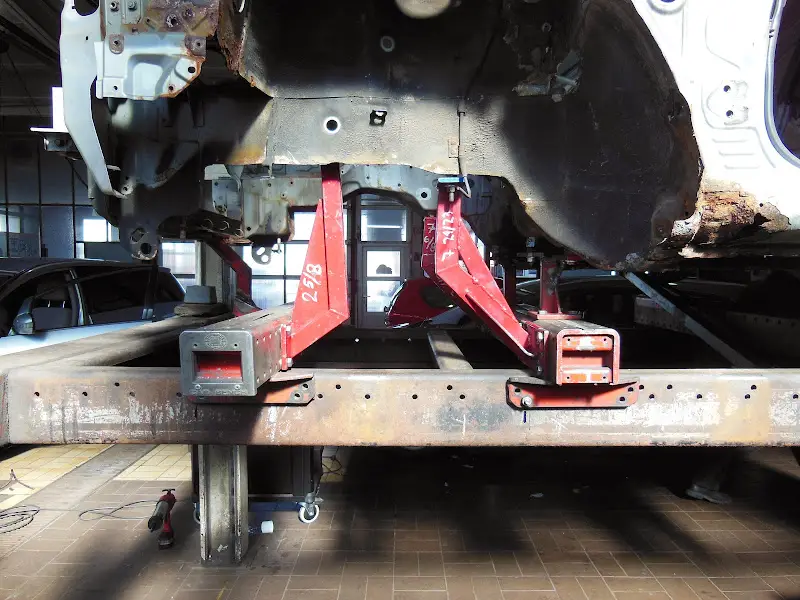
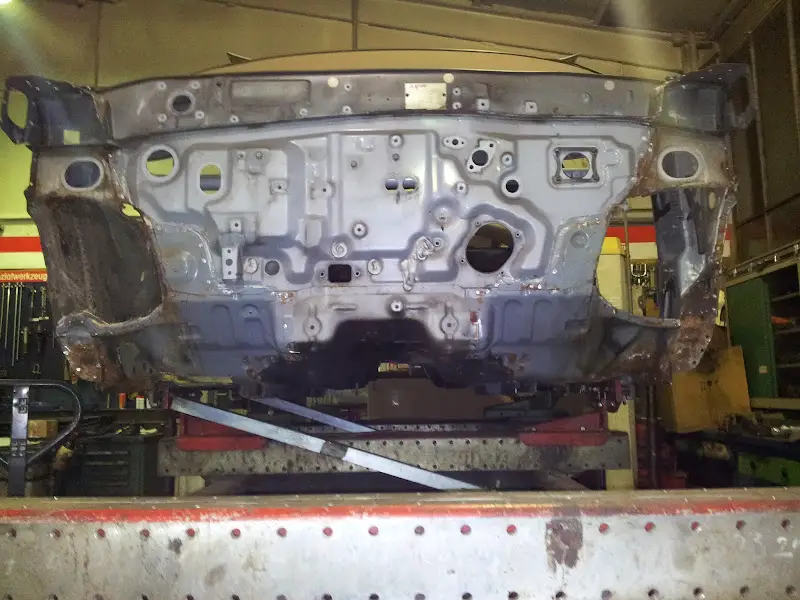
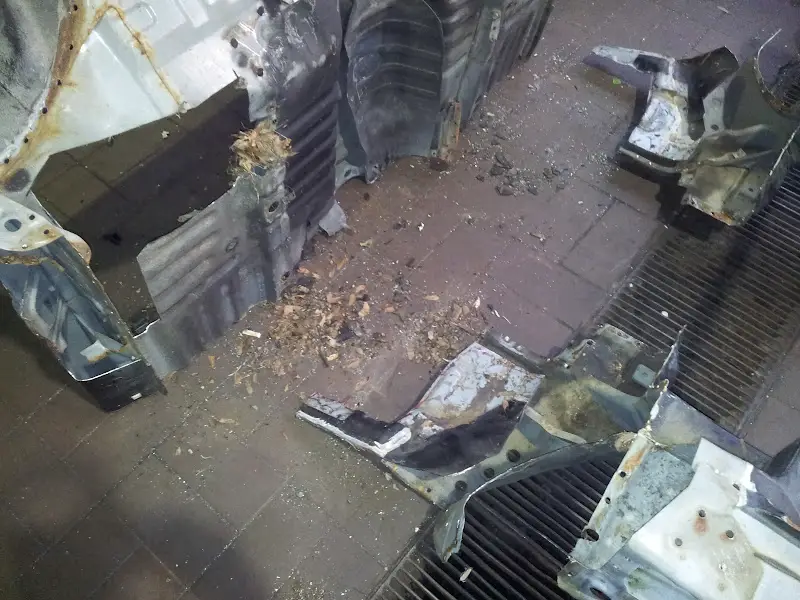
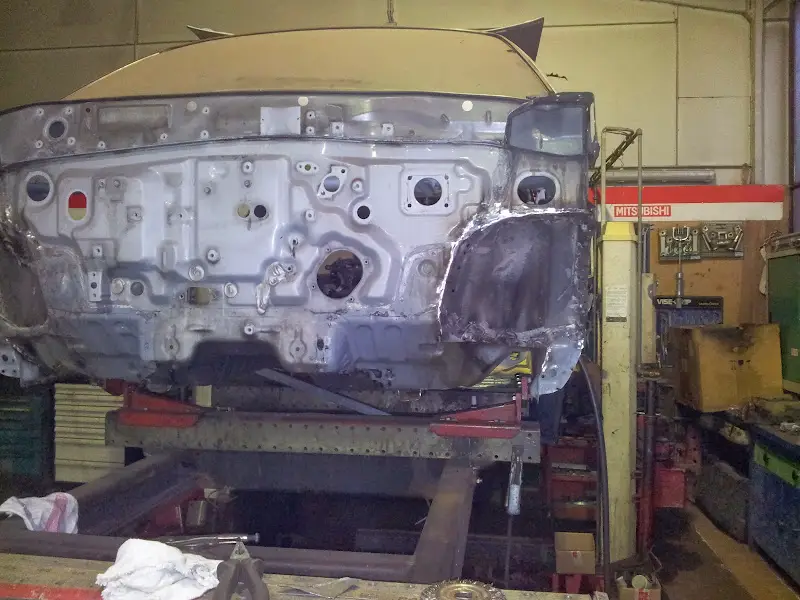
After removing the supports the slaughter began:
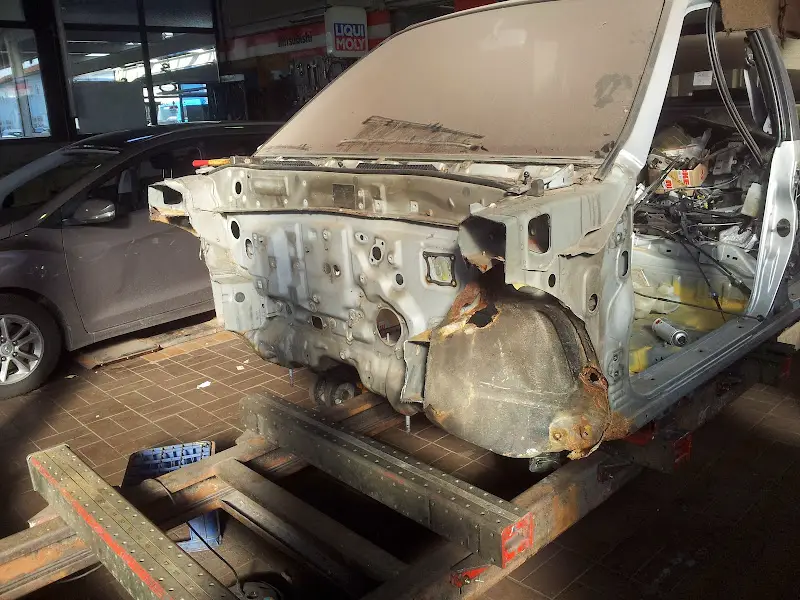
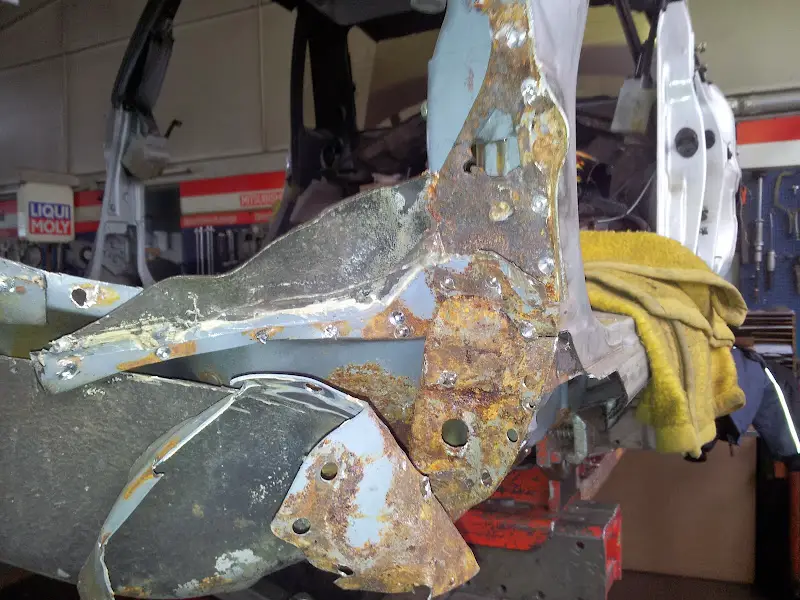
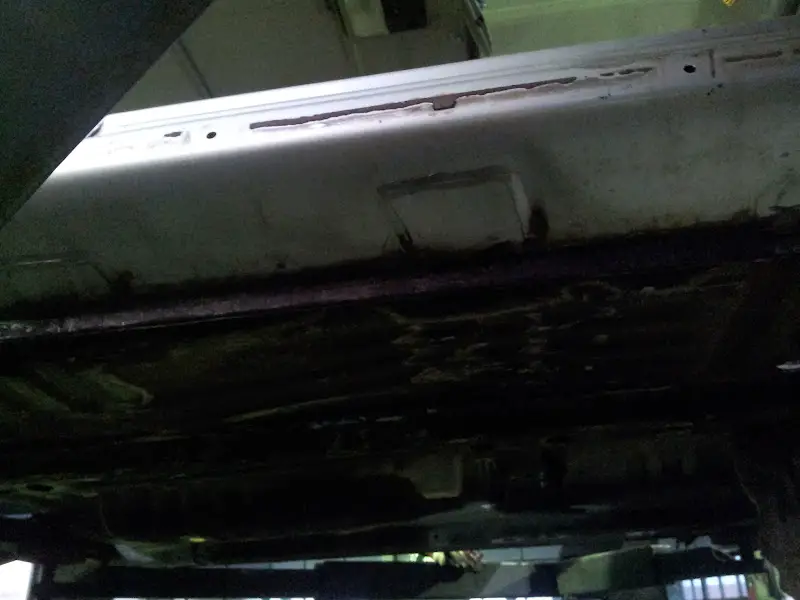
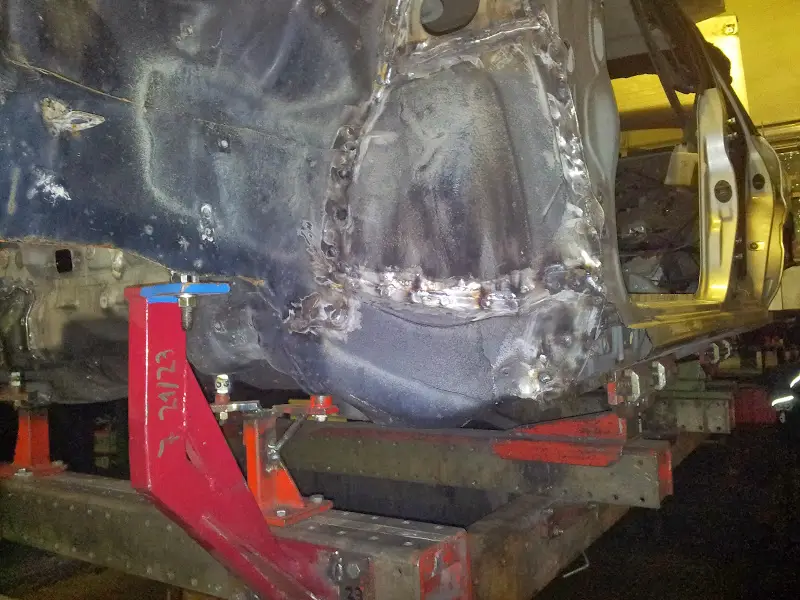
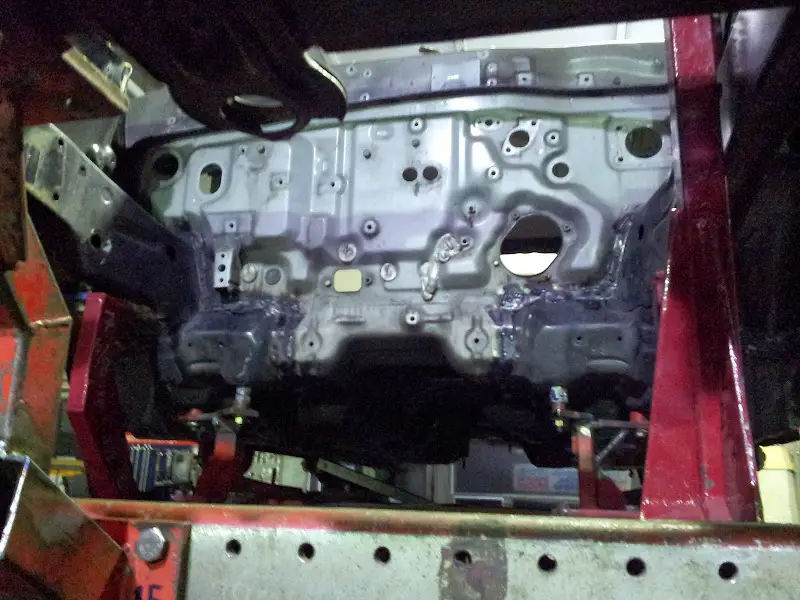
It took me nearly 2 days to remove the front, as the drawings in the workshop manual aren't that accurate, so especially on the sides I had to remove layer by layer to get an idea of the structure. And as Mitsubishi didn't save any steel the joint between the A-pillar, firewall and front members is MASSIVE. Unfortunately they used high-tensile steel mixed with "standard" body sheet (firewall) - so everywhere these different metrials are joined or layered, only rust is left of the low-grade steel when mixed with years of water and salt...
Today I stripped all the remaining parts off the RHD frontcut like brake lines, wiring loom, steering column, pedals etc and started to seperate the front from the firewall
The "new" front should be in place this weekend. As soon as I've made my decisions on where to route all the lines through the interior and where to put the hadraulic handbrake I can paint the floor, engine compartment and front+rear axles/supports with the chassis paint that arrived today and finally can start to put parts back on the car instead of removing more and more /ubbthreads/images/graemlins/wink.gif
Last weekend I mounted the body on the car bench and built a toolset for the front. I had an Evo 9 set and lots of old opel ascona/manta supports to modify - surprisingly the evo9 set nearly matched the necessary points. I'ts really not like they've developed a whole new car but it looks more like they've just improved and altered the initial design.
The shiny red painted supports are the evo9 ones - only modified by adding plates on the side so I didn't had to alter the mountig holes. These parts are now suitable for E39 and CT9 /ubbthreads/images/graemlins/wink.gif
After removing the supports the slaughter began:
It took me nearly 2 days to remove the front, as the drawings in the workshop manual aren't that accurate, so especially on the sides I had to remove layer by layer to get an idea of the structure. And as Mitsubishi didn't save any steel the joint between the A-pillar, firewall and front members is MASSIVE. Unfortunately they used high-tensile steel mixed with "standard" body sheet (firewall) - so everywhere these different metrials are joined or layered, only rust is left of the low-grade steel when mixed with years of water and salt...
Today I stripped all the remaining parts off the RHD frontcut like brake lines, wiring loom, steering column, pedals etc and started to seperate the front from the firewall
The "new" front should be in place this weekend. As soon as I've made my decisions on where to route all the lines through the interior and where to put the hadraulic handbrake I can paint the floor, engine compartment and front+rear axles/supports with the chassis paint that arrived today and finally can start to put parts back on the car instead of removing more and more /ubbthreads/images/graemlins/wink.gif
r4pt0x
Well-known member
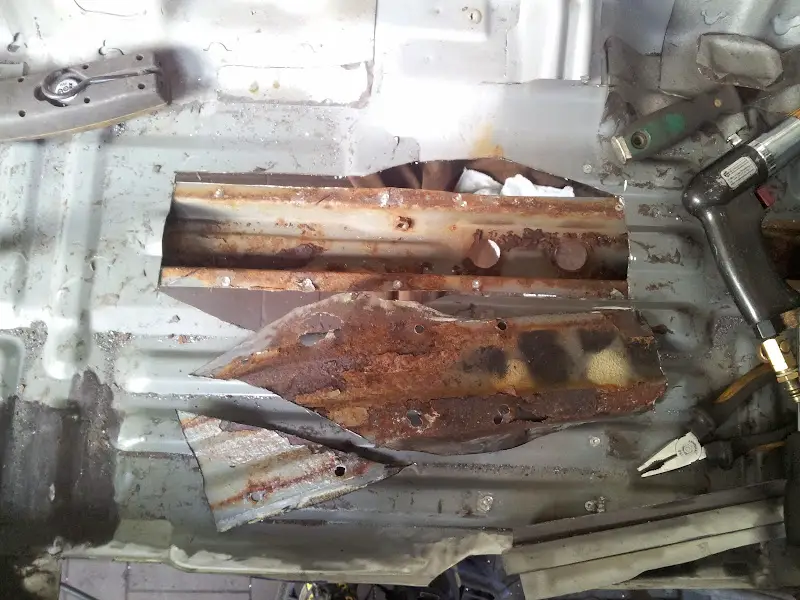
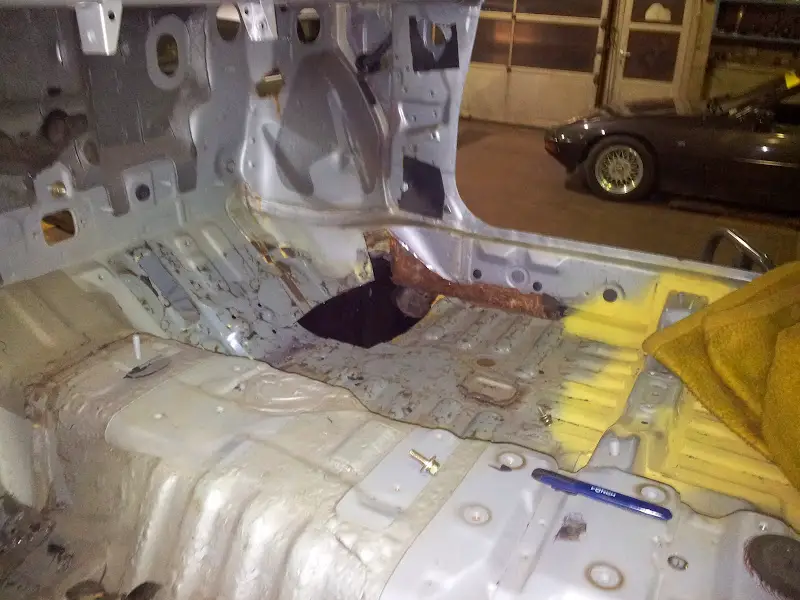
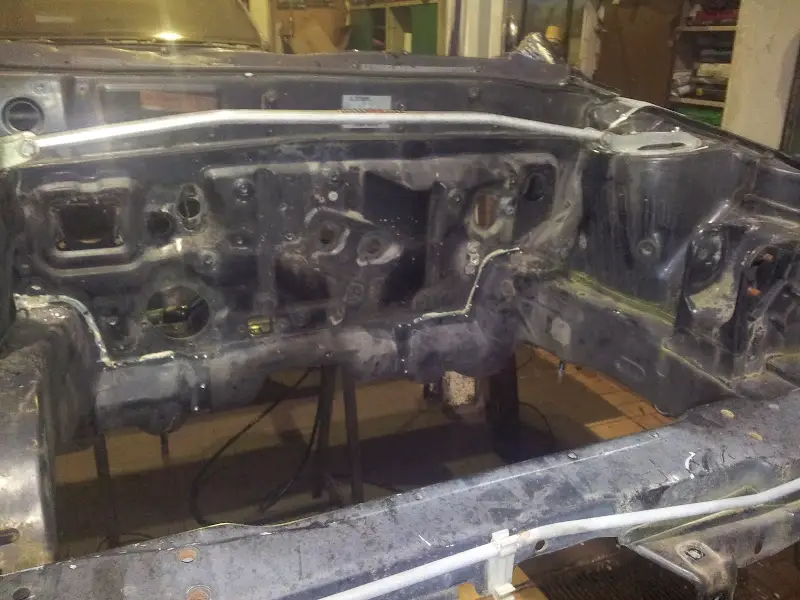
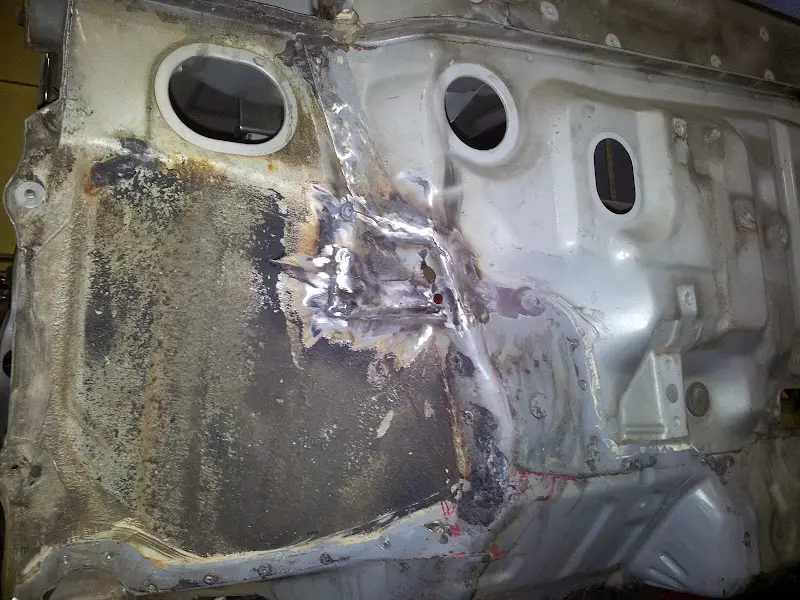
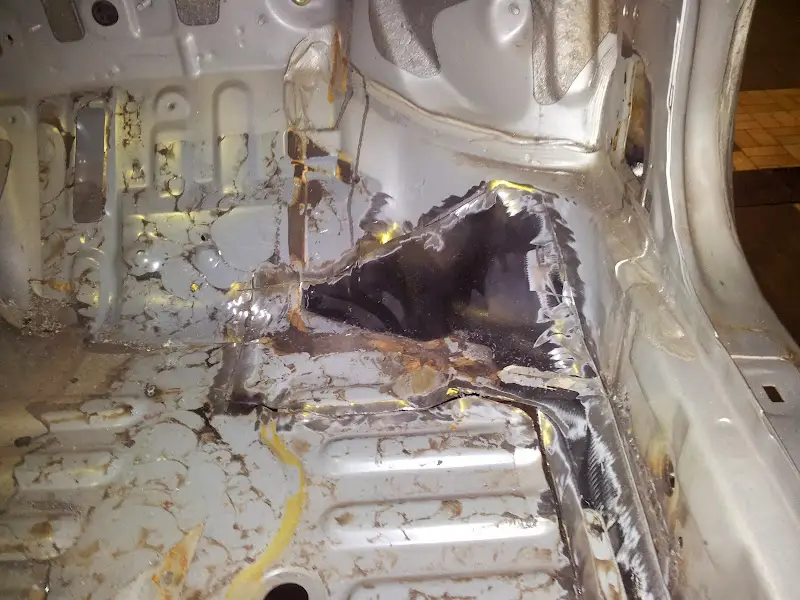
Separated the Front from the firewall plus cutting out some parts I want to restore on the A-pillar/wheel arch/side sill joint.
Seems like some rodent thought the crossmember would make a good home:
Seems like some rodent thought the crossmember would make a good home:
EgonOlsen
Well-known member
Jeez, when you take something apart, you are serious. /ubbthreads/images/graemlins/worthy.gif
Last edited:
4g63mightymax
Well-known member
Excellent work. Seeing this all go together (and come apart) is a breath of fresh air! Keep those pictures coming!
Oh, and what will you be coating all the interior metal with when you are done? Got a plan for that yet?
Oh, and what will you be coating all the interior metal with when you are done? Got a plan for that yet?
Last edited:
r4pt0x
Well-known member
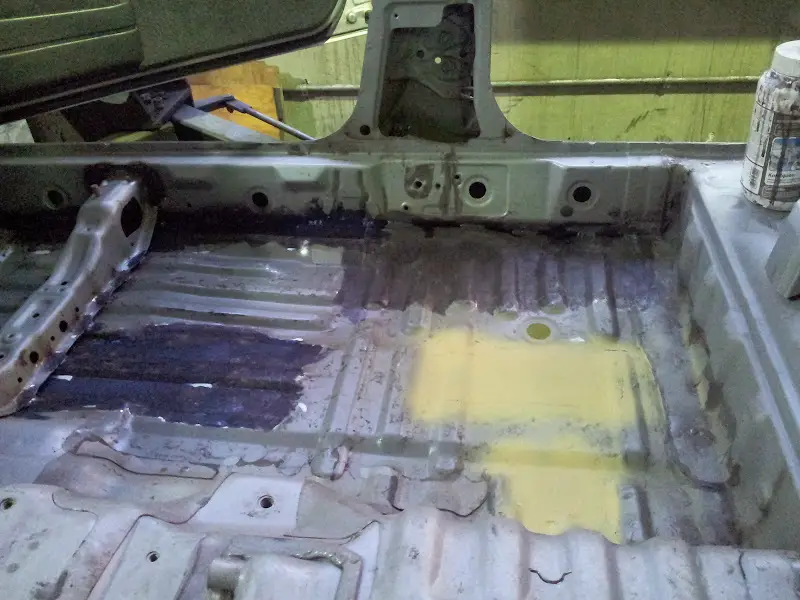
I'll use chassis paint based on owatrol oil for the engine compartment, floor panels (both silver) and all front/rear axle parts (black). The rear axle already got painted with pure owatrol oil which inhibits all light rust and gives an epoxy-like coating which can be painted. The paint is quite thick and flexible, giving good protection and a nice clean look.
Also the wheel arches will be painted in multiple layers of this paint with special primer, so I only have to use some wax-based underbody-protection which looks much cleaner. This also allows for easy inspection for eventually growing new rust (scratches, stone chips, etc...) - standard underbody-coating only covers anything going on underneath and falls off when it's already too late and the damage is done...
All cavities will be treated with fluid film liq A and after a few months when fluid film reached every last fold I'll apply a final coating with mike sanders wax.
owatrol and fluid film are used for water ballast tanks on ships or containers for derusting and protection against seawater - really great stuff and approved to work under harshest conditions...
Fenders, boot lid and the left side panel will be painted at the paintshop - I want it to look good and match the rest of the car, so i'm not doing any experiments by painting it myself without the necessary equipment...
r4pt0x
Well-known member
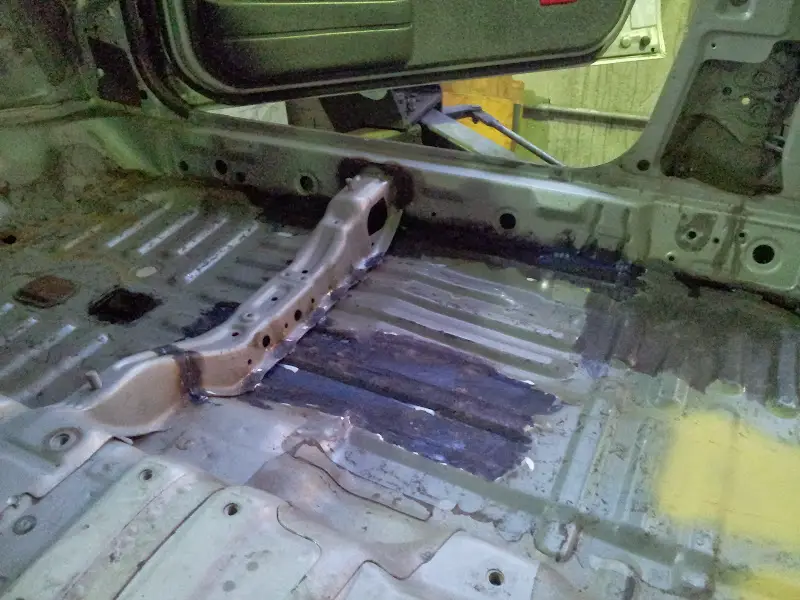
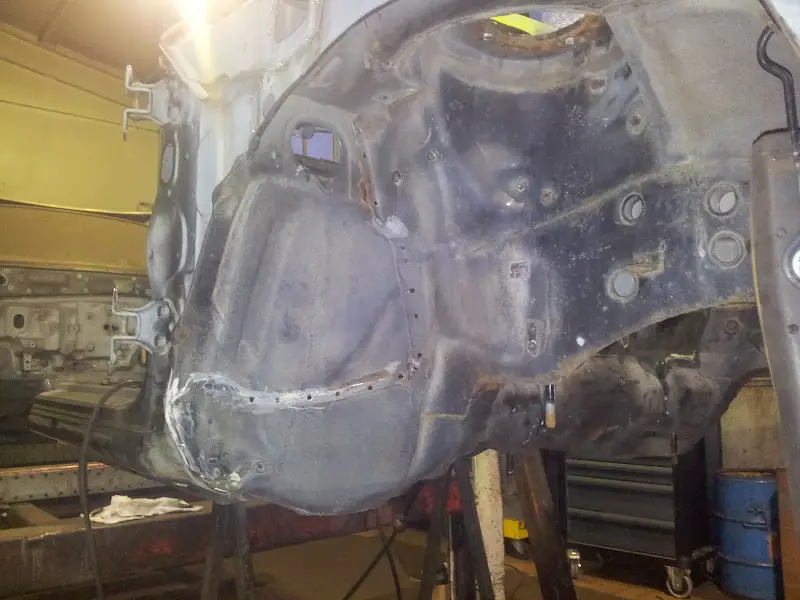
Yesterday I rebuilt both side sills at the front and replaced some rusty parts within the firewall/wheel wells:
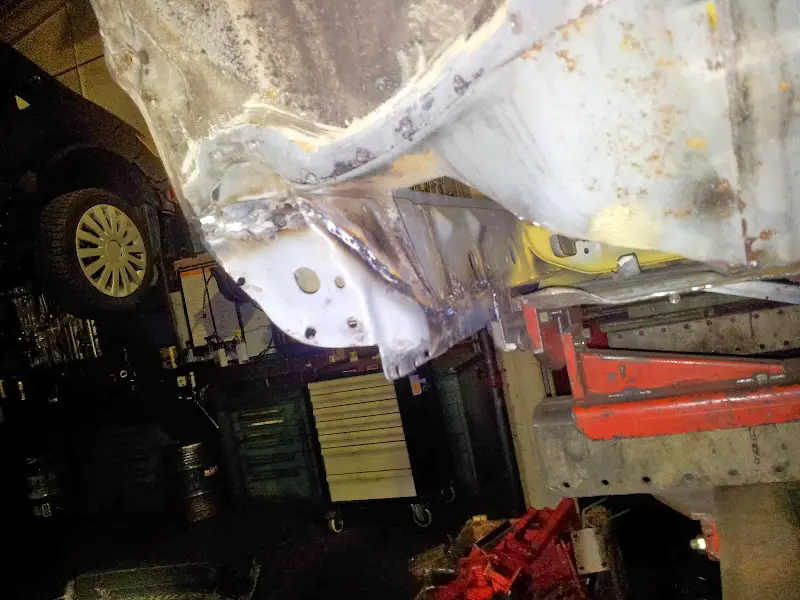

And today I fitted the "new" front. Was quite tricky to get the whole part to fit as I left both floor panel pieces on the structure:
It took ~3 hours to fit in and matching all important measurements. The car bench tools matched almost perfectly on the first try, but the upper crossmembers were a little bit off. But at the end I got a perfect fit with only 1mm error in the diagonal measurement but dead on for the longitudal ones.
Both sides are already welded on the upper and lower crossmembers. On the left side I finished welding from the outside, the rest will be done during the week after work...
Last edited:
r4pt0x
Well-known member
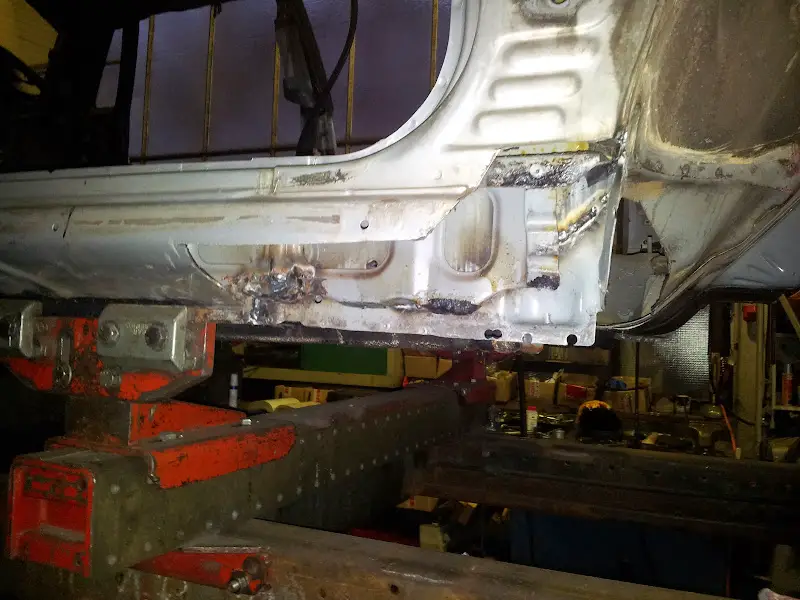
I finally finished welding today except the left outer part of the side sill - I spent 3 hours to rebuild the right hand side to look completely smooth (well, looks quite ugly on the pictures due to the bad camera quality...) so I had to skip the left side today and will finish it sometimes after hours this week.
Starts to look like a car again /ubbthreads/images/graemlins/smile.gif
The tooling will be removed as soon as I finished the left side sill (don't want to risk any warpage now).
After 3 layers of primer the rear axle parts also got their first colour coating:
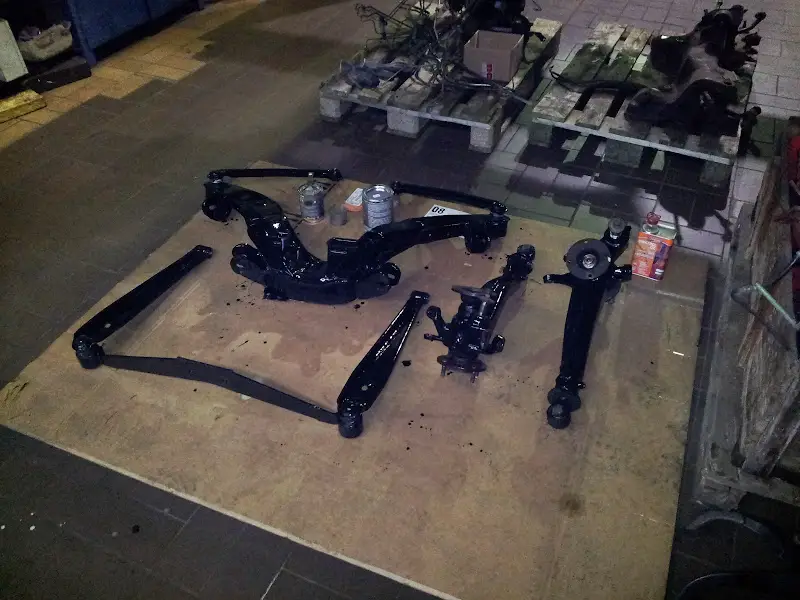
I'll add 1-2 more layers of paint during the week and start to paint the front axle parts as well as the engine compartment and the floor panels.
Starts to look like a car again /ubbthreads/images/graemlins/smile.gif
The tooling will be removed as soon as I finished the left side sill (don't want to risk any warpage now).
After 3 layers of primer the rear axle parts also got their first colour coating:
I'll add 1-2 more layers of paint during the week and start to paint the front axle parts as well as the engine compartment and the floor panels.
GSTwithPSI
Well-known member
That's some serious restoration work. Do you work in the shop pictured? Just curious as to how you have access to all that cool equipment. Looking good!
r4pt0x
Well-known member
Yes, I'm working at that shop as a mechanic and luckily I can use the workshop after hours or on weekends for my own cars. Otherwise all this would be way beyond my budget /ubbthreads/images/graemlins/wink.gif
