The Top Mitsubishi Galant VR-4 Resource

Join the best E39A 1991-1992 Mitsubishi Galant VR-4 community and document your GVR4 journey.

  • Software Upgraded - Reset Your Password to Login
    In order to log in after the forum software change, you need to reset your password. If you don't have access to the email address you used to register your GVR4.org account, you won't be able to reset your password. In that case, follow the instructions here to regain access to the forum.

Another AWS line removal Q with pics

TWEAKD4

Well-known member
Joined
Mar 24, 2002
Messages
605
Location
Fort Wayne, IN
I have searched through about every post on this and I just wanted to make sure. I wanted to make sure I do this right and this may help others.

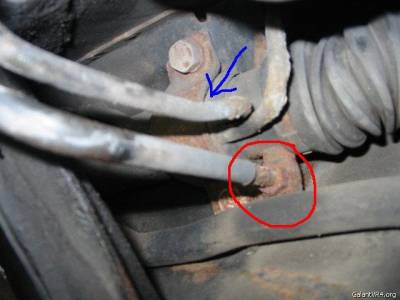
This pic is the same as the AWS removal/4 bolt install under the how to section. The circled red line gets replaced with a oil pan plug. This is one of the two high pressure lines and this pic can only be seen if you remove the plate under the trans. The blue arrow is the 2nd high pressure line that runs through rubber along the front rack to the drivers side.

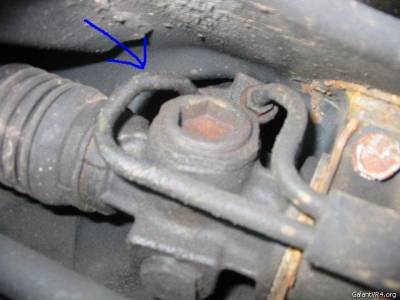
This is where it meets the rack on the drivers side. The blue circle is the same blue line above. It wasn't covered in anything that I have read but I assume this also needs blocked off with a oil pan plug. Very little room here. It won't be fun to remove this line.

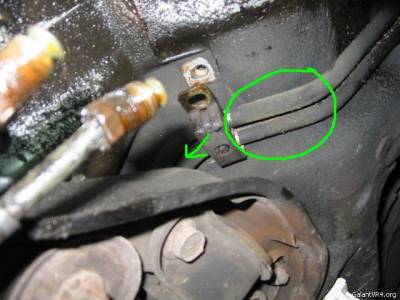
These are the two low pressure lines. They run over the front control arm and I can't see where they go. I belive they go to the PS reservoir. I will have to try to find where they go to block off. Does anyone know which of the many lines at the reservoir need plugged? I have a TEL reservoir that I was going to swap but I have read that the idiot light won't work with it.

I found a good post on welding the lines if you don't use the oil pan plug from Rob at Mofugas HERE. I always thought you just bend over the lines where you cut them off and weld them.
 
Last edited:

chucklesas

Well-known member
Joined
Feb 14, 2003
Messages
1,895
Location
Dayton, OH
The 2 lines circled in green come up next to the windshield washer bottle, then loop around the engine bay and come in at the bottom of the reservior.
 

Hertz

Staff member
Joined
Jul 29, 2002
Messages
13,501
Location
Chicago, IL
Quote:
if you don't use the oil pan plug from Rob at Mofugas


Mofugas closed a few years ago, but I'm sure there are other sources. /ubbthreads/images/graemlins/smile.gif
 

TWEAKD4

Well-known member
Joined
Mar 24, 2002
Messages
605
Location
Fort Wayne, IN
I know they closed but I should have phrased that better. It should read "if you don't use an oil pan plug try this method in this post by Rob at Mofugas."

Is the driver's side line correct that needs plugged as well? Just want to make sure.
 

Muskrat

Well-known member
Joined
Jun 13, 2004
Messages
2,107
Location
Lexington, KY
You need to plug BOTH high pressure lines. When I did I could only plug one with a oil pan plug, the other I just cut and had welded shut.

You need to either plug or loop the 2 lines that go to the reserviour, or replace it with a tel. I looped them so I don't know about the idiot light not working if you replace it.
 

atc250r

Staff member
Joined
Sep 11, 2003
Messages
13,235
Location
Orange County, NY
If you replace it with a TEL reservoir the idiot light will not work becuase the cap from the GVR4 is what makes it work. The GVR4 cap will not fit the TEL reservoir so therefore the light won't work. It may work if you get a regular Galant one but I don't know.

John
 

Ian M

Well-known member
Joined
Jan 11, 2002
Messages
2,348
Location
Martinsburg,WV
You can block the drivers side line at the "T" thats in the center of the rack. There is a short line going to the "T",just block the port coming out. Its way easier to get to. Plug that,and the outlet on the passenger side.

Some folks have mentioned having to cut the drain plugs to keep them from bottoming out before sealing. I didnt have to,but the plugs I used are aftermarket replacements I got from work,and they may have possibly been shorter.
 
Last edited:

TWEAKD4

Well-known member
Joined
Mar 24, 2002
Messages
605
Location
Fort Wayne, IN
Well for the archives I finished blocking everything off. Boy everyone is right this is a mess. I couldn't believe just how many lines it took to run the AWS system. I used new oil pan bolts from NAPA part #704-1920 to plug the two high pressure lines. I plugged this at the T described by Ian in the post above. It is right under the transfer case near the yoke.
img.jpg

The low pressure lines ran up into the engine bay under the washer reservoir bottle, under the air box/battery. They ran under the radiator to the PS reservoir. I couldn't just loop the lines there because the were two different sizes. My solution was to crush the unused outlets, weld them shut and for good measure put JB weld on the ends if there were any pin holes. I repainted it and here it is now.
img.jpg

Thanks for all the input and I hope this will help someone else when they go to pull the AWS lines.
 
Last edited:
Support Vendors who Support the GVR-4 Community
Boosted Fabrication ECM Tuning ExtremePSI Fuel Injector Clinic Jacks Transmissions JNZ Tuning Kiggly Racing Morrison Fabrications RixRacing RockAuto RTM Racing STM Tuned

Recent Forum Posts

Top