The Top Mitsubishi Galant VR-4 Resource

Join the best E39A 1991-1992 Mitsubishi Galant VR-4 community and document your GVR4 journey.

  • Software Upgraded - Reset Your Password to Login
    In order to log in after the forum software change, you need to reset your password. If you don't have access to the email address you used to register your GVR4.org account, you won't be able to reset your password. In that case, follow the instructions here to regain access to the forum.

EVO VIII suspension, Chapter II

Scott Y

Well-known member
Joined
May 8, 2001
Messages
482
Location
Lakewood, Colorado, USA
Here's a bunch of pics from the install. Pivvay and myself did the work, he welded the rear mount, made the front brackets, and provided a pair of hands. I have more pics if you want, just let me know.

Subjective rating of the suspension: awesome! The car is night and day different than the stock suspension with 155K on it. It didn't turn the Galant into a Z06, but I still have the 195/60/15 tires and stock swaybars/bushings. The BF Traction TAs have a sidewall made of silly putty and with the EVO suspension installed I have wear marks down over 1/2 the sidewall of the front tires. Turn-in seems quicker, braking seems steadier, and I can now drive the car over 80 mph without feeling like I'm taking my life in my hands. If I add a rear swaybar and decent tires then I'm sure the handling will take another leap upwards.

What I would do differently next time:
1. look into using EVO front mounting bolts, as they are probably longer than the Galant ones, because of the increased space between the strut ears.
2. tack the brake line mounting brackets to the EVO struts instead of using velcro
3. take some before/after pics of the car's leaning behavior in turns.


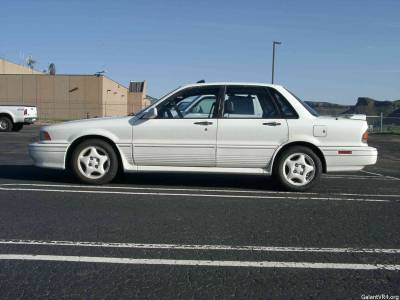
Below is the finished product, EVO VIII front and rear springs/struts installed:


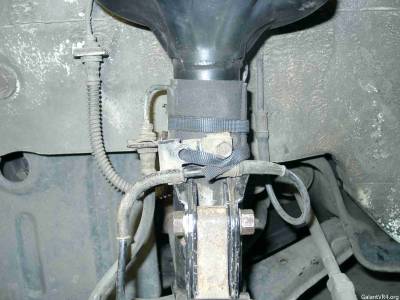
First up was the rears. I gave Pivvay a set of junk rear 1G struts and he welded the bottom mount to the EVO struts:


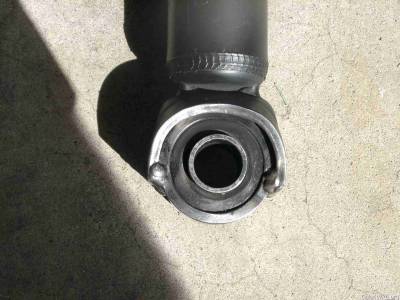
We installed the EVO strut as a unit, and didn't use any parts of the original GVR4 strut.
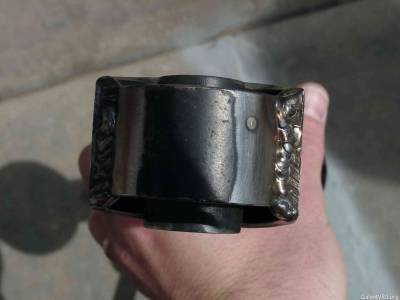
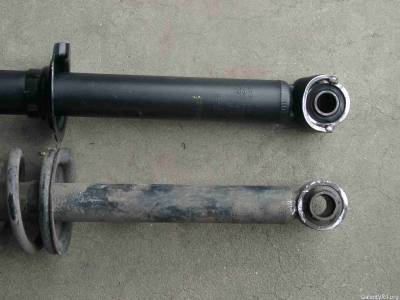
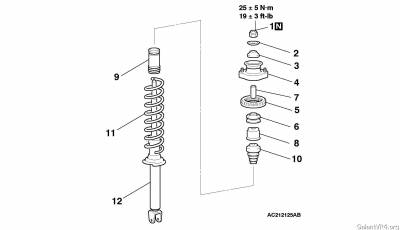
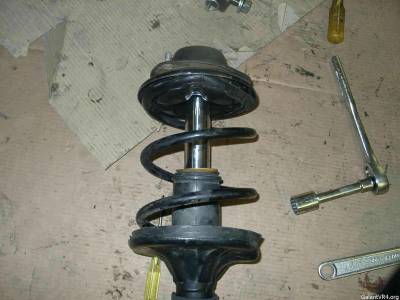
We had to use a pickle fork to release the driver's side strut from the rear mount, but otherwise it was a clean install. In case you receive your EVO rear struts disassembled, here is what the strut goes together like:


I took care of the rear brake line by:
1. wrapping some thin foam with super sticky adhesive on the back of it around the strut, then using an industrial-grade velcro strip to wrap around the strut and hold the brake line mount in place. It hasn't budged in over 100 miles, and looks to be secure. Of all the pics I have, I don't have a pic of this.

Off to the fronts! First, we installed the unmodified front strut and the ride height was over an inch higher than stock, with crazy positive camber:


So to fix that we cut a coil off the fronts:


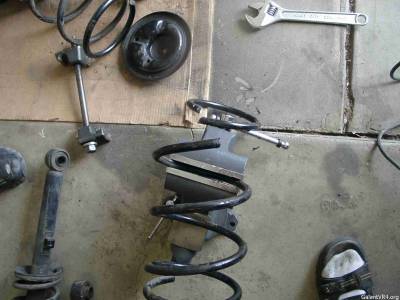
When the front strut was put together, the cut spring would not sit correctly in the top hat, and it seemed like it was trying to escape out of the hat toward the fenderwell. The outside edge of the spring might have been outside of the diameter of the hat to rub against the inner fenderwell when the strut compressed as well. To fix this, I rotated the spring 45 degrees counterclockwise, so that the top coil was pressing against the center of the top hat and had nowhere to go. This meant that the bottom coil was not sitting in its 'designated' spot, but it hasn't budged an inch since it was installed on the car, and I've hit some pretty serious bumps and had the car raised in the air on jackstands to see if I could move the coil around.


I used the same velcro/foam solution to mount the brake lines on the front struts:


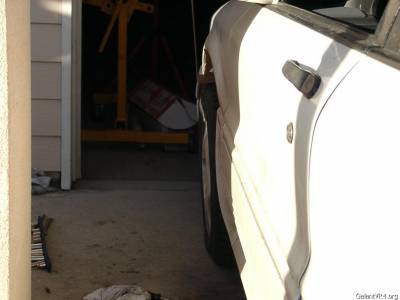
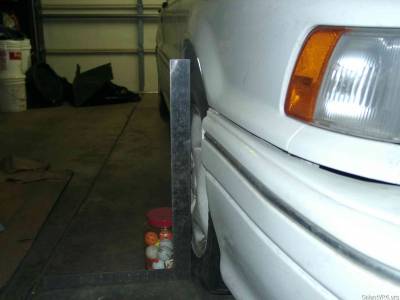
Cutting the front coil removed the positive camber. also, because the bolt holes are bigger on the EVO struts than the GVR4, we were able to pull the bottom bolt hole away from the car, and push the top bolt hole towards the car to generate some neg. camber. I used what I thought were hardened washers, but I could see the washers compress a bit when I tightened everything down so I am going to replace them. Here's the camber, with the cut EVO front strut installed; it's hard to tell in the pic, but the bottom of the square was up against the tire, and there was space between the top of the tire and the square:


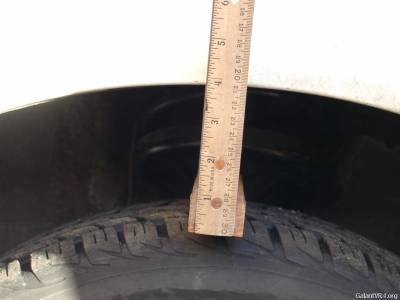
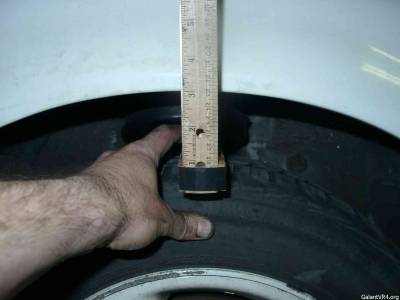
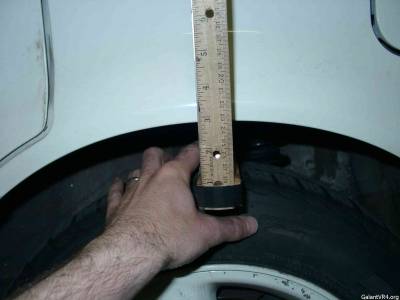
Here's the ride heights, after the install. Stock was front: 2 7/8", rear: 2 3/4"
EVO front:


EVO rear:
 

Scott Y

Well-known member
Joined
May 8, 2001
Messages
482
Location
Lakewood, Colorado, USA
Update:
Still love the EVO suspension. After 3000 miles, I finally had a day off and was able to get a wheel alignment. The EVO fronts added an inch of toe-in, and the outside shoulders of the front tires were showing it. The front camber is fine as well. The rears needed no adjustment.

Everything is lined up and working just fine, I'm very glad I did this mod.

-Scott Y
 

Hertz

Staff member
Joined
Jul 29, 2002
Messages
13,501
Location
Chicago, IL
Quoting Scott from another thread:
Quote:

Here's what I would do differently if I had to do it again:
I would seat the spring in the bottom hat and note it's orientation. Assuming the outward facing (wheel side) side of the strut is at 12 o'clock, I would only cut the coil in that plane. I didn't note exactly how the coil sat in the bottom hat when I cut mine, and I had to rotate the cut coil so that the uppermost coil would rest on the center portion of the strut and could not move inward toward the car as the strut compressed. Because the cut coil will not sit in the groove machined in the top hat, there wasn't enough to hold the spring in securely. With the spring rotated, it doesn't sit in the exact correct machined groove in the bottom hat. It also has not budged a millimeter in the nearly 5K miles that I've put on the suspension. I've the car car lifted a bunch of times and the coils do not move at all so I have no concerns that it's unsafe. I tried to take pics of all this and am having a hard time describing it in text. If you need further clarification let me know.


If this comment isn't appreciated feel free to delete/move it.

If one were to do the Evo 8 swap, instead of cutting the stock evo springs couldn't you get lowering springs for the Evo8 that will lower the ride height the appropriate amount to bring the Galant back to stock? I imagine that cutting the spring had a detrimental effect on ride quality (however for cost effectiveness it is excellent).
 

Evo 8 lowering springs will work great, I'm using Espelir for the Evo 8 all the way around. Cut Evo 8 front springs are not as bad as you may think. I had them before I switched to the Espelirs. The Evo 8 oem springs are cheap & can't be beat.
 

GVR4ZUM

Well-known member
Joined
Jul 8, 2002
Messages
1,455
Location
SoCal, USA
Can somebody please provide the measurement for the spacers. If you don't mind just fill in the measurements on the image. Also do these spacers have to be rounded on two corners?
Thank you very much.
 

Jeremy if you cut the ears off the old struts they will work just fine as well.
 

GVR4ZUM

Well-known member
Joined
Jul 8, 2002
Messages
1,455
Location
SoCal, USA
Thanks Garfield but I didn't have the fronts off yet, I wanted to have them before the install to save time too.
Ok, here are the measurements for the spacers. I also had my buddy cut the mounting for the brake lines off the old rear struts and had them welded on hose clamps. Or you can just buy Garfield's VR4 to EVO suspension SS brake lines.
Link
For the fronts, just a 1\2" long threaded rod (M6 or M8)welded on the hose clamp.
I should have done this mod a long time ago, I feel like I missed out. So, if you can't afford Teins, Hotbits and other pricey coilovers, these are real good options.


Thank you.
 

ktmrider

Well-known member
Joined
Sep 10, 2007
Messages
3,128
Location
Tempe, AZ
I happened to find out today that rear strut spacers made for the 02-07 Subaru Legacy fit EXACTLY onto the GVR4/TEL tophats.

They call them "saggy butt spacers" as the Leggies have a habit of reverse-stinkbuging after awhile.

Here is the link to them: click

They would be perfect for adjusting the rear end height on the G ride when using the EVO suspension bits.
 

Whoodoo

Well-known member
Joined
Jul 11, 2009
Messages
927
Location
Binghamton, NY
I have been toying with evo suspension lately as well. I just wanted to add to this thread that my ride height in the rear was almost exactly the same as scott's, but the front sat a bit higher. In order to get it down, I cut 1 1/5 coil front the *bottom* of the spring. Rotating the spring 45 degrees counterclockwise also helped keep it seated. Perhaps cutting the bottom of the spring reduced the amount of drop I got because the lower spring perch ramps up, giving the entire spring less coils to support weight with. However, I would still like it to be a touch lower, but cutting as much as I did is nearly the limit these springs can do.
 

4thStroke

Well-known member
Joined
Oct 22, 2007
Messages
1,864
Location
Vancouver, WA
Instead of adding spacers to both sides of the lower strut mounts, you can make one thick spacer and position it on the front side of the strut. This will add positive caster, which is what some people are after.

Anyone see an issue with this?

*Edited for grammar
 
Last edited:

toybreaker

iconoclast
Joined
Apr 30, 2006
Messages
3,581
Spencer,

That's an interesting idea! /ubbthreads/images/graemlins/smile.gif

A little more positive caster really helps these cars.

I'm not so sure that putting the spacer in the front is what we want to do though ...

Caster is the angle formed between the top and bottom steering pivots. This is generally the top and bottom ball joints of a double "a" arm system, or in the case of our mcpherson suspension, it is the angle from the ball joint center and the upper strut mount.

Positive caster on our cars is when the center of the strut top is located behind the center of the ball joint in the control arm.

Now, I may be wrong, but wouldn't putting the shim in the front of the strut force the knuckle and withit the lower balljoint backwards (towards the rear of the car?)

In my feeble understanding of the layout of our cars, wouldn't that decrease positive caster?

I would think that putting the spacer behind the knuckle would force the knuckle/lower balljoint forward, and that would fullfill the goal of increasing positive caster.

At any rate, you've asked an intriguing question, and hopefully, one of our suspension guru's will be along to answer both our questions.

Thanks for your contribution, and hopefully we can all learn something from an authority on the subject. /ubbthreads/images/graemlins/smile.gif
 
Last edited:

belize1334

Well-known member
Joined
Nov 18, 2003
Messages
3,316
Location
Bozeman, MT
Quote:

Now, I may be wrong, but wouldn't putting the shim in the front of the strut force the knuckle and withit the lower balljoint backwards (towards the rear of the car?)


The lower balljoint will remain fixed since it's position is dictated by the lower control arm. Putting the spacer on the front of the knuckle will tip the top of the knuckle back and swing the lower strut mount forward. For static suspension this is equivalent to moving the upper strut point backward and thereby increasing caster. But, since the upper and lower pivot points have not moved, the dynamic camber gains will be reduced at hard steering angles. The result is that it will have nice gains for turn-in but these will be reduced (relative to traditional caster geometry) as the wheel is turned farther toward full-lock. Still, it will never be worse than stock. I don't see a downside and I suspect that, in conjunction with whiteline caster bushings, the benefits would be considerable.
 

Whoodoo

Well-known member
Joined
Jul 11, 2009
Messages
927
Location
Binghamton, NY
It won't matter which side you put it in. Caster is the angle of the steering pivot axis. As you say, caster in a macpherson strut is determined by the strut top location and the lower ball joint. If both the strut top and lower ball joint don't move, then you haven't changed caster at all.

Edited out a completely wrong statement /ubbthreads/images/graemlins/smile.gif
 
Last edited:

Whoodoo

Well-known member
Joined
Jul 11, 2009
Messages
927
Location
Binghamton, NY
As the discussion about caster is being continued in the technical section, I would like to bring this thread back on to it's original subject.

One of the evo 8/9 struts I bought was completely trashed, so I had to cobble together some sort of combination of evo 8/9 and X parts for the front. With stock suspension up front, the evo 8/9 rear was very harsh. Having too soft of a suspension up front made the firmer rear suspension feel far too aggressive to the point of being uncomfortable. As my mom described it, "it made me jiggle a lot and I didn't like it."

After having bought a few parts from various places, I had an excess of suspension bits to play with.

I had:
2 evo X struts - good condition, only 5k miles
2 evo X springs - one of them was cut too much because I'm an idiot /ubbthreads/images/graemlins/uhh.gif
2 evo X top spring perches - I had already milled off the steel hat on top for using them with my camber plates

2 evo 8/9 struts - one was trash, the other was probably on it's way out too
4 evo 8/9 springs - all in good condition, so I could experiment with cutting coils
2 evo 8/9 top spring perches - I also milled off their steel hats

Please note that if you are not going to use camber plates, or the camber plates you are using need less clearance than mine, you don't need to mill anything off the top spring perches. I merely did this because my Ksport camber plates have a really beefy spherical bearing and I needed enough threads for the nut on top to grab onto.

In my post above, I knew I was only going to be able to use one strut, so I was merely trying to find a solution for the 8/9 strut that would get the ride height I was looking for as well as find the limit to how low you could make the spring go. If I wanted to find a long-term solution without spending any more money, I would have to use the evo X struts because they are the only ones that I had that would balance the rears.

So, what I finally ended up doing is this:

Due to the top of the evo X strut being different from the 8/9 (the shaft just underneath the threads is 17mm on the evo X strut, but 15mm on the 8/9), I could not use the evo 8/9 spring perch and spring on the X strut as is. In order to do this, I used a dremel to take the center hole in the 8/9 spring perch out a few millimeters so it would fit on the X strut. This allowed me to use 8/9 springs, which was good because I had a few extras and could experiment.

In my experimentation with all of the springs I had, I found some things that may be useful to others who want to do this swap.

First, I found the limits of what you can cut:

Evo 8/9 springs on 8/9 struts: just under 1 1/4 from the bottom was about as much as you can do.

Evo X springs on evo X struts: 3/4 from the bottom

Evo 8/9 springs on X struts (using 8/9 top spring perches) - I don't really know because I didn't want to deal with spring seating issues. If I had to guess, though it would be around 1 coil.

A few things I've learned about cutting evo springs and springs in general:

I found it best to cut from the bottom of the spring. The reason is because the bottom spring perch ramps up and allows for steeper angles of the coil while still holding it in place. The evo X top spring perch definitely needs the top coil intact. The top coil's radius reduces and the spring perch holds it in place on the inside. The evo 8/9 top spring perch holds the spring more from the outside, but because it is flat, it really needs the top coil to be flat as well. Cutting this coil will cause the spring to want to escape the perch because it is no longer being held in place from all around.

You cannot cut the spring too much because then there will be zero preload and it will not stay in place.

Preload does two things; keeps the spring encapsulated between the top and bottom perches, and determines ride height (to an extent). You need to have some preload on the spring or else, if the strut ever become unloaded, there will be nothing keeping the spring in place. This is bad. Don't do it. As for preload and ride height, it works like this. For every pound of preload you have, the weight of the car must counteract that before it will compress the spring. For example: If you have 500 pounds of preload and you also have 500 pounds of weight on that corner, then the suspension will not compress at all when the car is put on the ground. Now let's say the spring has a spring rate of 500 lb/in. If the corner weight were 1000 pounds instead of 500, then the suspension would compress 1 inch when set on the ground.

1000 lb of weight = 500 lb preload + (500 lb/in)(1 in of drop)

So, in order to have the lowest possible resting height while still keeping the spring seated, you must have at least a very small amount of preload.

This is why the evo 8/9 struts let you cut 1 1/4 coil off the 8/9 spring, but the X's only allow 3/4.

I'll conclude with a few words on the evo X struts with 8/9 springs

They ride beautifully. Only cutting 3/4 coil off the springs means the spring rate is very close to stock and it matches the 8/9 struts in the rear really well. From what I could tell, the X struts don't feel as aggressive as the 8/9's but the spring rates are identical, so this setup possibly has slightly better road manners that 8/9's all around. It does, however still have ride height issues. The 8/9 struts/springs in back sit pretty low while the fronts are close to stock. The only way of remedying this that I can tell is to get progressive springs for the front that have very little preload. You'll need progressive springs because having 200 lb/in springs with zero preload on evo X struts doesn't get the car low enough. You need to have a very low initial spring rate in order for the suspension to compress enough.

I think my game plan now is to get some saggy butt spacers for the rear to even out the stance and later down the road I'll solve this whole issue with making some coilovers. Until then, free evo rear suspension plus inexpensive evo X front struts is an excellent solution. You could ignore all my work getting the 8/9 springs on the X struts if you stick to the 3/4 coil maximum for the X springs.

Once again, I endorse this modification times a million. Best suspension for the money, easy to do, and there is a definite road map for what works and what doesn't. If you have any questions, feel free to ask. I think I should have all this stuff figured out by now /ubbthreads/images/graemlins/grin.gif
 
Support Vendors who Support the GVR-4 Community
Boosted Fabrication ECM Tuning ExtremePSI Fuel Injector Clinic Jacks Transmissions JNZ Tuning Kiggly Racing Morrison Fabrications RixRacing RockAuto RTM Racing STM Tuned

Recent Forum Posts

Top