Im surprised no one has done a write up on this, and I thought It was goin to be a bit more tough than it was, its quite easy.. It just smells a bit when burning the bushings /ubbthreads/images/graemlins/wink.gif
I did the install with the rear subframe on the ground while I was installing my 4bolt rear/eliminating 4ws but It can be done w/ the subframe still in the car, just not as much room..
You can get the Whiteline Rear Camber Kit directly from Whiteline..
http://www.whiteline.com.au/store/
Click on pictures for larger images
Tools needed..
-1/2 drive ratchet
-22mm 1/2 drive socket
-22mm open end wrench
-Breaker Bar (This is key!)
-Rubber Mallet
-PB blaster
-Torch of some kind (I used a propane torch)
-Metal pan (to catch melted bushings)
-Wire brush
-Rear Camber Kit: 4 bushings (2 for each side), 2 metal 'innards' and included lube
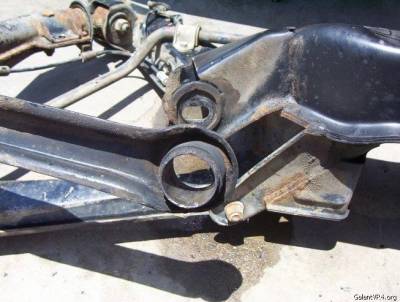
1. Soak bolt/nut w/ PB blaster..
2. Take the 22mm open end wrench to the nut on the end of the upper-inner control arm, and the 22mm socket w/ breaker bar to the opposing side and break loose.
3. Take the rubber mallet and hit the bolt out, the upper control arm should then fall.
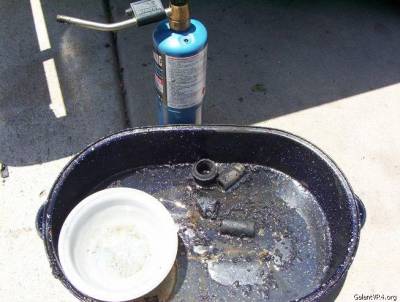
4. Get the torch ready, as well as the metal pan.
5a. Heat each side of the bushing directly for ~5 minutes. Take a 14mm socket w/ an extension, place it on the metal innards (metal inside the bushing) and hit hard w/ mallet until it pops out. Take a flathead screwdriver and scrape bushing out.
5b. (either one above or this one) Heat the bushing until catches fire and let burn (watching CLOSEFULLY w/ water on hand) until the metal practically falls out itself, along with the bushing.
-Trash the old bushing/innard..
I used method 5a. for the top bushing in the pan, and the 5b. method for the lower one
6. Torch the inside of the end of the upper control arm and scrape clean w/ a wire brush for ease of new bushing install..
7. Lube up both bushings (for one side) inside and out, install into end of arm.
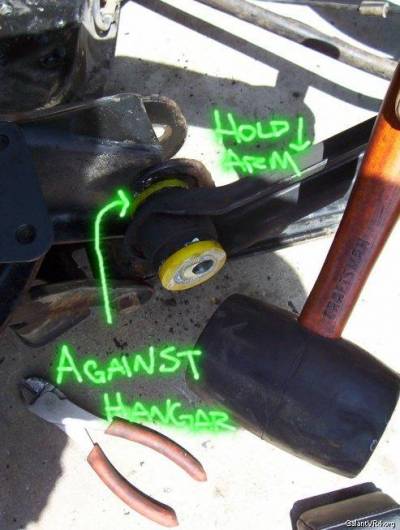
8. Lube up metal NEW metal innard. On the drivers side, push the metal innard w/ offset hole at 9oclock (passenger side at 3oclock) by hand til it hits the second bushing.
9. Place the control arm end against/on the outside of the hangar it bolts to. Pull the control arm tight and hit the metal innard w/ the rubber mallet until it goes all the way through..
10. Pull control arm back up into hangar from the bottom up, install bolt, nuts and hand tighten.
11. Take 22mm open end and 22mm socket and make sure you hold the nut in place or the arms will move where you dont want them to, tighten them.
/ubbthreads/images/graemlins/grin.gif /ubbthreads/images/graemlins/grin.gif You're done!
To adjust camber..
Jack up car, Loosen 22mm nut, then take 22mm socket on opposing side and either tighten/loosen til you get the desired amount of camber you want. Then re-tighten nut.
Whiteline kit installed:
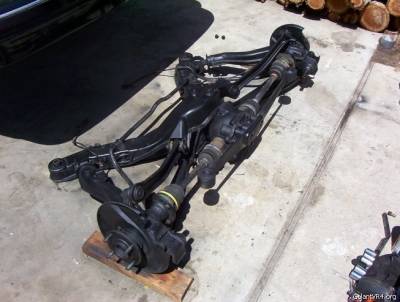
/ubbthreads/images/graemlins/wink.gif Have fun!
I did the install with the rear subframe on the ground while I was installing my 4bolt rear/eliminating 4ws but It can be done w/ the subframe still in the car, just not as much room..
You can get the Whiteline Rear Camber Kit directly from Whiteline..
http://www.whiteline.com.au/store/
Click on pictures for larger images
Tools needed..
-1/2 drive ratchet
-22mm 1/2 drive socket
-22mm open end wrench
-Breaker Bar (This is key!)
-Rubber Mallet
-PB blaster
-Torch of some kind (I used a propane torch)
-Metal pan (to catch melted bushings)
-Wire brush
-Rear Camber Kit: 4 bushings (2 for each side), 2 metal 'innards' and included lube
1. Soak bolt/nut w/ PB blaster..
2. Take the 22mm open end wrench to the nut on the end of the upper-inner control arm, and the 22mm socket w/ breaker bar to the opposing side and break loose.
3. Take the rubber mallet and hit the bolt out, the upper control arm should then fall.
4. Get the torch ready, as well as the metal pan.
5a. Heat each side of the bushing directly for ~5 minutes. Take a 14mm socket w/ an extension, place it on the metal innards (metal inside the bushing) and hit hard w/ mallet until it pops out. Take a flathead screwdriver and scrape bushing out.
5b. (either one above or this one) Heat the bushing until catches fire and let burn (watching CLOSEFULLY w/ water on hand) until the metal practically falls out itself, along with the bushing.
-Trash the old bushing/innard..
I used method 5a. for the top bushing in the pan, and the 5b. method for the lower one
6. Torch the inside of the end of the upper control arm and scrape clean w/ a wire brush for ease of new bushing install..
7. Lube up both bushings (for one side) inside and out, install into end of arm.
8. Lube up metal NEW metal innard. On the drivers side, push the metal innard w/ offset hole at 9oclock (passenger side at 3oclock) by hand til it hits the second bushing.
9. Place the control arm end against/on the outside of the hangar it bolts to. Pull the control arm tight and hit the metal innard w/ the rubber mallet until it goes all the way through..
10. Pull control arm back up into hangar from the bottom up, install bolt, nuts and hand tighten.
11. Take 22mm open end and 22mm socket and make sure you hold the nut in place or the arms will move where you dont want them to, tighten them.
/ubbthreads/images/graemlins/grin.gif /ubbthreads/images/graemlins/grin.gif You're done!
To adjust camber..
Jack up car, Loosen 22mm nut, then take 22mm socket on opposing side and either tighten/loosen til you get the desired amount of camber you want. Then re-tighten nut.
Whiteline kit installed:
/ubbthreads/images/graemlins/wink.gif Have fun!
Last edited by a moderator:
