The Top Mitsubishi Galant VR-4 Resource

Join the best E39A 1991-1992 Mitsubishi Galant VR-4 community and document your GVR4 journey. Login to browse without most ads.

Screw FIAV (mostly for archives)

keywords: FIAV, high idle, idle surge

The Colt is finally running again! Yet another car fixed by eliminating that piece of crap FIAV. No more retarded 2k rpm startup idle, much less the "broke at the track" 3500RPM idle I was getting. The car started right up this morning, high idle gone and no idle surge to boot.

JB Welded a dime over that biotch internally, gutted the rest and kept this ISC this time to see what it would be like.
 

steve

Well-known member
Joined
Sep 11, 2003
Messages
18,898
Location
NJ
How long does it take for a n00ber to install your blockoff plate, Chris?
 

probably not long at all, but I know the hardest part for me before was trying to get the screws out that hold the bottom half on without stripping them...they are a pita sometimes. I'm still debating whether to try this or not... /ubbthreads/images/graemlins/confused.gif
 

14u2nV

Well-known member
Joined
Jul 22, 2004
Messages
9,398
Location
Agency/St. Joe, MO
It only takes like 5-10 min to get the t/b out and cleaned up, then another 10-30 to get the flippin bolts out, then five to put it together, and 5-10 to put it back on. /ubbthreads/images/graemlins/grin.gif
 

Honestly I'd plan on an hour to install figuring that you are going to have a tough time with a couple screws. If you have an impact screwdriver with the right bit you'll be smooth sailing. It's an easy task once the throttle body is off. Plus it's totally reversable. Don't like it? Put it back to stock.
 

Quote:
If you have an impact screwdriver with the right bit you'll be smooth sailing.


+1 Get the impact! Anything else and you take a BIG chance of messing the heads up.
 

Barnes

Well-known member
Joined
Feb 9, 2003
Messages
6,249
Location
Richland, WA
All you need is an electric drill with a clutch. Just set it just below the point where it might strip the screw heads, and let the clutch action act like an impact driver. Worked like a charm for me.
 

steve

Well-known member
Joined
Sep 11, 2003
Messages
18,898
Location
NJ
Good info, electric drill with a clutch I do have. My idle is getting stupid so I'm gonna give this a try.
 

I use the drill method too. I will stand over the TB with it lodged between my feet, and I bear down with weight on the drill, torque set just below "strip threshold", and it works every time, never stripped one out.
 

Heh...I have broken a few flathead screwdriver bits that way howard /ubbthreads/images/graemlins/smile.gif
 

steve

Well-known member
Joined
Sep 11, 2003
Messages
18,898
Location
NJ
Anything else needed when putting this back together with the blockoff plate (gaskets, etc)?
 
Last edited by a moderator:

Just a little RTV. There is already a little rubber gasket stock so I just used some RTV to make sure it was sealed.
 

Good luck with with the clutch drill.It takes some practice to figure out where to set it and even by then the philips shape has turned into a round mess.
The back up plan is to get a dremel bit with a cut off wheel and make the screw a flat head.I had to do that to 2 screws.I thought I had the right sized bit for the first 3 but the last ones frigged me.


Over and out
 

This is an old thread but you don't need an impact driver or a clutch drill. The best way to get those pesky philips bolts off, is to use a 3/8ths drive #2 philips head, a 3/8th extension and use a hammer and HAMMER the philips driver into the bolts. Then place the rachet on, press down and twist to the left. Done and about 30 seconds per bolt.
 

DR1665

Well-known member
Joined
Oct 19, 2005
Messages
4,643
Location
Iowa City, IA
11.14.2011: Update for added clarification

I came across this thread (and a couple others in the How To section) on doing the FIAV/ISC delete. I felt I had enough information to do the mod, but not really enough to be confident with the results. So I'm updating this thread to share some additional thoughts and observations.

Before You Start
You will probably want to pick up a new TB gasket kit from the local parts store. Barring multiple trips to the store and trouble separating the TB, this is pretty much a 90 minute job if you take your time. You don't need to remove the intake, fuel rail, or anything complicated.

Separating the TB sections
As mentioned above, there are many ways to do this, but the impact driver is by far the easiest if you've got it. Getting those 5 screws out is the hardest part of the whole process.

The Block-off Process
You can buy a pre-made block-off plate, which allows you to leave the FIAV/ISC housing OFF the TB, or you can simply cut a blank gasket out of bulk gasket material you have around the garage. Hell, a playing card might even do the trick. The TB should not see temperatures of the sort that would require a metal gasket.

Once you've got the TB split apart, trace the outline of the FIAV/ISC side onto your gasket material, cut it out, then put it in place in your hand and pierce the bolt holes with a Philips screwdriver. Run your bolts through the FIAV/ISC side and then through the holes you started. This will hold the gasket in place as you bolt things back together. Might not matter, but I started by snugging the center bolt, then worked opposite corners sung, before tightening from the middle out.

Avoid CEL
If you are using a spare TB or have done anything with the TPS, adjust it before you re-install everything. Simply connect the TPS, set it on the intake manifold, turn the key to the ACC position and pull up the DRB info with your logger. Basically, you're looking for 100% TPS when you hold the TB WOT, which translates to 10-11% when closed.

I only mention this as I swapped a known good TPS from one TB to another as part of this process. The car ran fine, but I would get a CEL any time I took my foot off the gas and the RPMs dropped to around 1000 or so.

Setting Idle via BISS
Once you have everything adjusted and back together, test fire the car, bearing in mind you will probably have to crack the throttle a bit to keep it running. I found the best way to do this without risk of over-revving a cold engine is to get the gas pedal where you want it (just takes a little bit) before bumping the starter. You're gonna have to hold it there for a good 30-60 seconds to heat the engine.

Allow the engine to idle and get up to full operating temperature, adjusting BISS to keep the idle from being ridiculous. (Mine started out idling at 2500rpm.) Once the engine is warm, turn the BISS to reduce it where you want it to be (I went with 900rpm). That's it. Cold starts take a little pedal play for about ONE MINUTE, but then you get nice, smooth idle with no surge, and the tach drops neatly between gears without sinking below idle.

AC minus ISC
I have not tested this, but I suspect I'll be able to bump the idle via BISS during the summer months, as I'll have the AC on most of the time.

Hope this helps someone out in the future.
 

toybreaker

iconoclast
Joined
Apr 30, 2006
Messages
3,581
Thanks for the additional information, and the detailed post! /ubbthreads/images/graemlins/cool.gif

While you have things apart, a little carb cleaner on a rag and/or q-tip will make short work of any varnish in the throttle body bore and iac passages.

Do NOT spray carb cleaner willy nilly around the throttle plate!
You will wash out the lubricant in the throttle shaft bore and will probably replace it with gritty goo, leading to wear and boost leaks out past the seals. Just use blue paper shop towels and some patience, and it'll come out clean with minimal effort.


Re-setting the tps can be a chore, but one of the easiest/most accurate ways to dial this parameter in is to use voltage "seen" at the ecu with a closed throttle. It should read .5v, +/- .02v

It's worth noting that the actual position of the throttle plate will impact these numbers, so it's best to be sure you're not chasing a "tampered" factory adjustment.

For example, the closed throttle switch can hang things open when it's mis-adjusted, and the t-cable needs to have some slack before setting the tps.

As a "general" rule the tps should be ~approximately~ in the center of it's range when the throttle stop/closed idle switch are correctly positioned.

If you're still running the iac, you know that everything's golden when the tps reads .5v, and the iac shows a few counts on an idling warm motor with no loads (lights/climate control/etc off) Add a load, (like turn the steering wheel), and watch for an increase in the iac count. Try again with an electrical load like the lights and heater fan, and it should do the same.


If you delete the iac, set your idle (via the biss) to ~850rpm, with a hotel load or two on. (lights and maybe the heater fan)

This will ensure the alternator is spinning fast enough to make sufficient voltage so as to not strain the voltage regulator. It works hard enough as it is, and an idle speed under 750 will shorten it's service life significantly


If you;re running a turbo timer and have deleted your iac, bump the idle speed up to at least 900rpm. The radiator cooling fans will often cycle on the timer, and that will seriously stress the alternator. (it's actually a worst case scenerio. as the alty tries to put out more juice, it'll load the motor down, and as the rpm sags, it'll load it more, dropping the rpm further.

... and at that lower rpm, not much coolant/oil is being circulated through the engine ...


For what it's worth, I like to use metal for making the fiav block off plate.

Doesn't have to be anything elaborate, a piece of thin aluminum works fine and is easily cut/formed/drilled with hand tools.

Might save you some head scratching when a back fire takes out the playing card/cereal box/gasket material and now you're idling at 2500rpm. /ubbthreads/images/graemlins/smile.gif
 

beaner

Well-known member
Joined
Jun 22, 2005
Messages
1,562
Location
b'ham, mi
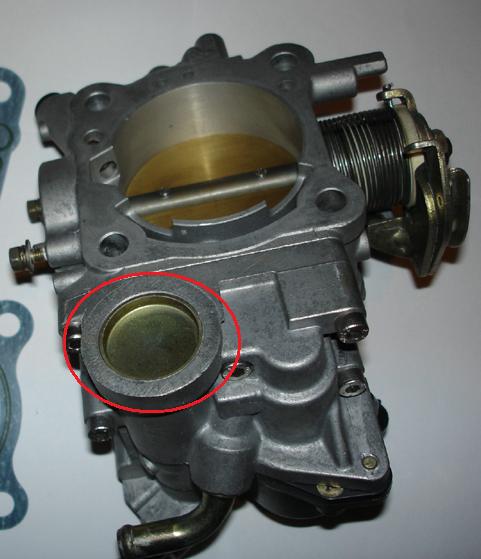
You guys are trying too hard when it comes to blocking off the FIAV. I'd only bother with a plate if I was deleting the ISC and and FIAV.

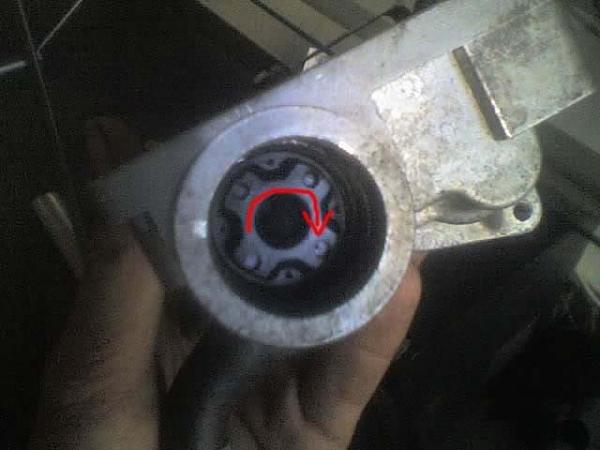
Pop this freeze plug off:
FnaVi.jpg


Turn clockwise until it bottoms out:
FynQh.jpg


Done.
 
Support Vendors who Support the GVR-4 Community
Boosted Fabrication ECM Tuning ExtremePSI Fuel Injector Clinic Jacks Transmissions JNZ Tuning Kiggly Racing Morrison Fabrications RixRacing RockAuto RTM Racing STM Tuned

Recent Forum Posts

Recent Classifieds Listings

Top