The Top Mitsubishi Galant VR-4 Resource

Join the best E39A 1991-1992 Mitsubishi Galant VR-4 community and document your GVR4 journey.

  • Software Upgraded - Reset Your Password to Login
    In order to log in after the forum software change, you need to reset your password. If you don't have access to the email address you used to register your GVR4.org account, you won't be able to reset your password. In that case, follow the instructions here to regain access to the forum.

Removing water pump

coyotes

Well-known member
Joined
Nov 15, 2013
Messages
1,544
Location
Seattle, WA
it's this method:

Quote:
Sometimes with the engine in the car, measuring the distance between the tensioner arm and auto tensioner body (usually with a drill bit) is hard to see or do. Example: Can't get in there or see if drill bit is truly parallel to the tensioner top (which affects measurement) or you can’t get a 2.6 ft-lb torque wrench on the tensioner pulley special tool #MLR-MD-998767. You can replace all that complicated tensioning torque stuff (which you can rarely get right with the engine in the car anyway - no room) with the following alternative. Just adjust the tensioner pulley so that the auto tensioner holding pin (eg. 1/16” allen wrench) moves freely all the way through the auto tensioner body and pin holes (after you turn the crankshaft and wait for the belt to stretch and auto tensioner to settle). Adjust the tensioner pulley to do this and it will automatically make the distance between the tensioner arm and auto tensioner body (drill bit measurement) be about .157 in. (spec is .150 - .177 in.). I've done over a dozen dsm timing belts this way every one done correctly. In fact you don’t have to get the Miller tool #MLR-MD-998767 (at OTC/SPX 800-533-0492) to adjust the tensioner pulley (with 2.6 ft-lbs torque – ya right) as the DSM manual states. Instead you can use a 90 degree pliers in the 2 tensioner pulley holes to adjust it (you may have to cut off one of the handles to clear the compressor pulley and grind the tips a little). Or you can put an allen wrench in one of the tensioner pulley holes and use the tensioner pulley bolt with your socket as a pivot point (http://www.dsmtuners.com/forums/attachment.php?attachmentid=56211).


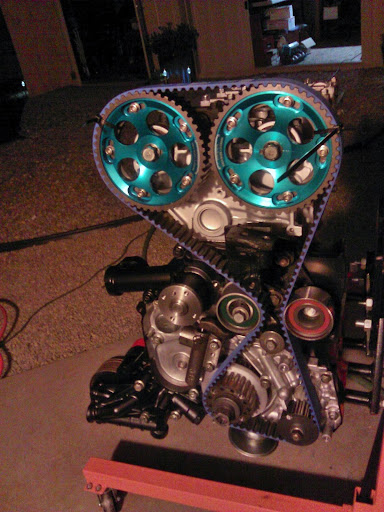
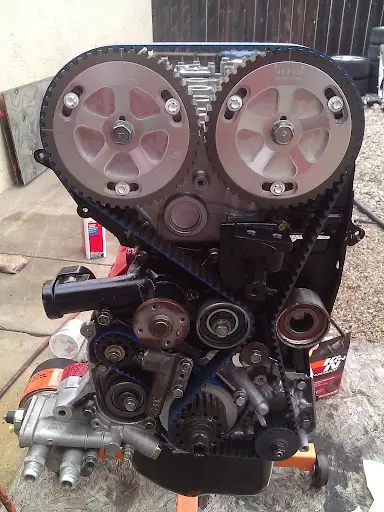
I can tension the belt properly but then the belt will rub on the bolt holding the arm to the block.
 

coyotes

Well-known member
Joined
Nov 15, 2013
Messages
1,544
Location
Seattle, WA
Quoting brisvr4:
The pulley is clocked wrong. it needs to be cw.
I use a method that I found on vfaq using a drill bit to set tension.
Works easy and hasn't failed me with multiple timing belt jobs over the last decade or so!

Below is taken directly from vfaq.


"Here is how I set the tension whether I am using a new tensioner or not:

I do not use an Allen wrench on the tensioner as noted previously, I just let the tensioner expand all the way
Once the belt is installed, I place a .150" drillbit (or the nearest larger size I have) on the top of the tensioner body, and screw in the tensioner tool until it captures the drillbit between the tensioner body and tensioner pulley bracket. When the bracket is close to the drillbit, I start spinning the drillbit, and stop screwing in the tool as soon as the bracket stops it from spinning. In other words, I stop when the pulley bracket is just snug against the bit.
I place a flatblade screwdriver between the engine and tensioner pulley, and lightly pry up on the pulley
I torque the pulley down
I back off the tensioner tool several turns, and immediately check the tensioner gap - if it has gotten too small or too large right away, I redo the steps above, changing the pressure used on the screwdriver. If the gap looks OK, I spin the engine 6 turns and wait 15 minutes and check the gap again.
There are other ways to do this, but this works best for me"

click


Thanks, perhaps I will try this method tomorrow. I haven't been feeling so hot on this lately, maybe I will just have someone come over that knows what they are doing and show me how.
 

desant78

Well-known member
Joined
Jun 23, 2010
Messages
732
Location
Clarksboro, NJ
You are so close! As stated, the tensioner went the wrong way. I usually set it to 11 o'clock and that puts the proper tension on the hydraulic tensioner. I also use the jay racing kit, and the special tool allows you to use a 8mm wrench. I would strongly suggest the kit, makes them easy! Best of luck!
 

coyotes

Well-known member
Joined
Nov 15, 2013
Messages
1,544
Location
Seattle, WA
Quoting BogusSVO:
I go CCW, that way if the bolt loosens, the pulley will move with the belt and tighten up.

Going CW, the belt will kick the pulley and let the belt go slack and skip teeth.


Bogus gave me some bogus info I guess. No big deal, I will just try it again tomorrow. With the "eyes" in the tensioner pulley at 11 it won't set proper tension on my car. It needs to go a bit further, but the side engine mount is in the way of my tool. I am setting tension with everything at TDC, is this the right position to have it in when setting tension? I have been setting tension via the grenade pin technique, where when the grenade pin slides in and out of the tensioner smoothly the tension is properly set. But I still can't get it right.
 
Last edited:

GSTwithPSI

Well-known member
Joined
Jan 1, 2012
Messages
3,461
Location
SoCal
Quoting brisvr4:
The pulley is clocked wrong. it needs to be cw.
I use a method that I found on vfaq using a drill bit to set tension.
Works easy and hasn't failed me with multiple timing belt jobs over the last decade or so!

Below is taken directly from vfaq.


"Here is how I set the tension whether I am using a new tensioner or not:

I do not use an Allen wrench on the tensioner as noted previously, I just let the tensioner expand all the way
Once the belt is installed, I place a .150" drillbit (or the nearest larger size I have) on the top of the tensioner body, and screw in the tensioner tool until it captures the drillbit between the tensioner body and tensioner pulley bracket. When the bracket is close to the drillbit, I start spinning the drillbit, and stop screwing in the tool as soon as the bracket stops it from spinning. In other words, I stop when the pulley bracket is just snug against the bit.
I place a flatblade screwdriver between the engine and tensioner pulley, and lightly pry up on the pulley
I torque the pulley down
I back off the tensioner tool several turns, and immediately check the tensioner gap - if it has gotten too small or too large right away, I redo the steps above, changing the pressure used on the screwdriver. If the gap looks OK, I spin the engine 6 turns and wait 15 minutes and check the gap again.
There are other ways to do this, but this works best for me"

click


As Coyotes said, the pulley shown in the pic isn't tensioned, which is why it's clocked wrong. I don't use a drill bit because it's too hard to locate it properly with the motor in the car. With an allen wrench, you can use the L shape to your advantage. You dip the small part of the L between the tensioner body and the arm, while using the handle of the allen wrench to center it on the tensioner body. This process allows you to properly locate the allen wrench without even having to look at the tensioner. Everything else you said I pretty much follow verbatim. Regardless of the tool used to check the tensioner gap, the steps you listed are exactly what you need to do in order to tension the belt properly.

Using the tensioner pin to set the initial gap would be worthless IMO. As brisvr4 pointed out, you need to be able to force the tensioner arm against something solid when initially setting the gap. I don't see how the tensioner pin would allow for that. The pin is made for 1 thing; holding the tensioner in place during shipping. The only other time I use it is when I remove the timing belt completely. I guess everyone has their own way of doing a TB job, but that's not one I'd ever use personally. The tensioner is always at about 11 O'clock on every motor I've ever done:

WP_000233.jpg


WP_000761.jpg


WP_000789.jpg
 
Last edited:

coyotes

Well-known member
Joined
Nov 15, 2013
Messages
1,544
Location
Seattle, WA
OK so, when using that method of using the tensioner tool, when you tighten it down down so the arm pinches on an allen key or drill bit, where then do you know where to set the tensioner pulley to? The directions say pry up with a screwdriver but that isn't very precise. How hard, and how far? It seems most people set theirs so the "eyes" on the tensioner pulley are at about 11 o'clock. I should just set it there, turn the engine over and then recheck the gap? should the drill bit just fit inside or be able to spin?

I am checking the tension while the engine is at TDC, is this correct? The belt tightens and loosens, at what position should I be checking tension?
 

brisvr4

Well-known member
Joined
Feb 13, 2004
Messages
955
Location
brisbane australia
If you use a drill bit then you want to wind the tensioner bolt in VERY SLOWLY until it just grabs the bit. The procedure should be the same with an allen key though.
I usually lightly spin the drill bit whilst tightening the rod till if grabs then i pry up gently on the pulley and tighten the bolt.
Leave it for 10 minutes then re check the gap before you move anything!
You might need to repeat the procedure a couple of times until you get the hang of it.
 

coyotes

Well-known member
Joined
Nov 15, 2013
Messages
1,544
Location
Seattle, WA
We'll see how it goes. what about the rest of my questions? I'm sure this will be easy in the future but it sure is a bitch to figure out the first time around. and to think I can set timing/tension on a b230ft in a matter of minutes with my eyes closed. I'm just the sort of guy that needs to be shown how to do it.
 

brisvr4

Well-known member
Joined
Feb 13, 2004
Messages
955
Location
brisbane australia
Yes, check tension while all the timing marks still line up.
You don't need to put a lot of pressure on with the screwdriver, just enough to hold it firm.
 

coyotes

Well-known member
Joined
Nov 15, 2013
Messages
1,544
Location
Seattle, WA
Ok I ended up getting it all back together on my own, along with some help over the phone from Brett. Thanks dude! Car runs again, although now I seem to have picked up an idle surge I didn't have before. I didn't remove any intake components or anything to do my timing belt, so wtf.. just changing one set of problems for another I guess.

The water pump has dribbled a bit of coolant out the water pipe outlet, although it is my understanding that this is normal, it will leak a little bit until it forms a proper seal. Please don't tell me I'm wrong, I don't want to have to do this all over again. Now that I know what to do though, it won't be that bad.


Now to figure out why my car is idle surging so bad. Also it has a high idle compared to before. I checked around to make sure everything was connected, didn't see any obvious problems...
 

highrpm666

Well-known member
Joined
Feb 19, 2014
Messages
124
Location
Morrison, Co
Every time I have disconnected my battery which I'm assuming you did, my car idles funny for the first couple starts. Surging, idling almost eratically till warm. Not bad but, enough to notice a difference. It goes away after a few drives for me.

My water pipe didn't leak a bit after my pump install. I have seen this happen on other cars with water pipe/o ring setups though and it usually goes away the first time it gets up to temp and the o-ring sets itself in place due to the water pressure. If yours doesn't seal you might have a problem in there.
 
Last edited:

highrpm666

Well-known member
Joined
Feb 19, 2014
Messages
124
Location
Morrison, Co
Coyotes, did u lubricate the o-ring with coolant or any type of sealant before popping the pump in to place? I used a transparently thin amount of grey rtv on mine and it seems to be working well. A dry install can cause the o-ring to roll or twist in the tightest fitting spot around the pipe, distorting it a bit causing a small leak. My guess is it will go away after a few heat cycles along with your idle issue.
 
Last edited:

coyotes

Well-known member
Joined
Nov 15, 2013
Messages
1,544
Location
Seattle, WA
nope I lubed it in coolant only, I cleaned the pipe with simple green and put the o ring on the pipe, then slid the water pump over it. made sure it had a good seal and torqued the water pump down in a criss cross fashion. I doublechecked all my vac lines and everything, can't find any air leaks, so I am hoping it goes away too. it never did it before though, and I have disconnected the battery before.
 

G

Staff member
Joined
Feb 24, 2004
Messages
8,896
Location
zompton
No, the water pump should not leak one drop. If it's leaking then air is getting in to your coolant system causing the idle surge.
 

highrpm666

Well-known member
Joined
Feb 19, 2014
Messages
124
Location
Morrison, Co
^ possibly you didn't burp/purge the cooling system properly? G is right. Air bubbles will cause idle surge also. And yes it really shouldn't be leaking and the issues could be directly related.
 

strokin4dr

Well-known member
Joined
Aug 30, 2005
Messages
2,770
Location
Savannah, GA
Pressure test the system and then use a funnel setup to burp the system is how I do it. Don't jump to the conclusion that it needs to be redone so fast. Clean it up and check it out thoroughly before taking anything back apart.
 

GSTwithPSI

Well-known member
Joined
Jan 1, 2012
Messages
3,461
Location
SoCal
Quoting coyotes:
Bummer, guess I will be doing the water pump over again.


Nah, brah. If the water pipe is leaking, you can remove it without touching the water pump. It sucks to get to, because you have to drop the exhaust mani, turbo, and all the BS on the front of the motor. But, if the O-ring on the pipe outlet is the issue, just pull off the pipe itself and replace the O-ring. It's not that big of a deal. It's certainly better than removing the water pump again, and redoing the timing belt. Fix the leak and then worry about the idle surge. You can always go to AutoZone and rent a coolant pressure tester for free. As suggested already, it would make troubleshooting your leak much easier.

Now that you got a successful timing belt job under your belt, you're on your way to being an accomplished 4G63 mechanic! Get used to fixing one thing, only to find multiple others things broken afterwards. I feel like you're starting to get a taste of why JSBallin is so common around here. /ubbthreads/images/graemlins/wink.gif
 
Last edited:

coyotes

Well-known member
Joined
Nov 15, 2013
Messages
1,544
Location
Seattle, WA
I can clearly see the leak coming from the water pump outlet, the body of it is sealed up good.

Maybe time to find a 2g manifold and make it more worth my while to take all that off. Ready to strip some turbo bolts /ubbthreads/images/graemlins/grin.gif
 
Last edited:
Support Vendors who Support the GVR-4 Community
Boosted Fabrication ECM Tuning ExtremePSI Fuel Injector Clinic Jacks Transmissions JNZ Tuning Kiggly Racing Morrison Fabrications RixRacing RockAuto RTM Racing STM Tuned
Top