How do you get the gauge cluster out? I took the two screws that hold in the bezel on the top, but i couldn't get the bezel out because the trip meter button was in the way :-\
You are using an out of date browser. It may not display this or other websites correctly.
You should upgrade or use an alternative browser.
You should upgrade or use an alternative browser.
The trip knob unscrews.
Jose....
Jose....
Drew, take a look at this... all in a nutshell.
galant cluster removal
galant cluster removal
ken inn
Well-known member
also, once the trip button is removed, you tilt the bezel top part towards you, and press in the color change button on the lower left. when you install the bezel back, it will press in the color button again.
Hertz
Staff member
If it isn't obvious, you'll have to lower the steering wheel/column, too.

Once you have it out of the way, remove the trip knob and depress the color change button, the easiest method is to rotate the top towards you and slide the whole thing to the right.
Once thing I did when I had mine out (repainting the needles) was to remove the ABS lamp (have mine disconnected) and to remove all the green condoms from the lamps. I had previously always kept my cluster on amber, but with the green condoms removed, the "clear" lamps look really nice.
quote:Originally posted by Hertz:
but with the green condoms removed, the "clear" lamps look really nice. PIC???? Sounds cool...
I'm thinking about the boost gauge install in the center of the cluster... you can drill a big gaping hole there? There's nothing in the back that would get screwed up?
but with the green condoms removed, the "clear" lamps look really nice. PIC???? Sounds cool...
I'm thinking about the boost gauge install in the center of the cluster... you can drill a big gaping hole there? There's nothing in the back that would get screwed up?
Hertz
Staff member
Hmm, just because I host digital pics doesn't mean I take them!
 Imagine it being a bit brighter, and a little on the green-ish side of white. It makes it look a lot more modern in my opinion... or at least, newer.
The cluster/boost mounting is pretty hard-core. There aren't any lamps or any moving parts in that area, but there is a bit of that flexible circuit board material back there... don't think there are any traces on it, though.

The cluster/boost mounting is pretty hard-core. There aren't any lamps or any moving parts in that area, but there is a bit of that flexible circuit board material back there... don't think there are any traces on it, though.
Ray who is on this board did it and did a write up back in the pre-Club DSM days. Still got taht somewhere Ray?
I am jonesing to do that boost guage in the cluster install. If anyone has a heads up on that, lemme know.
4g63t
Well-known member
Yeah, Ray about covered the process. I have mine out right now, so I'll snap some pics and post them...
4g63t
Well-known member
Here they are...
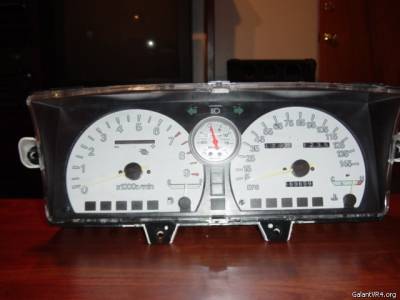
This is the finished product. It's hard to tell unless you really look hard, but the bezel is not perfectly centered on the boost gauge, nor is it centered between the 2 gauges. Oh well.
This is the gauges with the plate off, notice the lack of a bezel. I was halfway through the project when I realized that having removed the entire gauge "cup", there was nothing to attach the bezel to. Concordantly, vis a vis, ergo, I attached the bezel to the black "surround plate" (with epoxy) as seen in the next pics...
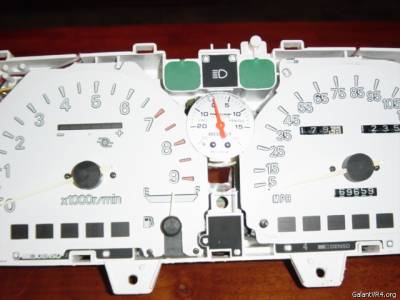
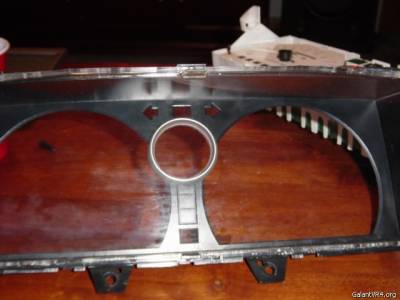
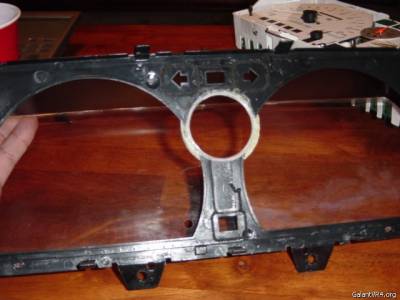
The next pics show what a tight sqeeze the gauge is in there. Notice how close it is to the high beam lamp, which I wanted to keep. Barely any room at all. As much as I love you guys, I'm not tearing into the guts to snap pics. I'll be updating it with different lights so I'll snap pics then. Look close and you can see the ragged edges where I tore away plastic with the pliers. The plastic is real soft for some reason, so don't get carried away. I ended up epoxying the gauge shaft (inside the gauge is a shaft which carries the air from the rear fitting to the front of the gauge, hence the "gauge shaft") to the cluster to keep it in place.
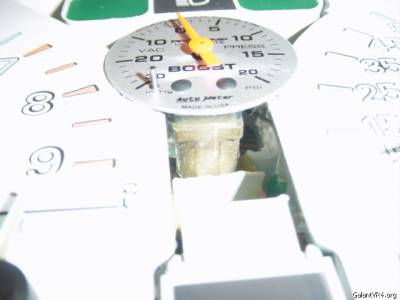
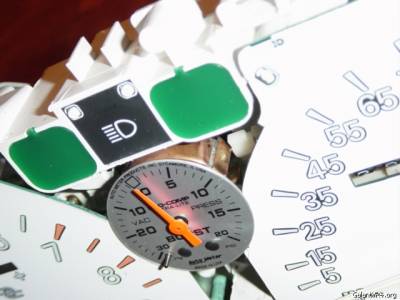
The next pic is the rear, kind of a clusterfuck back there, but hey, what can you do? I couldn't avoid cutting some traces, so I jumped some wires to where the traces went. I also soldered the boost gauge light wires to the cluster light wires, but since the bezel isn't properly mounted, the light doesn't illuminate the gauge face very well. I have something up my sleeve to fix that, it'll be pretty sweet. One last thing, I have to say thanks to my boy Adam, who stayed up with me for about 15 of the 20 hours it took to complete this. I'll try to answer questions, but a lot of this is stuff that will become clear once you have it half torn apart...

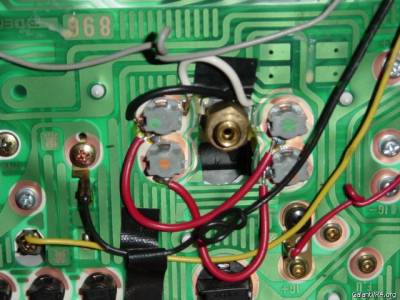
This is the finished product. It's hard to tell unless you really look hard, but the bezel is not perfectly centered on the boost gauge, nor is it centered between the 2 gauges. Oh well.
This is the gauges with the plate off, notice the lack of a bezel. I was halfway through the project when I realized that having removed the entire gauge "cup", there was nothing to attach the bezel to. Concordantly, vis a vis, ergo, I attached the bezel to the black "surround plate" (with epoxy) as seen in the next pics...
The next pics show what a tight sqeeze the gauge is in there. Notice how close it is to the high beam lamp, which I wanted to keep. Barely any room at all. As much as I love you guys, I'm not tearing into the guts to snap pics. I'll be updating it with different lights so I'll snap pics then. Look close and you can see the ragged edges where I tore away plastic with the pliers. The plastic is real soft for some reason, so don't get carried away. I ended up epoxying the gauge shaft (inside the gauge is a shaft which carries the air from the rear fitting to the front of the gauge, hence the "gauge shaft") to the cluster to keep it in place.
The next pic is the rear, kind of a clusterfuck back there, but hey, what can you do? I couldn't avoid cutting some traces, so I jumped some wires to where the traces went. I also soldered the boost gauge light wires to the cluster light wires, but since the bezel isn't properly mounted, the light doesn't illuminate the gauge face very well. I have something up my sleeve to fix that, it'll be pretty sweet. One last thing, I have to say thanks to my boy Adam, who stayed up with me for about 15 of the 20 hours it took to complete this. I'll try to answer questions, but a lot of this is stuff that will become clear once you have it half torn apart...

4g63t
Well-known member
Oh another thing, I don't know how the other guys did their hose, but I did it the dumb way. I led the hose all the way up to the back of the gauge, and then had to twist up my hands to attach it with the cluster half in and then hope it didn't kink when I put the cluster back in place. This time I'm going to attach a long piece of hose permanently to the gauge, and just feed it down so it couples somewhere else. Good luck!


curtis
Well-known member
Nice job It turned out really sweet.
The installation will probably be slightly different for each boost gauge. I used an HKS mechanical disassembled from it's casing. The drawback being it can not be backlit since the face is metal.
I believe Ron Gregory used one from JC Whitney which could be backlit by the stock instrument panel. I saw one other person on this board who did it recently.
My biggest suggestion is not to cut anything until you have everything apart and make sure that the gauge is going to fit. I took apart everything until I was left with just the main white plastic shell which everything was attached to. All the stock gauge needles pull straight off (don't try to twist or rock them) and make a note of their positions.
Basically the gauge sits where the stock auto transmission lights are right between the tach and speedo. The boost nipple on the gauge fits through one of the auto tranmission light holes and attaches with the original nut from the gauge. This is the important part to check whether one of the existing holes gets the gauge in the right position and also after attached whether the face of the gauge is going to be flush with the speedo and tach. You also want to check for clearance to the speedo because under boost when the spiral mechanism of the gauge uncoils, it may hit the speedometer and artificially limit the boost shown. Once you're reasonable sure it's going to fit, here's what I had to cut:
1. hole in blank spot on flexible circuit panel (conveniently directly behind auto tranny light holes) for vacuum hose
2. trim plastic around chosen auto tranny light hole for boost gauge (some of the plastic can be grabbed with pliers and snapped off)
3. trim black plastic template in front of auto tranny light holes for new gauge
4. trim a little off speedo and tach faceplates
This is from memory but I think that covers it. Actual work was probably only about an hour but I remember sweating a whole afternoon wondering if I was destroying the instrument panel.
turboflanagan
Well-known member
Chris, whose white gauge faces are those? Do they stick on? How do they fit?...
Hertz
Staff member
Wow Chris, thanks for taking pic! Did you strip the paint off your stock needles, or are they that faded?
I pulled mine about 2 months ago and repainted them... still have yet to get them lined up exactly right again, but it looks good.

I'm hearing that the needles "pull stright up" but I found that I really had to use 2 small screwdrivers and a little folded paper (pivot) to leverage them straight up.
If your illumination is a little dim, try removing those "bulb condoms" on the green or amber lamps... whichever ones you don't normally use. I bet you'll love it.
I pulled mine about 2 months ago and repainted them... still have yet to get them lined up exactly right again, but it looks good.

I'm hearing that the needles "pull stright up" but I found that I really had to use 2 small screwdrivers and a little folded paper (pivot) to leverage them straight up.
If your illumination is a little dim, try removing those "bulb condoms" on the green or amber lamps... whichever ones you don't normally use. I bet you'll love it.
4g63t
Well-known member
Thanks for the compliments guys, much appreciated.
 To answer the q's, the gauge faces are from importintelligence.com, some guys out of Exton, PA. I think they were like $25 or something. They are a thin (vinyl?) sheet, a lot like tint, and they go on the same way as tint. It literally took me like 15 minutes to do the faces. The fit is beautiful, and I love the finished product...highly recommended. Ryan, I never realized that the needles were dim until you said something, I just thought that's how they were! As for removing the needles, there are a couple of ways to do it, I used a regular fork and slipped it under the needles and eased them straight up. Anyway guys, don't be scared to do it, just be really careful!!


