The Top Mitsubishi Galant VR-4 Resource

Join the best E39A 1991-1992 Mitsubishi Galant VR-4 community and document your GVR4 journey.

  • Software Upgraded - Reset Your Password to Login
    In order to log in after the forum software change, you need to reset your password. If you don't have access to the email address you used to register your GVR4.org account, you won't be able to reset your password. In that case, follow the instructions here to regain access to the forum.

Rebuild Lasted 600 MIles

rmontalvo23

Well-known member
Joined
Mar 4, 2011
Messages
94
Location
Fort Lauderdale, FL
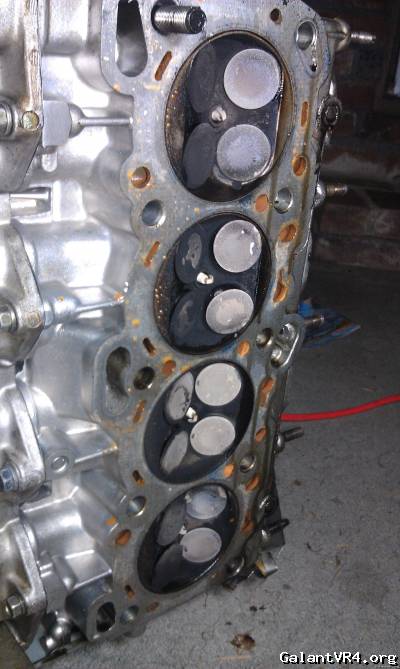
Got the head of a few minutes ago. All the valves are bent but the head itself looks salvageable.


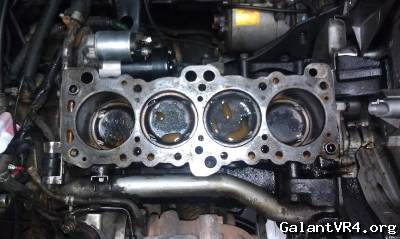
All four pistons have to be replaced. The cylinder walls are un-touched so that's one good thing.


After I removed the head I noticed that the bolt that holds the cover on which goes into the water pump is missing. I have no idea if it just wasn't installed when the engine was put in or if it's down in the bottom of the case at this point.

I don't have time to take the head apart and check the cams right now but I will on Saturday along with checking the oil pump and looking for that cover bolt.
 
Last edited:

grocery_getter

Well-known member
Joined
Jun 20, 2004
Messages
1,225
Location
Kent - industrial suburbs of Seattle, WA
That bottom end looks just fine. Smooth out the point of impact, use sandpaper to blend in the piston top again so its smooth where it used to be smooth. I would put the individual piston that you are working on up on TDC, and leave the headgasket on the block to protect the block surface while you are working on the pistons. After wards, clean the top of the deck with sharp clean razor blade carefully without scratching the top of the block. Clean the deck surface with some brake clean on paper towel and clean the wall with some 30 weight oil on some paper towel. Slap another head on it and its good to go.

Use white paper towel and not the blue shop towel, and definitely no red rags for internal works.

You dont need new pistons.

Save your money, buy good parts and good tools. Buy all Mitsubishi oil pump, the parts comes ala carte, buy all the pieces, assemble it with care and precision. Snap on makes a 10mm allen socket that is 10mm all the way up and it is a half an inch adapter. I think you should buy arp head stud for this time around though.
 
Last edited:

rmontalvo23

Well-known member
Joined
Mar 4, 2011
Messages
94
Location
Fort Lauderdale, FL
I'll see what I can do with these pistons. If I can get them somewhat smooth I'll leave them in for sure. If I can save some money and just get it back on the road I will.

I actually had ARP head studs on the previous block but after we found out that the block was no good my guy couldn't get the studs out of that block. So we had to use the OEM ones. I will add that to the parts order with my next paycheck.

About the 10MM hex socket. I actually went to Harbor Freight and they had a really good set of HEX sockets for $13.99. Worked like a charm on those stock head bolts.

The big challenge I think is trying to figure out why that belt snapped. I'm hoping it is the oil pump that locked up and not something else that will require the engine to get pulled out completely.
 

grocery_getter

Well-known member
Joined
Jun 20, 2004
Messages
1,225
Location
Kent - industrial suburbs of Seattle, WA
Well, now that the head is off you can spin the crank and see if it spins smoothly or not. There are not too many rotating parts on the timing belt path. If its not the crank, you got 2 more pulleys to check out then its the oil pump for sure. Since the oil pan is coming off, you can pop some of the rod caps and either the forward or the rear main bridge and look at the rod and main bearings. Also pop some of the cam caps and check out the cam bearings and journals condition. You can rule out oil pump failure/ oil starvation long before you dissasemble the oil pump. Spin the oil pump sprocket and see if it spin smooth or not either.

Observe the correct procedure and torque of the various fasteners that you are working with.
 

MuffinMan7580

Well-known member
Joined
Aug 6, 2011
Messages
142
Location
Fort Bragg, NC
Cam caps are supposed to be torqued to about 15 ft lbs. Many cheap torque wrenches are not accurate at the extreme low end of their range. FWIW, a beams style torque wrench never needs calibrating, and would work perfectly for cam caps. I personally use a craftsman 3/8" drive MicroTork wrench. It doesn't have ft lbs on it, so you have to do a little math, but works wonderfully.
 

rmontalvo23

Well-known member
Joined
Mar 4, 2011
Messages
94
Location
Fort Lauderdale, FL
Today I pulled the front wheels off and sun the engine. Pistons move just fine with no noises or obstructions. Spun it around 5 full times. Nothing seems to be seized in the bottom end.

pulling the head apart now and taking the cams off.
 

holeshotmoe

Well-known member
Joined
Apr 7, 2005
Messages
1,291
Location
MD
Sorry man! Hate to see that. I had a similar thing happen with very low mileage after a OEM timing kit change. Turned out to be over-tightened cam caps. Can't remember which, but either Haynes or Chiltens had the wrong torque values. /ubbthreads/images/graemlins/crazy.gif Supposed to be 14 ft/lbs or something and the book said 35 I think. This caused the cam to be very difficult to turn. In short order, the extra strain on the belt caused it to break. Bent the valves and dented the pistons. FWIW, I shaved the small mounds around the dents in the pistons with a knife blade.
 

5OF2k

Well-known member
Joined
Mar 28, 2012
Messages
664
Location
colorado springs, colorado
I tend to agree about the timing belt. If you dont setup the tensioner bearing correctly, it will bend valves.

On a positive note, good excuse to do the poormans' 2g pistons or go A/M.
 

mitsuturbo

Well-known member
Joined
Jun 2, 2008
Messages
3,551
Location
Near Seattle, Washington
Pistons do NOT need to be replaced. A few dings from bending valves is commonplace. It won't hurt anything.
The valves are bent... depending on to what degree they're bent, you may have some cracked guides now. Replace the cracked guides (if any) and the bent valves, seals, and put it back together.
 

mitsuturbo

Well-known member
Joined
Jun 2, 2008
Messages
3,551
Location
Near Seattle, Washington
I've always just cut the balance shaft and welded the hole shut. No issues with this route. Cheaper and faster than ordering a mitsu stub.

I know a friend who once tried the stub without oil groove as well. Exact same result as this guy...

Quoting Vman911:
I did a rebuild when I first got my VR4. I used a aftermarket OIL PUMP stub. (parts dinasour one) It was the solid one with no oil groove in it...Well car started up fine idled for 10-15 min checked for leaks all was ok and drove the car. 8/10ths of a mile down the road the oil pump locked up and sheared off timing sprocket. Bent 12 valves. That was a good learning leason. Get the mitsu factory stub for 12.00.

Which stub do you have in oil pump? I can post pics of my stub thats on my wall of shame.

 
Support Vendors who Support the GVR-4 Community
Boosted Fabrication ECM Tuning ExtremePSI Fuel Injector Clinic Jacks Transmissions JNZ Tuning Kiggly Racing Morrison Fabrications RixRacing RockAuto RTM Racing STM Tuned
Top