The Top Mitsubishi Galant VR-4 Resource

Join the best E39A 1991-1992 Mitsubishi Galant VR-4 community and document your GVR4 journey.

  • Software Upgraded - Reset Your Password to Login
    In order to log in after the forum software change, you need to reset your password. If you don't have access to the email address you used to register your GVR4.org account, you won't be able to reset your password. In that case, follow the instructions here to regain access to the forum.

JDM Fender Marker Light Install

BoostedAWD91

Well-known member
Joined
Mar 1, 2007
Messages
2,937
Location
Danville,Pa
I have a set of the jdm fender market lights and im trying to figure out a way to install them w/o having to purchase a set of jdm fenders. Has anyone else attempted this with any success? Could anyone with jdm fenders w/ the lights on them possibly be able to take a pic of how the hole is cut in the fender for these to mount in? Any help would be appriciated greatly
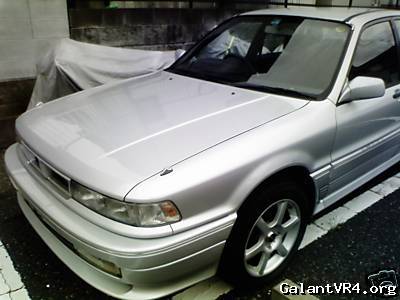
Here is a pic of what im trying to accomplish on the US Galant
 

DarkDevilMMM

Well-known member
Joined
Jun 8, 2001
Messages
4,065
Location
Vacaville, CA
I thought all you need is 1 small hole for the wires to go through, the marker itself is being held by using a good double sided tape. /ubbthreads/images/graemlins/dunno.gif
 

cOmpressor

Well-known member
Joined
Jul 3, 2007
Messages
2,044
Location
Bay Area, CA
Placement is going to be the hard part, ideally you would want both sides symmetrical but that is going to be a task.
 
Last edited:

BoostedAWD91

Well-known member
Joined
Mar 1, 2007
Messages
2,937
Location
Danville,Pa
no the lights arent held on by tape, they sit down in the fender. i talked to nate pharr about it since he has them and he bought jdm fenders made for the lights already and he explained it as the hole in the fender looks like a chevy emblem vertically. any jdm members w/ these chime in?
 

Wilfongtsi

Well-known member
Joined
May 21, 2006
Messages
444
Location
Fort Wayne IN
All you need to do is cut a rectangular hole in the fender, I will try and get some pics and measurements for you fri.
 

BoostedAWD91

Well-known member
Joined
Mar 1, 2007
Messages
2,937
Location
Danville,Pa
ok thanks... some pics of the hole and dimensions of the placement would be very helpful. also i dont know if its true or not but i heard that there might be wiring in the car already somewhere for the lights, is this true or not? last question, what size bulbs are used in these lights?
 

14u2nV

Well-known member
Joined
Jul 22, 2004
Messages
9,398
Location
Agency/St. Joe, MO
Why don't you just cut out a piece of cardboard or something to fit against the light, then transfer that pattern to the fender? /ubbthreads/images/graemlins/dunno.gif
 

chrisb33

Well-known member
Joined
May 3, 2007
Messages
363
Location
Manila, Philippines
oh and yeah. there should be a hole there. Not just held by a double sided tape. if you have the marker lights, cut the fender based on the inner side of the marker but a bit tighter so it will not fall off easily.

then if you really want to make sure they will not fall off, THEN go ahead and put some double sided tape.

I dont think i can take a picture of my fender with the marker taken out because im afraid i might snap a wire or two in there. sorry.

chris b
 

Wilfongtsi

Well-known member
Joined
May 21, 2006
Messages
444
Location
Fort Wayne IN
Here's a pic of the hole from a jdm fender,

Its a hair more than a half inch from the side, and about 7 3/8 from the front corner of the fender.
 

RedTwo

Well-known member
Joined
Jul 16, 2008
Messages
1,917
Location
New Zealand
I thought CAPS would tell me... and it does! Stupid thing shows the bulb info not on the bulb item but the complete assembly item.

PNC 80274L MB529117 Left, MB529118 Right...
PNC 80272AL MB529097 left, MB529098 Right...

12V-0.6W
 

BoostedAWD91

Well-known member
Joined
Mar 1, 2007
Messages
2,937
Location
Danville,Pa
i cant get the jdm parts from the Mitsu dealer here.
Those part numbers dont exist when i do a search for them
 

G

Staff member
Joined
Feb 24, 2004
Messages
8,896
Location
zompton
Why are their 4 part #'s? What is what?

Quoting RedTwo:
I thought CAPS would tell me... and it does! Stupid thing shows the bulb info not on the bulb item but the complete assembly item.

PNC 80274L MB529117 Left, MB529118 Right...
PNC 80272AL MB529097 left, MB529098 Right...

12V-0.6W


misterfixit

Well-known member
Joined
Aug 4, 2004
Messages
1,596
Location
Midlands, UK
the bulb is an assembly, and its expensive. if you want to change the bulb you have to undo the two screws on the unsderside of the marker and pull the clip off.

you'll then need to take a watch makers screwdriver and pill the pins out of the white connector half by lifting the tangs inside (you'll see these if you look in from the plug end). then when the plug is off the end slide the white clip off the end of the connector loom. (only do one light at a time they and their clips are handed, but they look the same)

gently (real gently) tease the rubber grommit out of the lamp body and in the centre of the gromit is the bulb.

On the connector end take the electrical tape off and push the wires up into the sleeve a little (you should now have a gap open up between the gromit and the sleeve).

Now gently again you need to tease the bulb out of the gromit. once out hold fire.

the replacement bulb to use is one of the interior switch bulbs. these come in a lille plastic base with a coloured plastic condom ontop. carefully with a watchmaker screwdriver unravel the wires that take the power to the donor bulb. once unhooked pull the bulb from its holder and remove its condom.

Now you have to disconnect and strip the wires on the marker light. strip only about 2mm of wire and tin it with solder. do not melt the jacket. then take the donor bulb and solder the tinned wire to one of the legs as close to the glass bulb as you can get. trim the excess leg off.

gently tease the replaced bulb back into its gromit and look to see if any leg is exposed. if so put a dab of silicone sealant around it. then push the sleeve up and replace the tape and retaining clamp. pnce the clamp is on again you can clip the white connector back. then load the bulb assembly back into the light (put a dab of petroleum jelly or grease on the gromit and smear it riond thr lip.)
then screw the clamp back down.

you've now saved youself $$$ the bulbs assemblies are about £40 ($80) here from mitsu. the interior bulbs are sbstantiALLY CHEAPER.

the circuit it operates off it the tail lights (your clearance lights at the front) are the ones to tap into.

Oh and when you clip them in the wing. the light faces the driver. (green like the interior gauge and sudries lights so you can see the front corners of the car)
the wattage is 0.4w

hope this helps.

Rich
 

MarW90GSX

Active member
Joined
Jan 2, 2013
Messages
26
Location
Jupiter, FL
Does anyone know the purpose of these lights? do they go on with the running lights or what? I got a set coming and would like to know what they do?
 
Support Vendors who Support the GVR-4 Community
Boosted Fabrication ECM Tuning ExtremePSI Fuel Injector Clinic Jacks Transmissions JNZ Tuning Kiggly Racing Morrison Fabrications RixRacing RockAuto RTM Racing STM Tuned
Top