How to remove the Dash on an Mitsubishi Galant VR-4
This process may save you weight (grams) if you only put back only necessary bolts, nuts, screws to stop the vibration and squeaks while driving although I do think you SHOULD put back all the bolts, nuts and screws.
What do I need to do this?
[*] 12mm socket
[*]10mm socket
[*]Foot Long extension for your ratchet
[*]1-Phillips screwdriver (mostly to remove screws and remove trim clips)
[*]1-flathead or standard screwdriver (to pry, be very careful when you pry)
[*]Ziploc bags to hold bolts/nuts/screws
[*]Paper and pencil to write what you put into those Ziploc bags
[*]Clear packaging tape (to tape bolts nuts screws on the locations of where they need to be screwed/bolted/tightened)
[*]Box or Space to put gauge cluster, kick panel, glove box, seats, center console, gauge bezel, radio, center console trim, etc
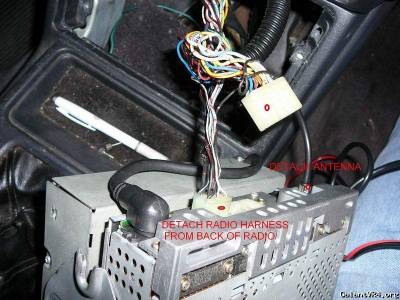
[*]Masking tape or Labels (to label wires when you disconnect them, you only need to label 12 of them, which are the cigarette lighter, hazard switch, defrost switch, fog lights, dimmer switch, ashtray light, center console light, radio harness, radio antennae. [/list]
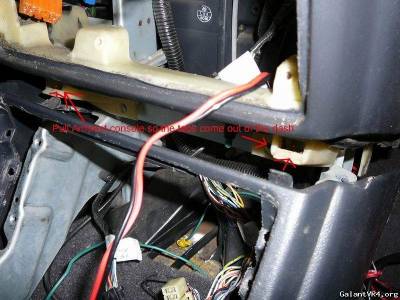
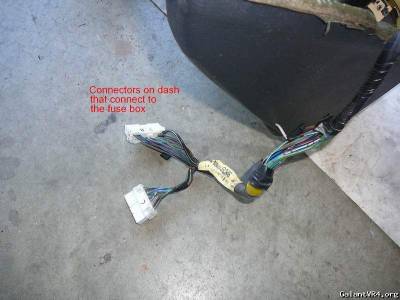
You will be disconnecting two harnesses at the fuse box if you disconnect more I would be worried. I used a label or sharpie to mark where they belong like A connector goes to A on the fuse box and B connector goes to B on the fuse box. That was all the marking I did, A and B.
I divided the dash removal into four sections, Driver side, Passenger Side, Center console (AC area), and armrest console. The driver side is the most detailed and longest part of the removal
Starting with the Driver’s side.
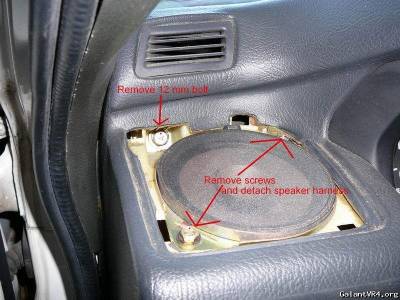
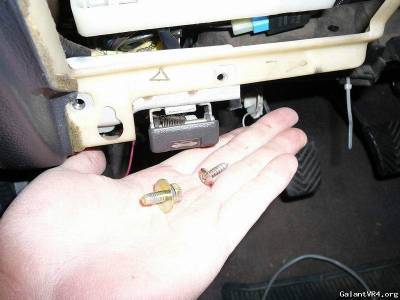
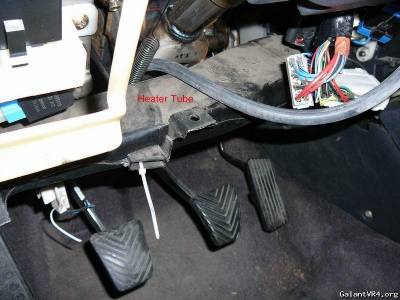
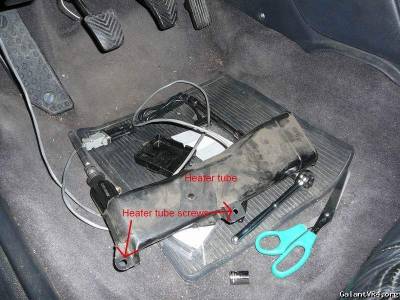
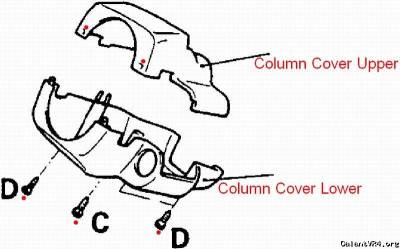
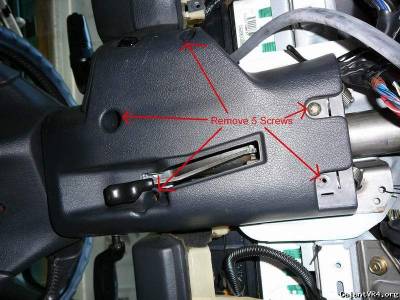
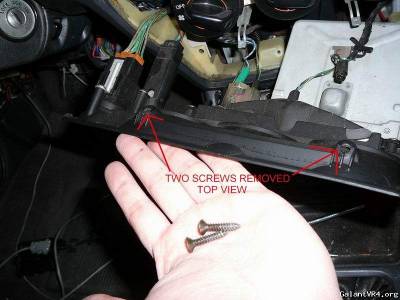
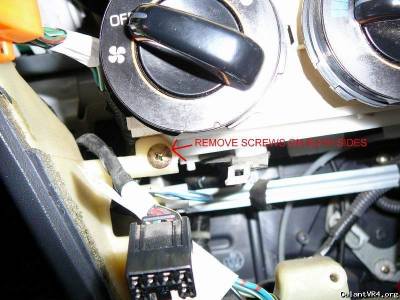
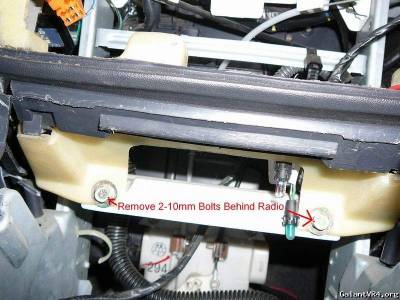
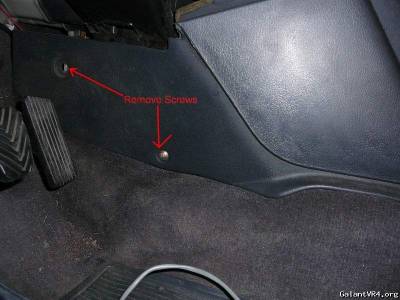
1. My kick panel was already removed so remove that first and set it aside. There is a diagram below of the 2-10mm bolts and 3 screws that need to be removed.
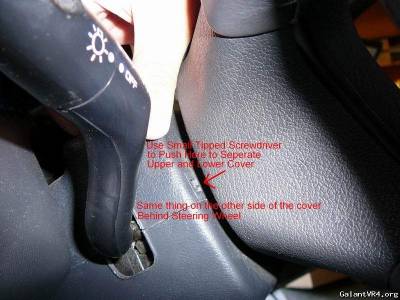
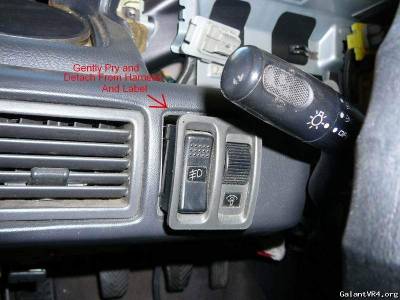
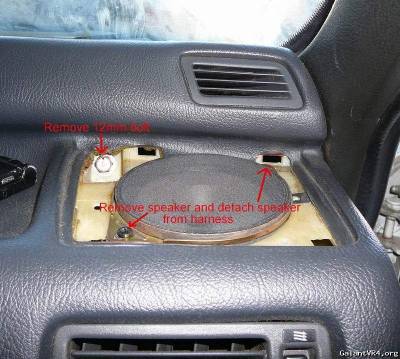
2.Remove the Dash Speaker Cover by gently prying UP.
3.

4.
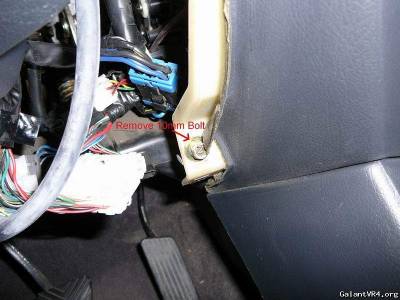
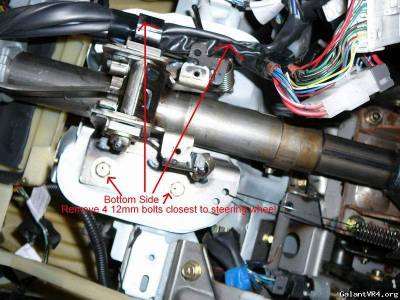
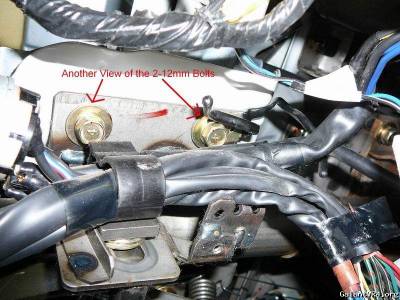
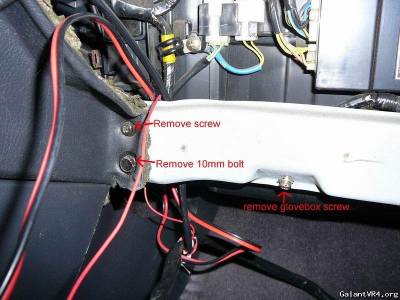
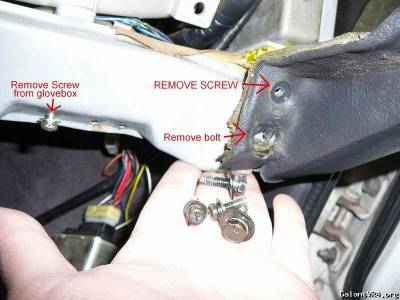
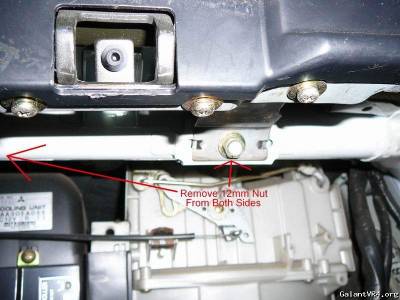
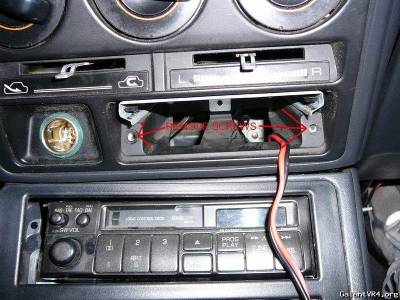
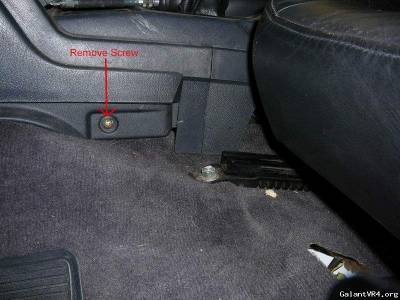
5. Remove the 10mm bolt near the armrest console
6.
7.
8.
9.
10.
11.
12.
13.
14.
15.Gauge Cluster Area
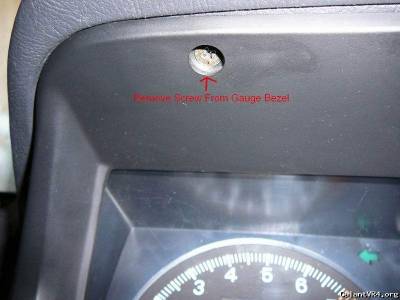
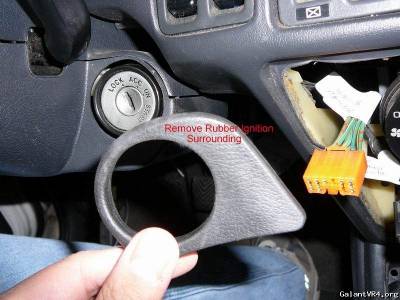
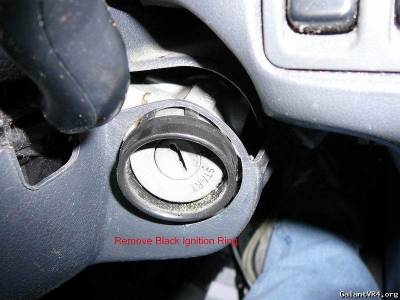
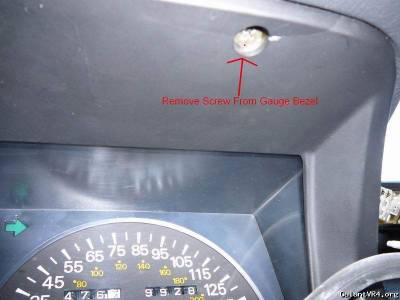
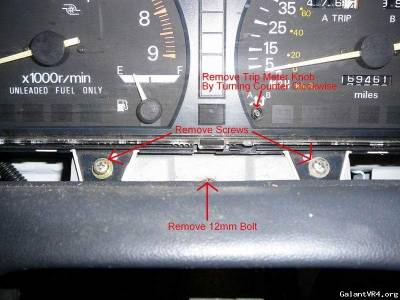
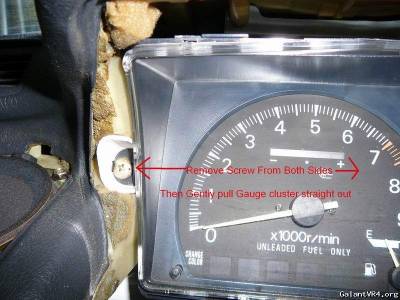
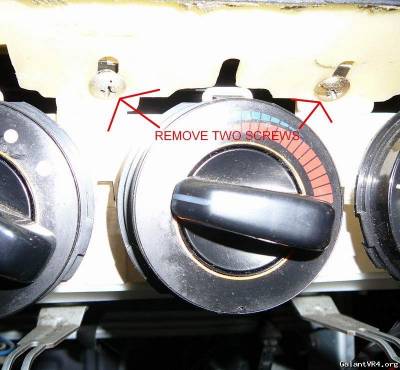
16.Remove the odometer reset knob by turning it counter clockwise (don’t lose it or you won’t have one to put back). After the 2 screws and odometer reset knob is removed, remove the gauge bezel.
17.
18.
19.

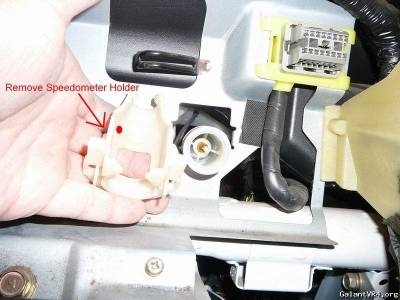
20.To remove the Speedometer Cable holder, you will need to pull the Speedometer cable by releasing it from the transmission and pulling it closer to you then remove the Speedometer holder OR if you’re really good you can slide the holder down and off the cable and out. It’s more tricky than explained but you can break this if you don’t do it carefully. I’ve broken a few at the junkyards.
21.
22.
23.
24.
25.
26.
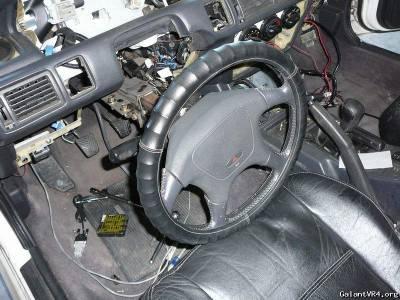
All Done with Drivers Side.
now...Passenger Side...
27.
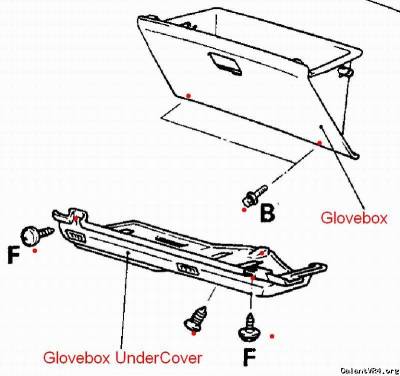
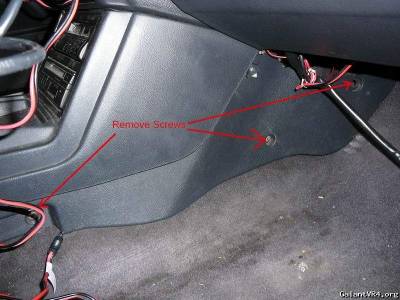
28. I thought I took pics of the glove box but its not in the camera. So remove the undercover by removing the 3 screws and then the two screws that hold the glove box, the glove box should come out or fall with the two screws holding it.
29.
30.
31.
32.
All Done with Passenger Side.
Now..center console...
33.

34.
35.
36.
37.
38.
39.
40.
41.
All Done with Center Console.
Now..Armrest/Floor Console...
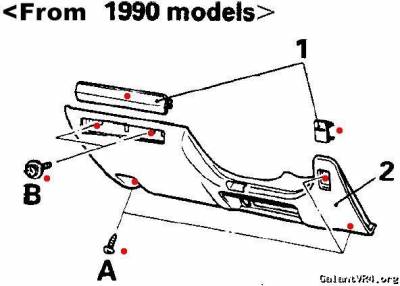
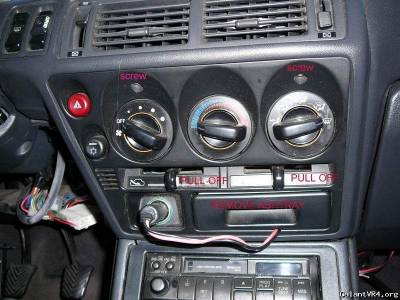
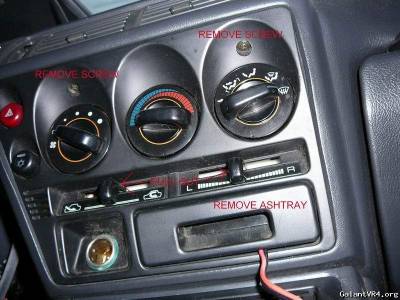
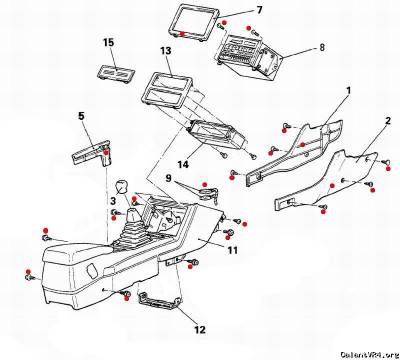
42. Here is a diagram of all the panels, bolts, screws and trim clips that need to be removed
43.
44.
45.
46.
47.
48.
49.
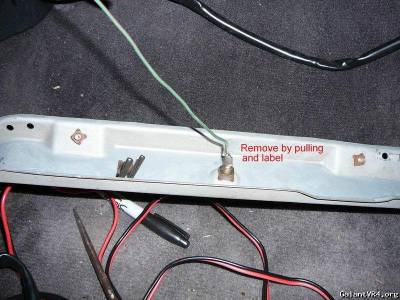
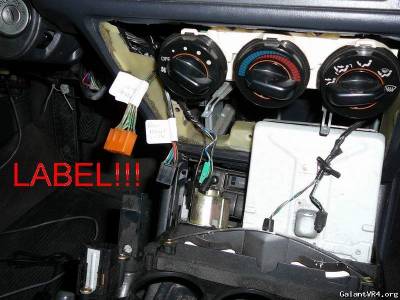
50. Remove the dash harness from the fuse box and make sure to label where it goes with a sharpie or a label!
The Dash should come out with no effort, if you tug, and it’s stuck, look around where it might be stuck.
ALL DONE! /ubbthreads/images/graemlins/cool.gif
This process may save you weight (grams) if you only put back only necessary bolts, nuts, screws to stop the vibration and squeaks while driving although I do think you SHOULD put back all the bolts, nuts and screws.
What do I need to do this?
[*] 12mm socket
[*]10mm socket
[*]Foot Long extension for your ratchet
[*]1-Phillips screwdriver (mostly to remove screws and remove trim clips)
[*]1-flathead or standard screwdriver (to pry, be very careful when you pry)
[*]Ziploc bags to hold bolts/nuts/screws
[*]Paper and pencil to write what you put into those Ziploc bags
[*]Clear packaging tape (to tape bolts nuts screws on the locations of where they need to be screwed/bolted/tightened)
[*]Box or Space to put gauge cluster, kick panel, glove box, seats, center console, gauge bezel, radio, center console trim, etc
[*]Masking tape or Labels (to label wires when you disconnect them, you only need to label 12 of them, which are the cigarette lighter, hazard switch, defrost switch, fog lights, dimmer switch, ashtray light, center console light, radio harness, radio antennae. [/list]
You will be disconnecting two harnesses at the fuse box if you disconnect more I would be worried. I used a label or sharpie to mark where they belong like A connector goes to A on the fuse box and B connector goes to B on the fuse box. That was all the marking I did, A and B.
I divided the dash removal into four sections, Driver side, Passenger Side, Center console (AC area), and armrest console. The driver side is the most detailed and longest part of the removal
Starting with the Driver’s side.
1. My kick panel was already removed so remove that first and set it aside. There is a diagram below of the 2-10mm bolts and 3 screws that need to be removed.
2.Remove the Dash Speaker Cover by gently prying UP.
3.
4.
5. Remove the 10mm bolt near the armrest console
6.
7.
8.
9.
10.
11.
12.
13.
14.
15.Gauge Cluster Area
16.Remove the odometer reset knob by turning it counter clockwise (don’t lose it or you won’t have one to put back). After the 2 screws and odometer reset knob is removed, remove the gauge bezel.
17.
18.
19.
20.To remove the Speedometer Cable holder, you will need to pull the Speedometer cable by releasing it from the transmission and pulling it closer to you then remove the Speedometer holder OR if you’re really good you can slide the holder down and off the cable and out. It’s more tricky than explained but you can break this if you don’t do it carefully. I’ve broken a few at the junkyards.
21.
22.
23.
24.
25.
26.
All Done with Drivers Side.
now...Passenger Side...
27.
28. I thought I took pics of the glove box but its not in the camera. So remove the undercover by removing the 3 screws and then the two screws that hold the glove box, the glove box should come out or fall with the two screws holding it.
29.
30.
31.
32.
All Done with Passenger Side.
Now..center console...
33.
34.
35.
36.
37.
38.
39.
40.
41.
All Done with Center Console.
Now..Armrest/Floor Console...
42. Here is a diagram of all the panels, bolts, screws and trim clips that need to be removed
43.
44.
45.
46.
47.
48.
49.
50. Remove the dash harness from the fuse box and make sure to label where it goes with a sharpie or a label!
The Dash should come out with no effort, if you tug, and it’s stuck, look around where it might be stuck.
ALL DONE! /ubbthreads/images/graemlins/cool.gif
Last edited by a moderator:
