The Top Mitsubishi Galant VR-4 Resource

Join the best E39A 1991-1992 Mitsubishi Galant VR-4 community and document your GVR4 journey.

  • Software Upgraded - Reset Your Password to Login
    In order to log in after the forum software change, you need to reset your password. If you don't have access to the email address you used to register your GVR4.org account, you won't be able to reset your password. In that case, follow the instructions here to regain access to the forum.

How to make 1g DSM fuel sending unit to work on VR4

fongvr4

Active member
Joined
Apr 13, 2010
Messages
38
Location
Silver Spring, MD
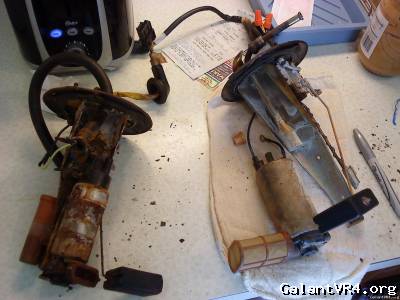
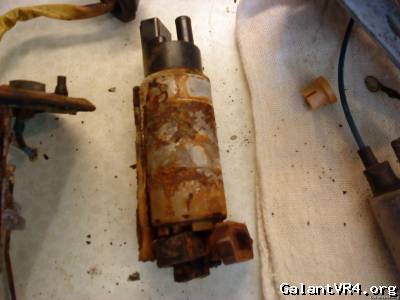
the fuel pump on the vr4 went bad, and the sending unit looks pretty bad as well when took the cover off the car. so, I decided to change the whole unit if possible, along with the new fuel pump. initially, I thought about the RTM fuel unit setup, but too much. then I went on to look for a cheap replacement fuel pump for now before I figure what to do with the cover. then I found this fuel sending unit w/ fuel pump came off a 1991 Eclipse turbo AWD. I was excited cuz the unit looks identical, and I was hoping for a direct drop in to get my car running. don't laugh, I am a newbie to vr4. I didn't know the 1g DSM tank is deeper than that of vr4. so, I found out the eclipse unit is about 1 1/4 inch longer than the vr4 one. after few thoughts, and talked to my friend, I decided to modify the eclipse fuel sending unit to make it work on vr4 since the cover, and wiring on it are so much better than the original one on vr4. here are the steps what I did:

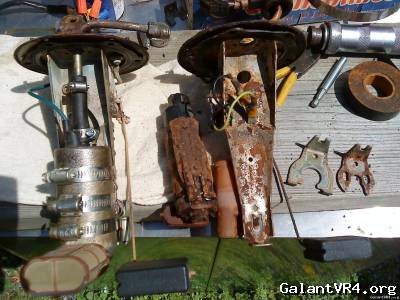
1)take out the fuel pump(I left the wiring on the pump cuz they are still good) off the eclipse
2)make a mark about 1 1/4 inch from the bottom of the unit, and cut it off
3)cut the fuel line cup that connects to the fuel pump. you want to leave an inch of the tub for connection to the fuel pump
4)clean the cut area to make it smooth. then get a section of a rubber fuel line hose to connect the fuel line tub to the pump
5)secured the pump to the sending unit with 3 hose clams.

bingo, it is done, as you see in the picture. everything else on the eclipse unit is the same as vr4, except the length of the unit. oh, also, the orientation of the unit is little different from vr4, but that is not a problem at all. you just need to turn the unit to line up, and put bolts on.

I installed it on the car today, and started the car right up. I felt so good when I heard the car running again.
/ubbthreads/images/graemlins/cool.gif


johnnyRacer

Well-known member
Joined
Jan 9, 2005
Messages
776
Location
Tampa, FL.
This is a great idea considering direct replacement sending units from gvr4's and ggsx's are getting harder to find. However, I'm curious of the thedsmguy's comment about the float for the fuel level working or not. This information is very important, if your going to go this route.
 

theevozero

Well-known member
Joined
Oct 12, 2011
Messages
331
Location
Odessa, Texas
I actually did this the other day, but I havent been able to verify if the guage and light work the same. Anyone?.... Anyone?
 

Hittman

Well-known member
Joined
Sep 11, 2009
Messages
472
Location
Northern VA
^Does the needle stop at E? or does it continue past E...is it able to get to F when full?

I'm about to do this tomorrow, I will post up in better detail how I go about everything.
 

EHmotorsports

Well-known member
Joined
Sep 25, 2012
Messages
1,278
Location
Beaverton
yes it is the same. have been running a Modded 1g dsm unit in my galant for a year now.
 

Hittman

Well-known member
Joined
Sep 11, 2009
Messages
472
Location
Northern VA
OK, so I FINALLY got this done. BUT I decided to do it the "right" way...the closest to OEM spec way that I could get for what resources I had available.

First of all, buy yourself a set of turbo sockets....IRWIN makes a set, and they're not all that expensive...I think $24 bucks total. These will help you TREMENDOUSLY, not ony with this project, but for any other stuck nuts/bolts you may have on your GVR4

I will say to cut things short, the only additional information I'd add to the VFAQ would be that instead of a 19mm flare nut wrench, use a 3/4 wrench, AND USE THE TURBO SOCKET TO TAKE OFF THE RETAINING NUTS, if you dont, you will have rounded, rusted nuts that will be the pain in your side, and deprive you from sleeping for a good long while.

On to pics and explanations


Using the turbo socket takes 5 minutes...without it you could spend hours


Side by Side comparison 1G on the left, as you can see the fuel fill sensors are only secured by TWO tiny phillips head screws, remove them and at a later step, you will re-install the GVR4 unit


Comparison of the fuel sensors...the 1G is longer, so remove/repalce


Dissasembly of the FSU's is straightforward, use your common sense here, everything on these units are either phillips screwdriver or 7mm bolt/nut.


Naked bracket comparison


Carefully drill out the spot welds from each bracket and use a vice to hold in place, use a metal shim, and hammer it lightly in between the top of the sending unit and the bracket to remove the bracket, this is a delicate process and takes the most time, so please be careful while doing this


What the bracket looks like off the unit


Now here is the ringer, if you have access to a welder then you're ahead of the curve, before re-assembly, you want to weld the bracket back in place, if you dont have access to a welder, I assume you could use some sort of JB Weld polymer to adhere bracket to top.


NOTE: you will have to cut the lower pipe from the 1G fuel sending unit and connect it with a rubber hose (I used 5/8" fuel hose) in order for the fuel pump to fit.
 
Support Vendors who Support the GVR-4 Community
Boosted Fabrication ECM Tuning ExtremePSI Fuel Injector Clinic Jacks Transmissions JNZ Tuning Kiggly Racing Morrison Fabrications RixRacing RockAuto RTM Racing STM Tuned

Recent Classifieds Listings

Top