Well the how-to section isn't recieving this so i'll move it here.. /ubbthreads/images/graemlins/tongue.gif
Here i'll explain a few cool do-it-yourself mods that are both easy on the wallet and also fun and creative to work on.
How to make a JDM front lip:
Since a lot of members are having a hard time finding a lip for their JDM bumper locally and affordably I decided i'll spill the beans on my secret mod /ubbthreads/images/graemlins/wink.gif
First, get the garnish trim piece that fits between the bumper and the headlights. This piece is the same for all galants, GS, LS, VR4, RS, 2000GTX, etc. You can get these from your parts car, or from your local junkyard. They range from $0-$20.

Then trim off the tabs on the garnish where the bolts go, so it looks kind of like this. I ground off some of the surface rust in the pictured trim.

Then zip-tie or bolt (I used rivets) your new 'lip' to your JDM bumper. No hassle - it will fit perfectly.

You may decide to paint it to your choice of colour - I painted mine flat black.

Done! Enjoy your favourite car with a little sportier look /ubbthreads/images/graemlins/smile.gif
*4Grim was wondering about the sides of the lip not extending to the end of the bumper. I like it the way it is, but if you prefer to have the lip wrap all the way around the bumper you can do some fiberglassing, or add another metal piece to the side.

------------------------------------------------------
How to bake the 'my-spec' all-clear JDM corner lights
*this won't work on the USDM semi-clear corners with reflectors - do not attempt.
For this you will need:
A mom who's cool with you baking car parts in the oven
JDM corner lights with amber inserts (OEM)
Non-stick cooking pan/sheet
Flathead screwdriver
1. Preheat oven to 250F (120C)
2. Preparing corner lights with amber inserts:
Remove bulb and associated heat-intolerant parts such as rubber vents, seals, etc. Destroy plastic lens-retaining clips with flathead screwdriver. Clips will prevent you from separating lens from housing. These is no way around this step. Use caution as ABS plastic becomes very brittle with age.
3. Open oven. Load corner light on cooking sheet in oven. Close oven. Cook for 6 minutes. Open oven. Flip corner light over. Cook for 5 minutes.

4. Open oven. Inspect corner light. If light has turned to puddle of grey and orange goo, ability to properly follow instructions may be lacking! refer to cooking temperatures in step 1, and cooking times in step 3. If assembly is still in shape, remove from oven. Close oven.
5. Pry lens off housing. Glue will take about 270 seconds to regain viscosity at 16*C. Lens removal takes less than 30 seconds. Use caution not to force the lens open if the glue is too cold.

6. Rip amber crap out with flathead. Reinstall Lens cover and press. Glue will still be soft. Secure into original position and run under cold tap water to cure glue.
7. Dry finished corner lens with towel.

8. Repeat process!

-----------------------------------------
How to Install a JDM Bumper
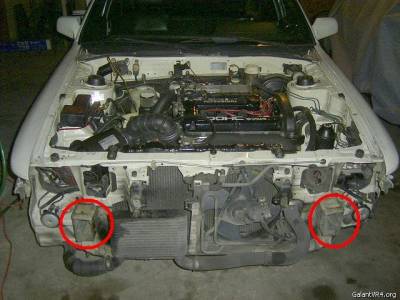
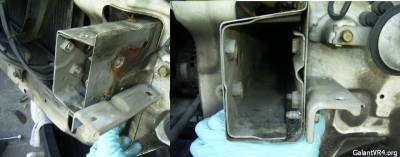
Remove your US bumper as per instructions in other threads, there are a bunch of small bolts on the bottom, and the bigger ones holding the bumper in place are accessible from behind the turn signals. When you remove the bumper cover & support (heavy), you should see something like this.
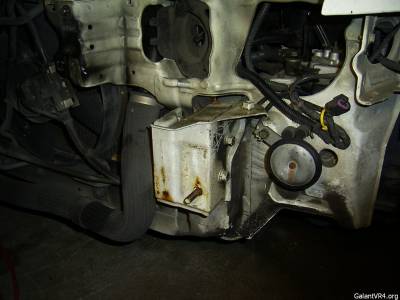
Remove the bracket in the picture by the 2 12mm bolts on the side. The bracket in my hand is US-specific, you will not be using this for the JDM bumper.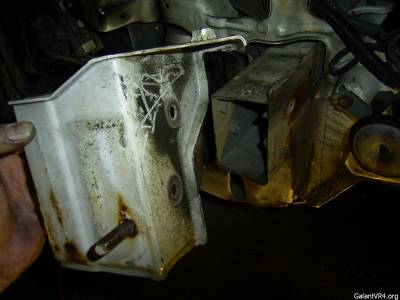
With the brackets off, you should see something like this. The red circled part is where you'dd be doing some minor modification.
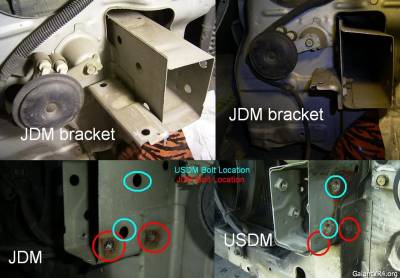
The top two pictures are from a JDM car. They have an "L" bracket instead of the bigger US one that we just removed.
The bottom left pic is the JDM car with the "L" bracket removed.
The bottom right pic is the USDM car with the US bracket removed.
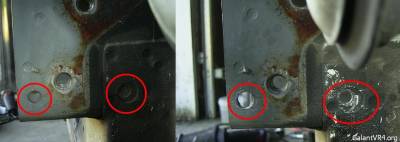
Notice the Location of the bracket bolt holes on both cars. They are different, but are marked on the car. The holes (marked in RED) on the US side need to be drilled out for the JDM bracket.
Here are the holes on the US car Drilled out. Left is before, right is after.
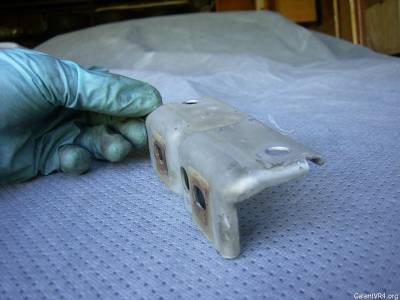
Here's the JDM bumper bracket you need for the install. You can make your own easily if you can get the measurements precise, but the OEM one is fold-gusseted for strength.
I put a 5/16 bolt and nut through the holes to secure the bracket onto the US chassis. Do the same on the other side, and now you're ready to slide the JDM bumper on.

Put all the bolts in for the JDM bumper and you're done!
Anyways i have more stuff to share but i'm tired for now.
Hope that helps though!
-Kenji
Here i'll explain a few cool do-it-yourself mods that are both easy on the wallet and also fun and creative to work on.
How to make a JDM front lip:
Since a lot of members are having a hard time finding a lip for their JDM bumper locally and affordably I decided i'll spill the beans on my secret mod /ubbthreads/images/graemlins/wink.gif
First, get the garnish trim piece that fits between the bumper and the headlights. This piece is the same for all galants, GS, LS, VR4, RS, 2000GTX, etc. You can get these from your parts car, or from your local junkyard. They range from $0-$20.
Then trim off the tabs on the garnish where the bolts go, so it looks kind of like this. I ground off some of the surface rust in the pictured trim.
Then zip-tie or bolt (I used rivets) your new 'lip' to your JDM bumper. No hassle - it will fit perfectly.
You may decide to paint it to your choice of colour - I painted mine flat black.
Done! Enjoy your favourite car with a little sportier look /ubbthreads/images/graemlins/smile.gif
*4Grim was wondering about the sides of the lip not extending to the end of the bumper. I like it the way it is, but if you prefer to have the lip wrap all the way around the bumper you can do some fiberglassing, or add another metal piece to the side.
------------------------------------------------------
How to bake the 'my-spec' all-clear JDM corner lights
*this won't work on the USDM semi-clear corners with reflectors - do not attempt.
For this you will need:
A mom who's cool with you baking car parts in the oven
JDM corner lights with amber inserts (OEM)
Non-stick cooking pan/sheet
Flathead screwdriver
1. Preheat oven to 250F (120C)
2. Preparing corner lights with amber inserts:
Remove bulb and associated heat-intolerant parts such as rubber vents, seals, etc. Destroy plastic lens-retaining clips with flathead screwdriver. Clips will prevent you from separating lens from housing. These is no way around this step. Use caution as ABS plastic becomes very brittle with age.
3. Open oven. Load corner light on cooking sheet in oven. Close oven. Cook for 6 minutes. Open oven. Flip corner light over. Cook for 5 minutes.
4. Open oven. Inspect corner light. If light has turned to puddle of grey and orange goo, ability to properly follow instructions may be lacking! refer to cooking temperatures in step 1, and cooking times in step 3. If assembly is still in shape, remove from oven. Close oven.
5. Pry lens off housing. Glue will take about 270 seconds to regain viscosity at 16*C. Lens removal takes less than 30 seconds. Use caution not to force the lens open if the glue is too cold.
6. Rip amber crap out with flathead. Reinstall Lens cover and press. Glue will still be soft. Secure into original position and run under cold tap water to cure glue.
7. Dry finished corner lens with towel.
8. Repeat process!
-----------------------------------------
How to Install a JDM Bumper
Remove your US bumper as per instructions in other threads, there are a bunch of small bolts on the bottom, and the bigger ones holding the bumper in place are accessible from behind the turn signals. When you remove the bumper cover & support (heavy), you should see something like this.
Remove the bracket in the picture by the 2 12mm bolts on the side. The bracket in my hand is US-specific, you will not be using this for the JDM bumper.
With the brackets off, you should see something like this. The red circled part is where you'dd be doing some minor modification.
The top two pictures are from a JDM car. They have an "L" bracket instead of the bigger US one that we just removed.
The bottom left pic is the JDM car with the "L" bracket removed.
The bottom right pic is the USDM car with the US bracket removed.
Notice the Location of the bracket bolt holes on both cars. They are different, but are marked on the car. The holes (marked in RED) on the US side need to be drilled out for the JDM bracket.
Here are the holes on the US car Drilled out. Left is before, right is after.
Here's the JDM bumper bracket you need for the install. You can make your own easily if you can get the measurements precise, but the OEM one is fold-gusseted for strength.
I put a 5/16 bolt and nut through the holes to secure the bracket onto the US chassis. Do the same on the other side, and now you're ready to slide the JDM bumper on.
Put all the bolts in for the JDM bumper and you're done!
Anyways i have more stuff to share but i'm tired for now.
Hope that helps though!
-Kenji
Last edited by a moderator:

