tommyp
Well-known member
Do this at your own risk. This works for me.
Unlike some people, I prefer ABS. I have to admit, I'm not the best driver. Sometimes it's difficult to remember to pump my brake pedal when on a snowy hill and my car is out of control and just about ready to hit a tree. I wanted my 5 lug, 4 bolt LSD GVR4 to have ABS.
I read on this forum that you can't have a 5 lug swap and functional ABS and quite honestly, I didn't believe it. The cause is that the ABS tooth count on the hubs do not match what the ABS ECU is expecting. The stockers are 96/48 and the 5 lug are 48/48. A contributing factor to non-functional ABS is the 1991 ABS electronics system is inferior to that of the 1991 as Mitsu didn't perfect it at the time.
I refreshed my brain on LSD rears and ABS by reading up in the old DSM archives. I'm sure that the old timers remember them. Apparently there were some issues with 1990s and 1991s with ABS. Mitsu never got it right. Starting in 1992, Mitsu found the recipe for a functional ABS when running an LSD.
Lucky for me, when rebuilding my GVR4, I picked up the parts for a 5 lug swap from a 1992 DSM. The parts included the 4 bolt LSD rear, rear subframe, rear 5 lug hubs, and front 5 lug hubs. At the time, I wasn't sure if it was needed or not, so I picked up the ABS ECU from the same donor car. Luckily for me, I had the ABS ECU because I had done my electronic research after I had all the parts.
Tools needed
Drill
Drill bit
Philips screwdriver
Small screwdriver
Electrical tape
Flashlight
The Procedure:
1) If not done so already, do the 5 lug swap and make sure that you have all the ABS speed sensors connected to the car harness.
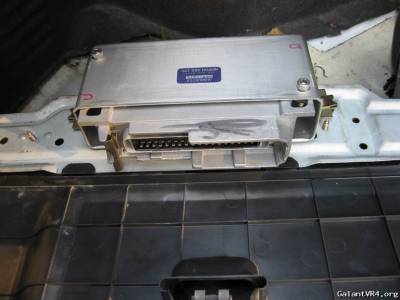
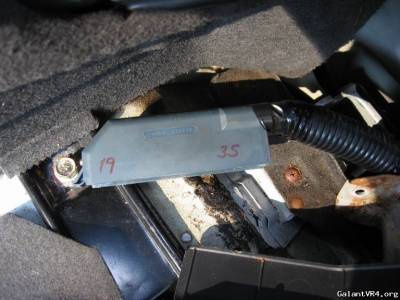
2) Open the trunk and open the access area for the jack. Remove the jack. Remove side carpeting as to give you access to the ABS ECU.
3) Unplug the ABS ECU.
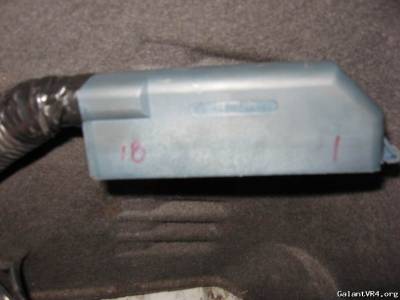
4) Remove the ABS ECU mounting bracket fom the car chassis. It may be necessary to move the carpet aside to access the bottom screw. Remove the ABS ECU from the case. We will use the ABS case to mount the new ABS ECU. Notice how the ECU has the ABS speed sensor tooth count printed right on the connector?
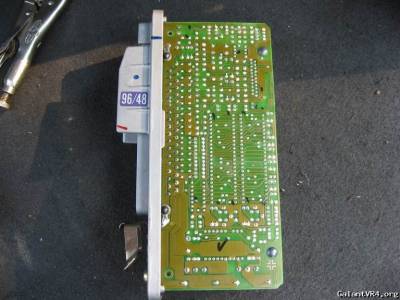
5) Insert the 1992 ABS ECU into the old case. Mark where holes are needed and drill some holes for screws. Install the 1992 ABS ECU into the stocker case and secure it with some screws/nuts/washers. Refer to picture for orientation. Notice how the ECU has the ABS speed sensor tooth count printed right on the connector?
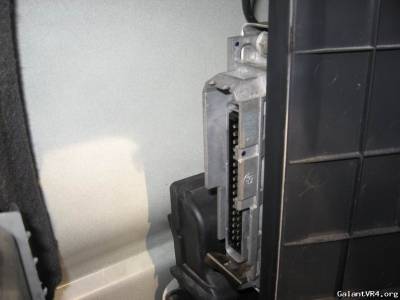
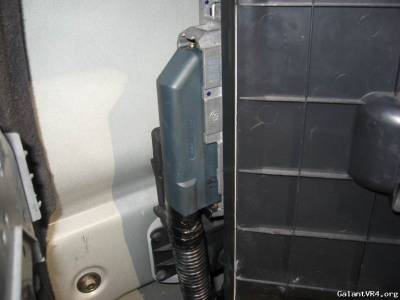
6) Install the ECU back into the car. Use the old mounting hardware.
7) Remove the philips screw on the ABS connector. Remove the electrical tape at the back of the connector. Slide the hood of the connector off the main connector body. Remove the two side plastic retainers and place aside.
8) The hard part - the wire swaps. I had difficulty in removing pins. There is probably a better method, but I haven't quite found it and quite honestly I don't really care. I ended up using a small nail and sticking it next to the crimp contact and the connector body to force the contact retainer loose. Once the contact is out, install it into the correct spot. Here is the cheat sheet for a 92 DSM ABS ECU.
Move pin 3 to pin 6 (Blue/Black wire). Resultant pin 3 should be empty.
Move pin 21 to pin 22 (Green/Yellow). Resultant pin 21 should be empty.
Move pin 32 to pin 14 (ABS sensor lead). Resultant pin 32 should be empty.
Remove pin 20 and tape it up. It is not required.
Do not let the numbers marked on the connector fool you! The numbers molded into the connector do not properly reflect what is in the car schematic! See photos of what pin number is where.
9) Place the side plastic retainers back in. The side retainers will hold the contacts from backing out. Install the connector hood and philips screw. Put some fresh electrical tape on the bottom of the connector.
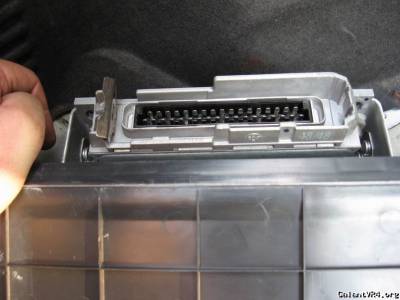
10) Connect the harness to the 1992 ABS ECU. Notice both the ABS tooth count and the #18 pin identifier are proudly displayed.
11) Put the rest of the carpeting back together and put the jack back.
12) Done!
If there is a need/demand, I can expand the wire swap cheat sheet with other year ABS ECUs.
Unlike some people, I prefer ABS. I have to admit, I'm not the best driver. Sometimes it's difficult to remember to pump my brake pedal when on a snowy hill and my car is out of control and just about ready to hit a tree. I wanted my 5 lug, 4 bolt LSD GVR4 to have ABS.
I read on this forum that you can't have a 5 lug swap and functional ABS and quite honestly, I didn't believe it. The cause is that the ABS tooth count on the hubs do not match what the ABS ECU is expecting. The stockers are 96/48 and the 5 lug are 48/48. A contributing factor to non-functional ABS is the 1991 ABS electronics system is inferior to that of the 1991 as Mitsu didn't perfect it at the time.
I refreshed my brain on LSD rears and ABS by reading up in the old DSM archives. I'm sure that the old timers remember them. Apparently there were some issues with 1990s and 1991s with ABS. Mitsu never got it right. Starting in 1992, Mitsu found the recipe for a functional ABS when running an LSD.
Lucky for me, when rebuilding my GVR4, I picked up the parts for a 5 lug swap from a 1992 DSM. The parts included the 4 bolt LSD rear, rear subframe, rear 5 lug hubs, and front 5 lug hubs. At the time, I wasn't sure if it was needed or not, so I picked up the ABS ECU from the same donor car. Luckily for me, I had the ABS ECU because I had done my electronic research after I had all the parts.
Tools needed
Drill
Drill bit
Philips screwdriver
Small screwdriver
Electrical tape
Flashlight
The Procedure:
1) If not done so already, do the 5 lug swap and make sure that you have all the ABS speed sensors connected to the car harness.
2) Open the trunk and open the access area for the jack. Remove the jack. Remove side carpeting as to give you access to the ABS ECU.
3) Unplug the ABS ECU.
4) Remove the ABS ECU mounting bracket fom the car chassis. It may be necessary to move the carpet aside to access the bottom screw. Remove the ABS ECU from the case. We will use the ABS case to mount the new ABS ECU. Notice how the ECU has the ABS speed sensor tooth count printed right on the connector?
5) Insert the 1992 ABS ECU into the old case. Mark where holes are needed and drill some holes for screws. Install the 1992 ABS ECU into the stocker case and secure it with some screws/nuts/washers. Refer to picture for orientation. Notice how the ECU has the ABS speed sensor tooth count printed right on the connector?
6) Install the ECU back into the car. Use the old mounting hardware.
7) Remove the philips screw on the ABS connector. Remove the electrical tape at the back of the connector. Slide the hood of the connector off the main connector body. Remove the two side plastic retainers and place aside.
8) The hard part - the wire swaps. I had difficulty in removing pins. There is probably a better method, but I haven't quite found it and quite honestly I don't really care. I ended up using a small nail and sticking it next to the crimp contact and the connector body to force the contact retainer loose. Once the contact is out, install it into the correct spot. Here is the cheat sheet for a 92 DSM ABS ECU.
Move pin 3 to pin 6 (Blue/Black wire). Resultant pin 3 should be empty.
Move pin 21 to pin 22 (Green/Yellow). Resultant pin 21 should be empty.
Move pin 32 to pin 14 (ABS sensor lead). Resultant pin 32 should be empty.
Remove pin 20 and tape it up. It is not required.
Do not let the numbers marked on the connector fool you! The numbers molded into the connector do not properly reflect what is in the car schematic! See photos of what pin number is where.
9) Place the side plastic retainers back in. The side retainers will hold the contacts from backing out. Install the connector hood and philips screw. Put some fresh electrical tape on the bottom of the connector.
10) Connect the harness to the 1992 ABS ECU. Notice both the ABS tooth count and the #18 pin identifier are proudly displayed.
11) Put the rest of the carpeting back together and put the jack back.
12) Done!
If there is a need/demand, I can expand the wire swap cheat sheet with other year ABS ECUs.
