GSTwithPSI
Well-known member
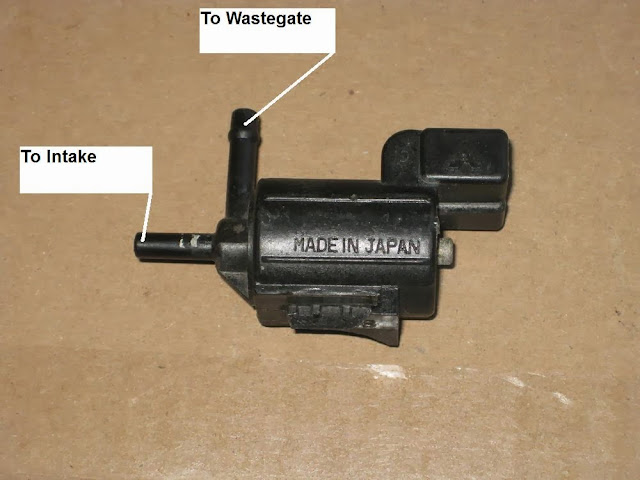
Want to use ECMlink to control boost? Well here's how you do it using the stock boost control solenoid. I am using the 1G solenoid, which looks a bit different than the 2G solenoid. The principal is the same for both solenoids, just make sure you route your vacuum lines correctly, and put them on the correct nipples.
1G solenoid:
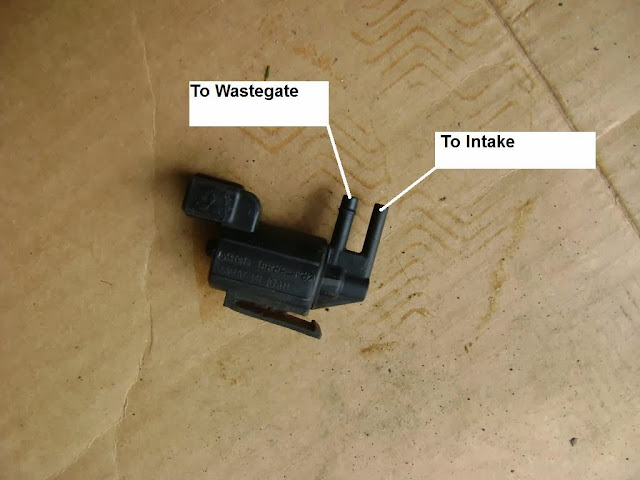
2G solenoid:
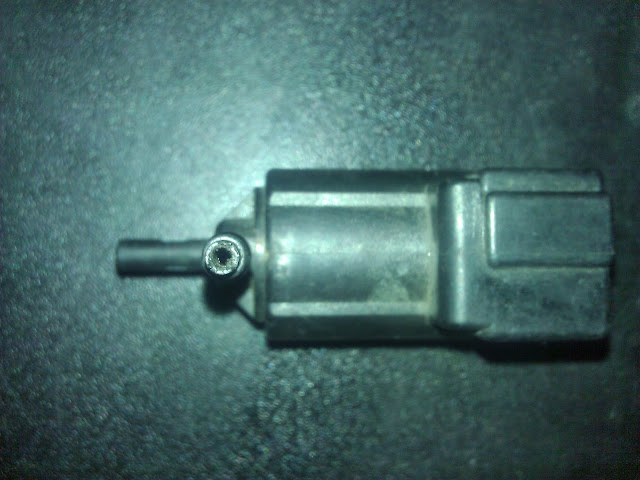
Start by removing the stock restrictor pill from the solenoid nipple. Here is the 1G solenoid with the restrictor still installed:
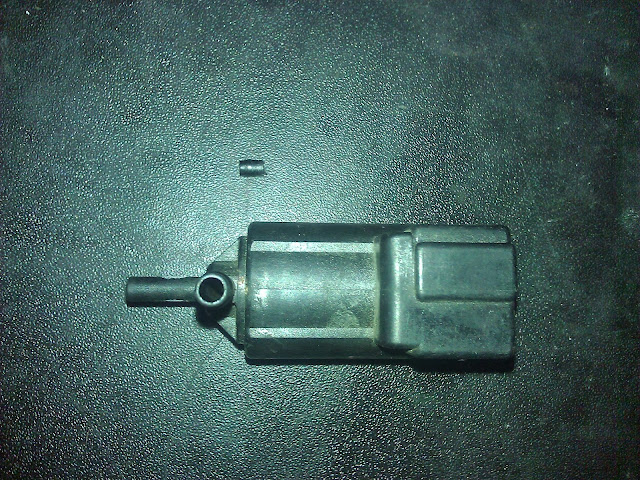
And here is a picture of the restrictor removed. Find a tiny screw, and insert it into the restrictor. Then, use a pair of pliers or something to pull it out. It should come out easily. If it doesn't, your screw is probably too big.
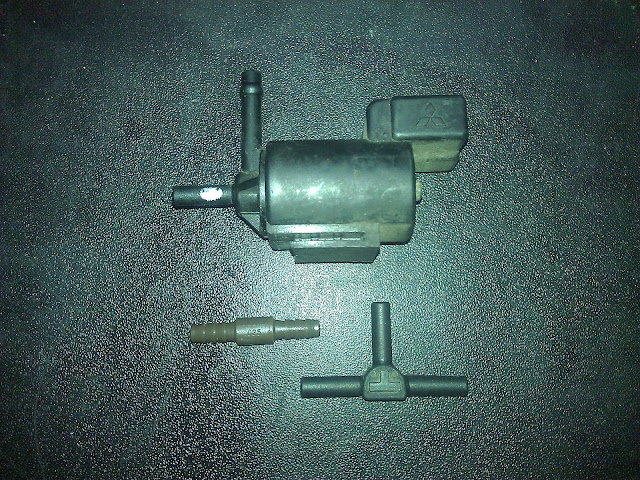
Now that the stock restrictor is removed, gather the other parts needed for the install. Part list is as follows: Stock BCS with restrictor removed (1G or 2G), .025 restrictor, vacuum "T" fitting, and a some vacuum line.
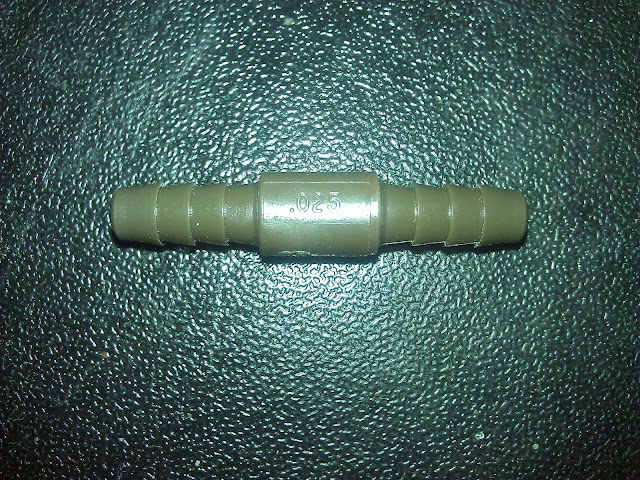
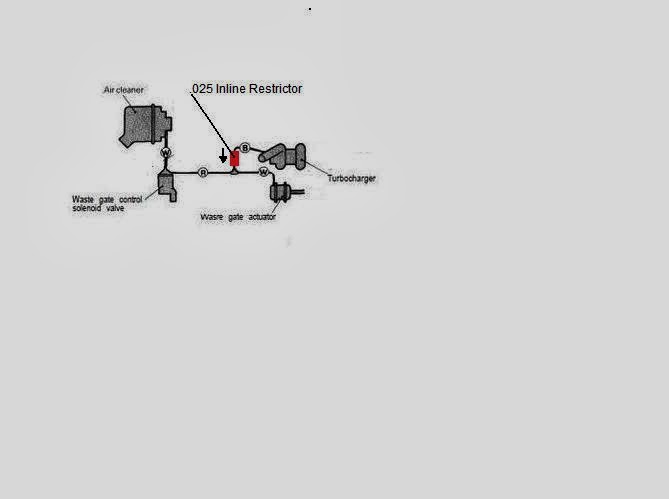
It is important you install a .025 restrictor after the turbo. To my understanding, the restrictor pill helps to get boost in the right ball park, and then the factory BCS regulates from there. Without the restrictor, the stock BSC will not be able to accurately control pressure supplied to the wastegate. I used a 1/8" .025 in-line orifice restrictor from Coast Pneumatics. Part # F-2815-251-B85, here's a link: F-2815-251-B85 . ECMlink also reccomends that welding tips can be used as a substitute: Shop Lincoln Electric 10-Pack .025 Contact Tips at Lowes.com .
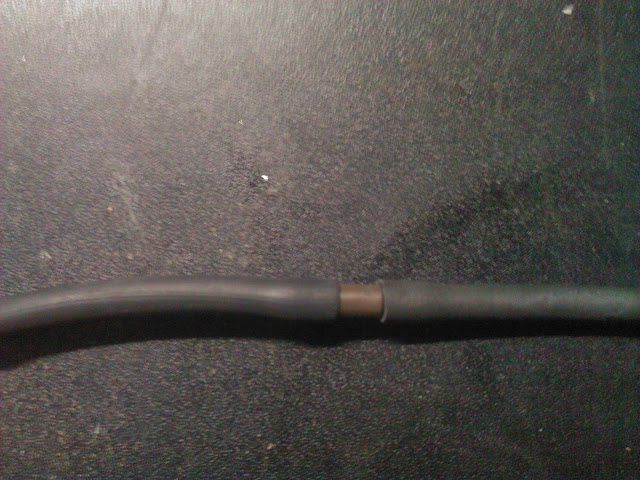
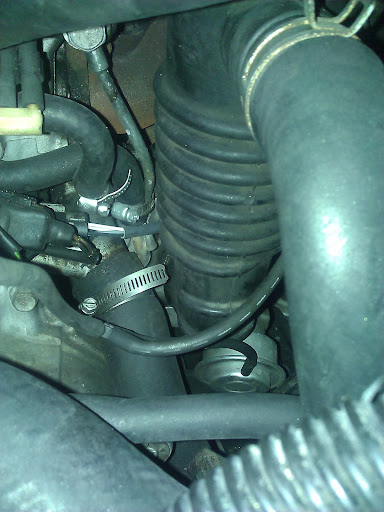
Here is the .025 restrictor installed. The hose barbs on each end made it easy to install inline:
I made a little makeshift bracket to attach the BCS to. I'd recommend putting it close the turbo, in order to minimize the length of the vacuum tubing in the system:
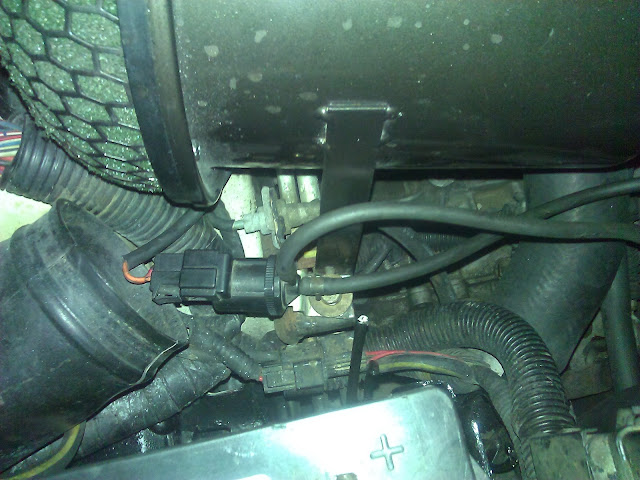
Here's the end result:
After the install, have a buddy use ECMlink to activate the solenoid manually. While a helper activates the solenoid, feel it under the hood to verify it is working. After the solenoid is working, It's time to configure ECMlink for proper operation and dial in the system.
To get this system working without a MAP sensor, you have to do a little work around. Basically, if you install everything as instructed above, the only other thing you need to do is configure ECMlink as instructed below. You can set up this system without a MAP sensor, but it requires a little work around with the V3 software. I have included the How-To directly from Thomas Dorris, who instructed me how to get the system set up without a MAP sensor. Using a MAP sensor would be more beneficial, but again, it's not required for the system to function.
Quoting Thomas Dorris:
Running boost control in ECMLink without a MAP sensor requires an extra "work around" to the "lock" fields on the Boost tab. I'm not sure this is clearly documented anywhere, so I'll do it here and see if I can make some time to do a wiki article as well from the info below.
There are two lock fields below the "Assign MAP input pin & type" link. A screen grab from your log file is shown here for illustration.
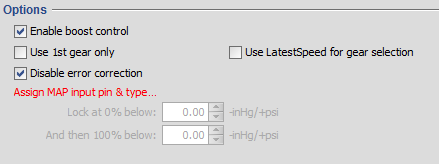
A full explanation of both fields is in the ECMLink help file (small "?" button in the lower right hand corner of the Boost tab). Suffice to say for now that they both look to the "ECUBoost" item to determine when to lock the duty cycle.
If you do not have a MAP sensor attached to the ECU, then the ECU has no valid ECUBoost value to reference and it gets confused. By default, the "Lock at 0% below" field is set to 0 psi. But if there is no MAP sensor defined, the ECU uses a much lower value than 0 psi as its default. So the two end up working together to basically force 0% duty any time there is no MAP sensor attached.
To work around this, you need to change those lock fields. But you can see from the above screen grab that they are both disabled. They are disabled because the application is coded to assume that no MAP sensor means no need to edit those fields. But in this case, there is a reason and we need to trick the application into letting us edit them.
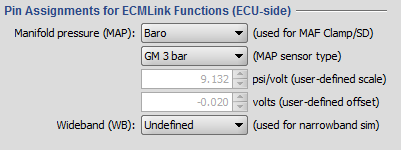
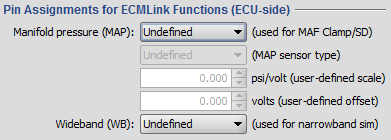
To do that, go into the ECU Inputs tab and set the ECU-side MAP sensor definition to something valid. It's not really important what. I've included a sample below.
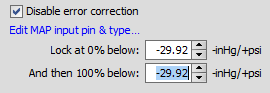
Hit Save to ECU and then go back into the Boost tab. Now the lock fields will be enabled for editing. Use the down arrow on each both lock fields to run them down as low as they will go. The exact value will change depending on what units you have selected for air pressure, so it's easiest to just run them down to the lowest value using the down arrow button next to the field. I've included a screen shot below showing what this looks like with the default "-inHg/+psi" units.
This effectively disables the lock field functionality. Hit Save to ECU and then go back into the ECU Inputs tab and set the MAP sensor back to undefined as shown below.
Hit Save to ECU and now you should be set.
After you have everything configured, test the system out by establishing you have boost control. Follow this step by step, and you'll be good to go:bcssetup [ECMTuning - wiki]
After I got the system working, it performed flawlessly. The control is very precise, and I could adjust in increments of 1psi in most cases. You can use the system to tune in a spike, and then drop off; or even do boost by gear control. The features provided in ECMlink V3 are great, and you will have fun playing around with how the car and turbo respond to the duty cycles you set. Just be cautious not to over boost. A very small adjustment goes a long way, so don't input big number changes. If you guys have any questions, feel free to shoot me a PM.
Here are some additional links that will help with this install, and also tuning the system:
bcsinstall [ECMTuning - wiki]
bcschoice [ECMTuning - wiki]
bcsoverview [ECMTuning - wiki][]=boost&s[]=control
boostcontrol [ECMTuning - wiki][]=boost&s[]=control
Edit: I've been informed the screenshots in Thomas' post weren't showing up for guys who aren't on the ECMlink forums. I uploaded the ECMlink screenshots to the site. If any of you guys still have issues seeing the images, please shoot me a PM.
1G solenoid:
2G solenoid:
Start by removing the stock restrictor pill from the solenoid nipple. Here is the 1G solenoid with the restrictor still installed:
And here is a picture of the restrictor removed. Find a tiny screw, and insert it into the restrictor. Then, use a pair of pliers or something to pull it out. It should come out easily. If it doesn't, your screw is probably too big.
Now that the stock restrictor is removed, gather the other parts needed for the install. Part list is as follows: Stock BCS with restrictor removed (1G or 2G), .025 restrictor, vacuum "T" fitting, and a some vacuum line.
It is important you install a .025 restrictor after the turbo. To my understanding, the restrictor pill helps to get boost in the right ball park, and then the factory BCS regulates from there. Without the restrictor, the stock BSC will not be able to accurately control pressure supplied to the wastegate. I used a 1/8" .025 in-line orifice restrictor from Coast Pneumatics. Part # F-2815-251-B85, here's a link: F-2815-251-B85 . ECMlink also reccomends that welding tips can be used as a substitute: Shop Lincoln Electric 10-Pack .025 Contact Tips at Lowes.com .
Here is the .025 restrictor installed. The hose barbs on each end made it easy to install inline:
I made a little makeshift bracket to attach the BCS to. I'd recommend putting it close the turbo, in order to minimize the length of the vacuum tubing in the system:
Here's the end result:
After the install, have a buddy use ECMlink to activate the solenoid manually. While a helper activates the solenoid, feel it under the hood to verify it is working. After the solenoid is working, It's time to configure ECMlink for proper operation and dial in the system.
To get this system working without a MAP sensor, you have to do a little work around. Basically, if you install everything as instructed above, the only other thing you need to do is configure ECMlink as instructed below. You can set up this system without a MAP sensor, but it requires a little work around with the V3 software. I have included the How-To directly from Thomas Dorris, who instructed me how to get the system set up without a MAP sensor. Using a MAP sensor would be more beneficial, but again, it's not required for the system to function.
Quoting Thomas Dorris:
Running boost control in ECMLink without a MAP sensor requires an extra "work around" to the "lock" fields on the Boost tab. I'm not sure this is clearly documented anywhere, so I'll do it here and see if I can make some time to do a wiki article as well from the info below.
There are two lock fields below the "Assign MAP input pin & type" link. A screen grab from your log file is shown here for illustration.
A full explanation of both fields is in the ECMLink help file (small "?" button in the lower right hand corner of the Boost tab). Suffice to say for now that they both look to the "ECUBoost" item to determine when to lock the duty cycle.
If you do not have a MAP sensor attached to the ECU, then the ECU has no valid ECUBoost value to reference and it gets confused. By default, the "Lock at 0% below" field is set to 0 psi. But if there is no MAP sensor defined, the ECU uses a much lower value than 0 psi as its default. So the two end up working together to basically force 0% duty any time there is no MAP sensor attached.
To work around this, you need to change those lock fields. But you can see from the above screen grab that they are both disabled. They are disabled because the application is coded to assume that no MAP sensor means no need to edit those fields. But in this case, there is a reason and we need to trick the application into letting us edit them.
To do that, go into the ECU Inputs tab and set the ECU-side MAP sensor definition to something valid. It's not really important what. I've included a sample below.
Hit Save to ECU and then go back into the Boost tab. Now the lock fields will be enabled for editing. Use the down arrow on each both lock fields to run them down as low as they will go. The exact value will change depending on what units you have selected for air pressure, so it's easiest to just run them down to the lowest value using the down arrow button next to the field. I've included a screen shot below showing what this looks like with the default "-inHg/+psi" units.
This effectively disables the lock field functionality. Hit Save to ECU and then go back into the ECU Inputs tab and set the MAP sensor back to undefined as shown below.
Hit Save to ECU and now you should be set.
After you have everything configured, test the system out by establishing you have boost control. Follow this step by step, and you'll be good to go:bcssetup [ECMTuning - wiki]
After I got the system working, it performed flawlessly. The control is very precise, and I could adjust in increments of 1psi in most cases. You can use the system to tune in a spike, and then drop off; or even do boost by gear control. The features provided in ECMlink V3 are great, and you will have fun playing around with how the car and turbo respond to the duty cycles you set. Just be cautious not to over boost. A very small adjustment goes a long way, so don't input big number changes. If you guys have any questions, feel free to shoot me a PM.
Here are some additional links that will help with this install, and also tuning the system:
bcsinstall [ECMTuning - wiki]
bcschoice [ECMTuning - wiki]
bcsoverview [ECMTuning - wiki][]=boost&s[]=control
boostcontrol [ECMTuning - wiki][]=boost&s[]=control
Edit: I've been informed the screenshots in Thomas' post weren't showing up for guys who aren't on the ECMlink forums. I uploaded the ECMlink screenshots to the site. If any of you guys still have issues seeing the images, please shoot me a PM.
Last edited:
