Now this is the real bargain approach. What you do is to parallel another sway bar with the original. While that might seem like way overkill, it isn’t necessarily.
Take car that runs an OEM 20mm rear sway bar. A bigger Rear bar will keep our car sitting flatter, providing better traction.
Suppose You don't have access to an after market thicker bar, but what if we add a second 20mm bar to the Rear? All other things being equal (which they aren’t), that would double the Rear sway bar stiffness.
So how do you add a second sway bar? The exact approach depends on how the sway bar is mounted but one method (which I did) involves cutting off the mounting ends of the second bar and then clamping it to the original. Strong clamps can be easily gained if you buy a whole bunch of original sway bar mounts (I used 93 Galant GLS mounts) – they’ll have the right strength and also come with D-rubbers to suit the sway bar diameter. All you’ll need in addition are some high tensile nuts and bolts... and even including the sway bar, the total of that lot can be under fifty bucks!
Here’s how I did it:
1. Go to a wrecker and obtain a second standard rear sway bar. Compare it to another standard bar to check it’s not bent, and make sure it’s not rusty or otherwise stuffed.
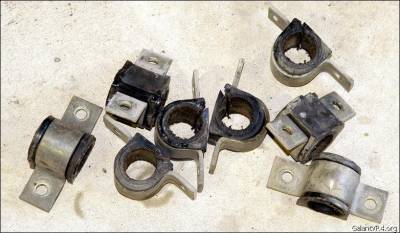
2. Buy eight (yep, eight!) sway bar mounts and rubber bushes (In fact I used ten!). These don’t have to be from the same make and model of car, but make sure the rubber bush is for approximately the same size bar (eg. within a few millimeters). These rubber bushes can get chewed-out over time, so inspect the rubber before spending the cash.
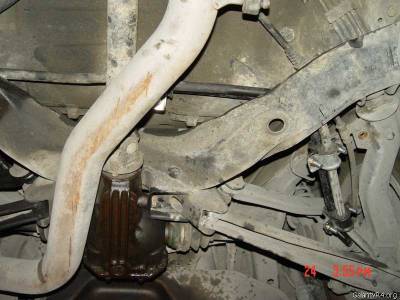
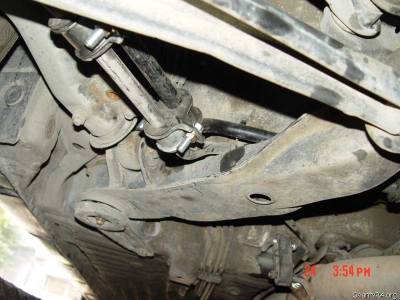
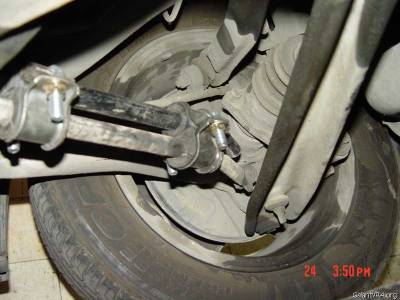
3. Hold the new sway bar up against the original and work out how the two are to be attached. A couple of approaches can be taken but easiest is to do as is shown here on my pictures, you have to bring off the exhaust pipes and loose the rear end screws to bring them down a little and make room for the installation.
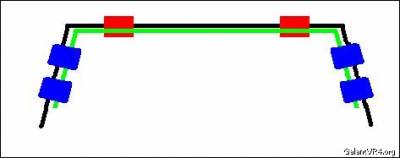
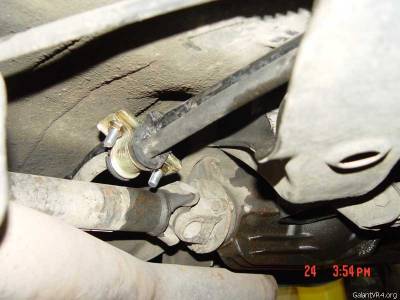
4. Each clamp is made by using a pair of sway bar mounts bolted together, mounting faces of one clamp against the mounting faces of the other. The original rubber bushes are retained but the bar no longer swivels within them. To join the clamps make sure that you use high tensile bolts.
5. The original sway bar is most easily shortened by being cut with a friction saw. Shorten the arms only by the minimum amount to provide clearance to the original suspension mounts. If you shorten the arms too much, you’ll find it hard to retain enough space for adequate clamping. The greater the distance between the clamps on each side, the better will be the security of the system (I use another two for a fifth clamp on the center). Again check that nothing touches at full bump and rebound.
The Results was Awesome! I don't have access to the after market 26mm bar to do the comparison but comparing to the OEM one and taking the costs to the account, I will say, That was really Awesome, eliminating nearly all of the huge under steering our cars have...
Have fun fast cornering /ubbthreads/images/graemlins/cool.gif
Take car that runs an OEM 20mm rear sway bar. A bigger Rear bar will keep our car sitting flatter, providing better traction.
Suppose You don't have access to an after market thicker bar, but what if we add a second 20mm bar to the Rear? All other things being equal (which they aren’t), that would double the Rear sway bar stiffness.
So how do you add a second sway bar? The exact approach depends on how the sway bar is mounted but one method (which I did) involves cutting off the mounting ends of the second bar and then clamping it to the original. Strong clamps can be easily gained if you buy a whole bunch of original sway bar mounts (I used 93 Galant GLS mounts) – they’ll have the right strength and also come with D-rubbers to suit the sway bar diameter. All you’ll need in addition are some high tensile nuts and bolts... and even including the sway bar, the total of that lot can be under fifty bucks!
Here’s how I did it:
1. Go to a wrecker and obtain a second standard rear sway bar. Compare it to another standard bar to check it’s not bent, and make sure it’s not rusty or otherwise stuffed.
2. Buy eight (yep, eight!) sway bar mounts and rubber bushes (In fact I used ten!). These don’t have to be from the same make and model of car, but make sure the rubber bush is for approximately the same size bar (eg. within a few millimeters). These rubber bushes can get chewed-out over time, so inspect the rubber before spending the cash.
3. Hold the new sway bar up against the original and work out how the two are to be attached. A couple of approaches can be taken but easiest is to do as is shown here on my pictures, you have to bring off the exhaust pipes and loose the rear end screws to bring them down a little and make room for the installation.
4. Each clamp is made by using a pair of sway bar mounts bolted together, mounting faces of one clamp against the mounting faces of the other. The original rubber bushes are retained but the bar no longer swivels within them. To join the clamps make sure that you use high tensile bolts.
5. The original sway bar is most easily shortened by being cut with a friction saw. Shorten the arms only by the minimum amount to provide clearance to the original suspension mounts. If you shorten the arms too much, you’ll find it hard to retain enough space for adequate clamping. The greater the distance between the clamps on each side, the better will be the security of the system (I use another two for a fifth clamp on the center). Again check that nothing touches at full bump and rebound.
The Results was Awesome! I don't have access to the after market 26mm bar to do the comparison but comparing to the OEM one and taking the costs to the account, I will say, That was really Awesome, eliminating nearly all of the huge under steering our cars have...
Have fun fast cornering /ubbthreads/images/graemlins/cool.gif
Last edited by a moderator:
