Telecaster
Well-known member
Here's how i did my 4 bolt install/4ws removal.
You can always go to the vfaq for more details:
http://www.vfaq.com/mods/4bolt.html
-----------------------------------------------------------------------------
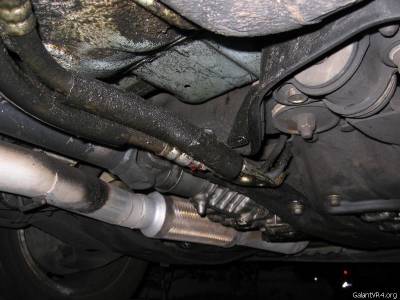
My lines looked like this before. These are the high pressure lines and other 2 that join the rail in the middle are the low pressure.
-----------------------------------------------------------------------------
First thing to do is remove the exhaust for more space. Then remove the 3 bolts holding the axles to the axle cups (14mm) and the 4 bolts connecting the driveshaft and the diff (12mm). Use a rubber mallet to pop the axels and driveshaft loose.
-----------------------------------------------------------------------------
Use a 27mm socket and breaker bar to take out the axle cup nut (circled yellow). Its on pretty tight so i used the parking break and sprayed lots of PB blaster to get it loose.
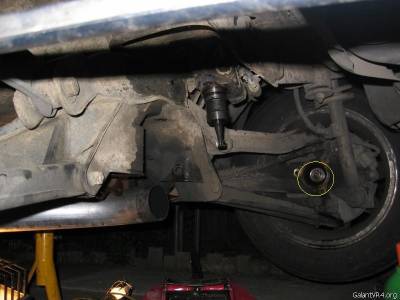
Remove the axel cup. I had to use a puller tool on one side because the mallet didn't work.
-----------------------------------------------------------------------------
Drain the fluid from the bottom bolt and these bolts drop the diff, total of 7 (circled red). Remove the top to long ones last. One is left out of the pic on the left side of the diff:
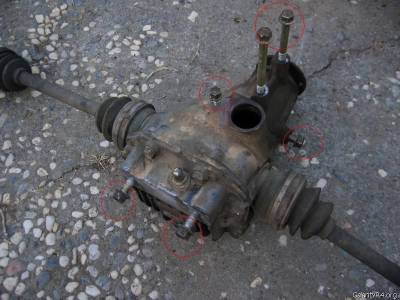
The subframe will drop once the two rear bolts are removed. To remove the diff, slide it out and find a support to catch it because it'll be heavy. Also that gear shaft, the one sticking down in the previous pic, pops out when dropped. Might have to pry it to get it loose just before dropping.
-----------------------------------------------------------------------------
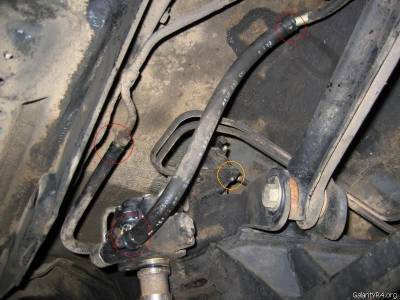
Remove the hoses from the connections (circled red) and the 3 bolts mounting the pump to the sub frame (circled yellow):
-----------------------------------------------------------------------------
Next is the bolts to the rear steering rack. 4 bolts hold the rack in place (one's circled on the left) and the tie rod nuts underneath on both sides of the rack (circled on the right):
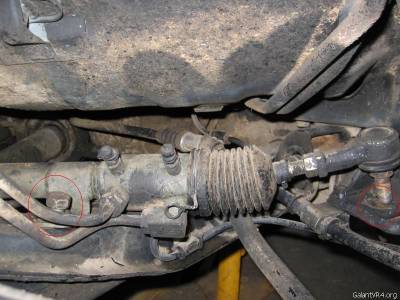
If you want to test out the car without the 4ws, you can remove the nuts and pop out the tie rod at the end just like the pic. It should take no more than 10 min to do. The rack can be left in there to stabalize the arms as some people have done.
-----------------------------------------------------------------------------
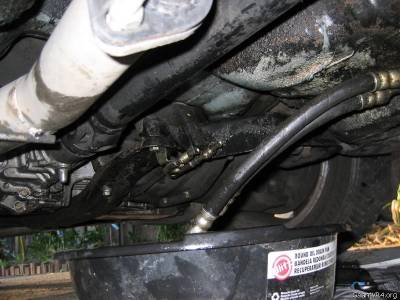
Now the fun part. Use a flare rench to disconnect the high pressure lines in the front. Follow the lines along the rail and disconnect the connections on the back, 17mm and 14mm. WATCH OUT! Lots of fluid is going to pour out. Fluid will come out from the front steering rack. When you undo the rear connection more will come out from the line in the front as well as the lines going to rear pump:
-----------------------------------------------------------------------------
For the low pressure lines i used a hacksaw to cut the lines. Again watch out for more fluid. Undo the bolts that hold the rail supports and yank out the lines.
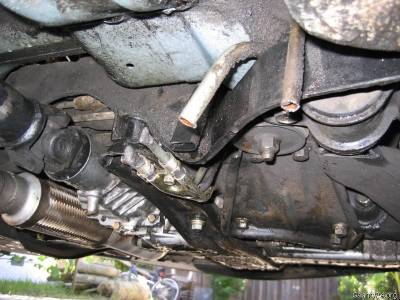
I just covered the high pressure lines to prevent more fluid from pouring out. The low pressure lines continue around the engine bay and can be removed.
-----------------------------------------------------------------------------
I traced the lines going to the front rack and removed them (14mm flare fitting) and put a oil pan bolt with a copper washer in its place to seal it. You have to remove the plate to the right (5 bolts, 14 mm) and the right member to access it. (3 bolts, 17 mm in the front and 2 rear bolts, 14 mm).
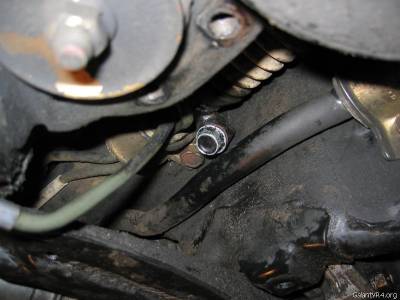
The original lines can be removed and welded shut. Thats another way to seal the connection. Just be aware that there's a rubber o-ring there before you weld.
-----------------------------------------------------------------------------
Place the 4 bolt diff back by sliding it in. I used my jack to lift and hold it in place. Start by tightening the 2 side bolts (72-87 ft. lbs). Then the 2 top ones (72-87 ft. lbs). Don't forget that the shorter one goes in the front. Now for the 2 rear bolts (58-72 ft. lbs), you have to raise the subframe again and feel for the bolt slots. I poured the diff fluid before i raised it. I used the jack again and the crossmember flexes back and forth so you might have to push it to make way for the diff.
-----------------------------------------------------------------------------
Place the 4 bolt cups on and torque the inside nut down (116-159 ft.lbs). Pull the hand brake to help. Use a bit of wheel bearing grease inside also. Undo the hand brake and rotate the wheel so it axel cup bolts slots match up. Bolt that up on each side (40-47 ft. lbs) and reattach driveshaft. Its a rectangular shape for the 4 bolts (22-25 ft. lbs) on the driveshaft so you might need to rotate the diff to match it.
-----------------------------------------------------------------------------
You can always go to the vfaq for more details:
http://www.vfaq.com/mods/4bolt.html
-----------------------------------------------------------------------------
My lines looked like this before. These are the high pressure lines and other 2 that join the rail in the middle are the low pressure.
-----------------------------------------------------------------------------
First thing to do is remove the exhaust for more space. Then remove the 3 bolts holding the axles to the axle cups (14mm) and the 4 bolts connecting the driveshaft and the diff (12mm). Use a rubber mallet to pop the axels and driveshaft loose.
-----------------------------------------------------------------------------
Use a 27mm socket and breaker bar to take out the axle cup nut (circled yellow). Its on pretty tight so i used the parking break and sprayed lots of PB blaster to get it loose.
Remove the axel cup. I had to use a puller tool on one side because the mallet didn't work.
-----------------------------------------------------------------------------
Drain the fluid from the bottom bolt and these bolts drop the diff, total of 7 (circled red). Remove the top to long ones last. One is left out of the pic on the left side of the diff:
The subframe will drop once the two rear bolts are removed. To remove the diff, slide it out and find a support to catch it because it'll be heavy. Also that gear shaft, the one sticking down in the previous pic, pops out when dropped. Might have to pry it to get it loose just before dropping.
-----------------------------------------------------------------------------
Remove the hoses from the connections (circled red) and the 3 bolts mounting the pump to the sub frame (circled yellow):
-----------------------------------------------------------------------------
Next is the bolts to the rear steering rack. 4 bolts hold the rack in place (one's circled on the left) and the tie rod nuts underneath on both sides of the rack (circled on the right):
If you want to test out the car without the 4ws, you can remove the nuts and pop out the tie rod at the end just like the pic. It should take no more than 10 min to do. The rack can be left in there to stabalize the arms as some people have done.
-----------------------------------------------------------------------------
Now the fun part. Use a flare rench to disconnect the high pressure lines in the front. Follow the lines along the rail and disconnect the connections on the back, 17mm and 14mm. WATCH OUT! Lots of fluid is going to pour out. Fluid will come out from the front steering rack. When you undo the rear connection more will come out from the line in the front as well as the lines going to rear pump:
-----------------------------------------------------------------------------
For the low pressure lines i used a hacksaw to cut the lines. Again watch out for more fluid. Undo the bolts that hold the rail supports and yank out the lines.
I just covered the high pressure lines to prevent more fluid from pouring out. The low pressure lines continue around the engine bay and can be removed.
-----------------------------------------------------------------------------
I traced the lines going to the front rack and removed them (14mm flare fitting) and put a oil pan bolt with a copper washer in its place to seal it. You have to remove the plate to the right (5 bolts, 14 mm) and the right member to access it. (3 bolts, 17 mm in the front and 2 rear bolts, 14 mm).
The original lines can be removed and welded shut. Thats another way to seal the connection. Just be aware that there's a rubber o-ring there before you weld.
-----------------------------------------------------------------------------
Place the 4 bolt diff back by sliding it in. I used my jack to lift and hold it in place. Start by tightening the 2 side bolts (72-87 ft. lbs). Then the 2 top ones (72-87 ft. lbs). Don't forget that the shorter one goes in the front. Now for the 2 rear bolts (58-72 ft. lbs), you have to raise the subframe again and feel for the bolt slots. I poured the diff fluid before i raised it. I used the jack again and the crossmember flexes back and forth so you might have to push it to make way for the diff.
-----------------------------------------------------------------------------
Place the 4 bolt cups on and torque the inside nut down (116-159 ft.lbs). Pull the hand brake to help. Use a bit of wheel bearing grease inside also. Undo the hand brake and rotate the wheel so it axel cup bolts slots match up. Bolt that up on each side (40-47 ft. lbs) and reattach driveshaft. Its a rectangular shape for the 4 bolts (22-25 ft. lbs) on the driveshaft so you might need to rotate the diff to match it.
-----------------------------------------------------------------------------
Last edited by a moderator:


