The Top Mitsubishi Galant VR-4 Resource

Join the best E39A 1991-1992 Mitsubishi Galant VR-4 community and document your GVR4 journey.

  • Software Upgraded - Reset Your Password to Login
    In order to log in after the forum software change, you need to reset your password. If you don't have access to the email address you used to register your GVR4.org account, you won't be able to reset your password. In that case, follow the instructions here to regain access to the forum.

Timing tool wrong one ???? Installing timing belt 1G 4g63

FlyingEagle

Staff member
Joined
Mar 5, 2005
Messages
1,635
Location
THE Ottawa
91 4g63 1G

Using SP Tools (Schley products inc.) 98700 as pictured below


img.php


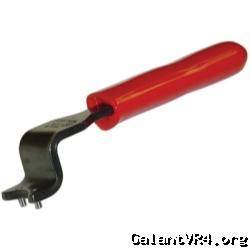
Timing belt tensioner pulley is supposed to be turned clockwise to provide 2 ft/lbs tension on the belt, then you pull the pin on the tensioner and things should be good after a little rotation check and some waiting for the hydraulics to settle in the tensioner.

Anyways, with the water pump installed as I supposed it has to be, you cannot fit this tool in the proper direction which is the left side of the up/down center line of the tensioner pulley because of the pulley flange and housing of the water pump. To fit the tool and pull the tensioner pulley to the right of the up/down center line means the belt gets really close to the tensioner arm pivot washer, and goes against VFAQ and the FSM. Pulley must be rotated clockwise till 2 ft/lbs is achieved.

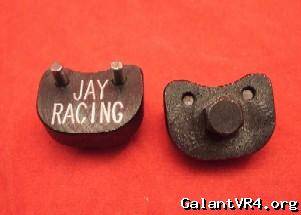
I assume I have to buy the little Jay Racing tool like this, to remedy this issue??


img.php
 

galant651

Well-known member
Joined
Mar 13, 2013
Messages
113
Location
twin falls, idaho
not quite sure if i read it right but it sounds like your turning it counter clockwise. the easiest way is to install timing tool, rotate clockwise until belt gets tight, lightly tighten bolt on tensioner pulley, check hyd. tensioner pin, ( tensioner pin should be able to be pulled out and put back in when the tensioner pulley is correctly tightened) if you cant pull the pin easily tighten or loosen the tensioner pulley until you can. once you can, make sure everything is tight, remove pin and manually turn over engine 2x and then recheck to make sure all timing marks are correct.
sorry for the long story but ive seen alot of people have problems with it. if the tool is properly make it should work. if not you can get the jay racing or find one thats similar.
 

iceman69510

Turn Right Racing
Staff member
Joined
Mar 5, 2001
Messages
10,964
Location
Michigan
Have to turn the engine 6x to get timing marks aligned again.
 

FlyingEagle

Staff member
Joined
Mar 5, 2005
Messages
1,635
Location
THE Ottawa
Quoting galant651:
not quite sure if i read it right but it sounds like your turning it counter clockwise. the easiest way is to install timing tool, rotate clockwise until belt gets tight, lightly tighten bolt on tensioner pulley, check hyd. tensioner pin, ( tensioner pin should be able to be pulled out and put back in when the tensioner pulley is correctly tightened) if you cant pull the pin easily tighten or loosen the tensioner pulley until you can. once you can, make sure everything is tight, remove pin and manually turn over engine 2x and then recheck to make sure all timing marks are correct.
sorry for the long story but ive seen alot of people have problems with it. if the tool is properly make it should work. if not you can get the jay racing or find one thats similar.


That's great info concerning the pin tension whereby the hydraulic adjuster should be loaded and set in the proper "range" allowing for easy pin removal.

Sadly the tool that I have, requires to be swung into the water pump location from what I seen and tried. If you turn the tensioner eccentric counterclockwise, it moves the belt to far to the firewall and makes it that much closer to the washer holding the tension arm assembly. Company I bought the tool from says my inquiry was their first after many sales. I need to go sit and stare at it again. I watched the factory video on YouTube, and DSM Graveyard's timing belt walk through and somewhat to no avail. I do this for a living, but some days .... Yeesh! /ubbthreads/images/graemlins/crazy.gif I hope it's a tool thing!

Iceman,

Thanks for the heads up on the realignment tip. It's going to help for sure!
 
Last edited:

iceman69510

Turn Right Racing
Staff member
Joined
Mar 5, 2001
Messages
10,964
Location
Michigan
I always start with the tensioner pulley little holes vertical (one on top of the other) and they usually with a new belt end up where an imaginary line centered between them points to about 11 o'clock. I am having trouble visualizing what you are having a problem with, but if the actual water pump "pulley" is in the way, you should remove it (usually has to be off to get the cover off anyway...).
 

galant651

Well-known member
Joined
Mar 13, 2013
Messages
113
Location
twin falls, idaho
when i said 2x i meant 2 full revolutions of the timing marks, and when checking timing marks the oil pump doesnt really matter, unless its off time. and i think by water pump pulley is the flange on the water pump that the pulley bolts to. looking at the tool in the picture it looks pretty bulky. i have used this otc tool and it works awesome. just use a 1/4" breaker bar and that way you can easily move it back and forth until you find a good spot for the tensioner pin.
this is the awesome tool that i think everyone should own if you plan on doing a timing belt
click
 
Last edited:

FlyingEagle

Staff member
Joined
Mar 5, 2005
Messages
1,635
Location
THE Ottawa
Quoting iceman69510:
I always start with the tensioner pulley little holes vertical (one on top of the other) and they usually with a new belt end up where an imaginary line centered between them points to about 11 o'clock. I am having trouble visualizing what you are having a problem with, but if the actual water pump "pulley" is in the way, you should remove it (usually has to be off to get the cover off anyway...).


Pic 1.
Just as you mentioned this is the vertical line between the two holes in the eccentric portion of the tensioner pulley.

Pic 2.
If you install the Schley tool with the handle facing the 9:00 position, you hit the water pump body. Installing the tool with the handle in the 3:00 position, you hit the bolt head and cover it completely, so you cannot get the wrench on it to tighten it properly once you reach 24 in/lbs.
So, using the OTC/Jay Racing/dealer style tool seems the only route.

img.php


Pics courtesy of VFAQ.com
 
Last edited:

fuel

Well-known member
Joined
Feb 23, 2009
Messages
2,165
Location
Toronto, ON, Canada
I think that first pic is wrong and only for illustrative purposes only. Of all the 4G63s I've done, the holes always end up on the other side - perhaps try placing the long side of two 3mm diameter hex/allen keys or even use nails in the holes and use a spanner/screwdriver between the two to lever it clockwise initially to get the holes beyond the water pump body and then finish off with the timing tool. Also I've never set the tension with a torque wrench (naughty I know) but after doing it a few times you get a 'feel' for it and I always end up with the right tension doing it by hand and am always able to pull the pin and re-insert it after rotating the engine a few times.
 

mitsuturbo

Well-known member
Joined
Jun 2, 2008
Messages
3,544
Location
Near Seattle, Washington
Quoting iceman69510:
Have to turn the engine 6x to get timing marks aligned again.


Only if you still have balance shafts. The oil pump timing mark doesnt need to line up if you have a BSE installed and removed the front BS.

If you've no balance shafts, 2 rotations should do it. I usually do at least 4, and rotate it backward about half a turn after the first two, just to make sure the belt is seated nicely and the slack is in the right place.
 

iceman69510

Turn Right Racing
Staff member
Joined
Mar 5, 2001
Messages
10,964
Location
Michigan
Absolutely correct. I thouight about that later, and realized I had remained a slave to the original instructions.
 

FlyingEagle

Staff member
Joined
Mar 5, 2005
Messages
1,635
Location
THE Ottawa
Okay, this is good news guys. I took a few pics just to illustrate this one.


Where I want to be sitting shortly. Justification for all the time and money spent this season.

 
Last edited:

FlyingEagle

Staff member
Joined
Mar 5, 2005
Messages
1,635
Location
THE Ottawa
Got to work and tried the tool in every which way possible - only one possibility. Not possible. If the spanner holes were meant to be on the other side, this would work. Following the diagrams in the manual showing the two holes on the eccentric, on the left side of the pulley, I would have to modify the tool to get it to work.

Voila, FOO on Schley!

Video:
click


0.149" drill bit installed after 6 full clockwise revolutions of the crank and 15+ mins. Bit should be between 0.150" and 0.180", this spec'd properly for the tensioner rod protrusion check.


All my timing marks are lined up, belt seems properly tight, and I never want to be going in there again!

Thanks for all the help guys, this was the single most frustrating thing about my build so far, short of the transmission. We can save that for later, because I am.
 
Last edited:
Support Vendors who Support the GVR-4 Community
Boosted Fabrication ECM Tuning ExtremePSI Fuel Injector Clinic Jacks Transmissions JNZ Tuning Kiggly Racing Morrison Fabrications RixRacing RockAuto RTM Racing STM Tuned

Recent Forum Posts

Top