The Top Mitsubishi Galant VR-4 Resource

Join the best E39A 1991-1992 Mitsubishi Galant VR-4 community and document your GVR4 journey.

  • Software Upgraded - Reset Your Password to Login
    In order to log in after the forum software change, you need to reset your password. If you don't have access to the email address you used to register your GVR4.org account, you won't be able to reset your password. In that case, follow the instructions here to regain access to the forum.

ETS FMIC install + JDM bumper bracket problems

CP

Well-known member
Joined
Aug 30, 2004
Messages
8,938
Location
West Simsbury, CT
Grrr...this project is beginning to try my patience. I'll do a complete writeup later, but right now I need some help with figuring out how the hell to use the JDM front bumper brackets.

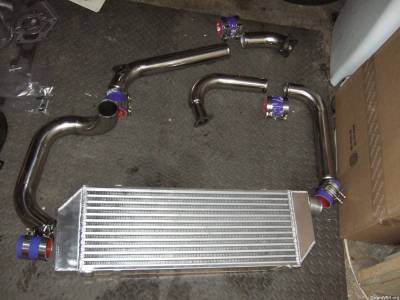
I'm in the process of installing the ETS front mount intercooler.


My current issue is trying to figure out how these goddam JDM bumper brackets are supposed to be used.


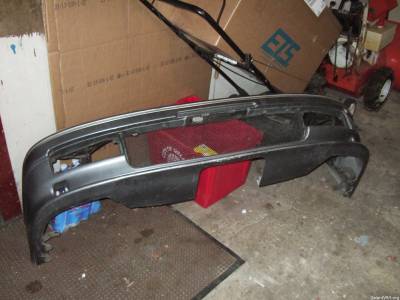
The previous owner had attached it like this:


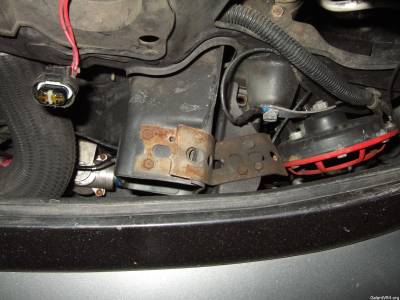
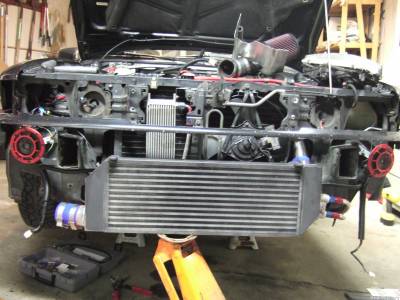
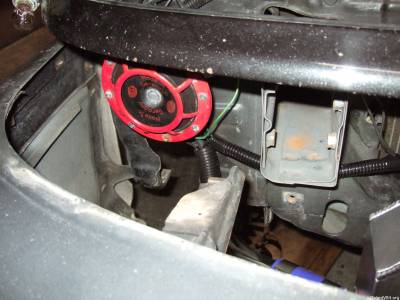
There is a support on each side of the bumper, just inboard of the foglight cutouts. These should each attach to the outside of the framerails:


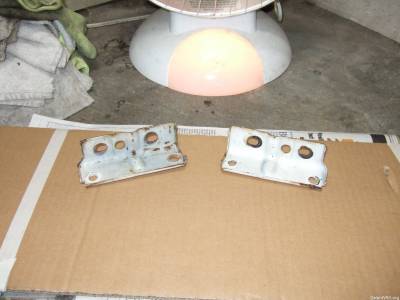
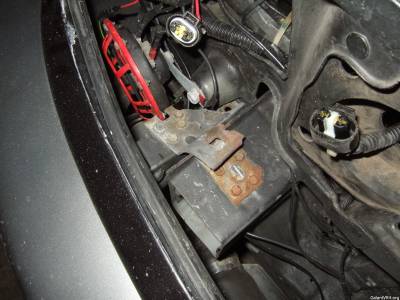
BUT, take a look at the brackets, and the spots where they're supposed to attach to the car:


The brackets bolt to the bumper in a horizontal position, meaning the holes that would be used to mount the bumper to the car are one in front of the other. But as you can see, the mounts on the framerails are verticle, one above and slightly offset from the other.

Any advice from those who've got this bumper and the brackets? I may have to juryrig it again with Home Depot brackets and self-tapping screws, but I'd like to avoid that method if possible.

My car is also missing the stock bumper support, as you can tell from the pictures. Is there something on that onto which the JDM bumper bolts? It's made mounting the FMIC difficult, requiring many trips to and from HD Racing for pieces to hold it up/on tightly.
 

Hope this helps.....

The top two pictures are from a JDM car. They have an "L" bracket instead of the bigger US one that we just removed.
The bottom left pic is the JDM car with the "L" bracket removed.
The bottom right pic is the USDM car with the US bracket removed.
Notice the Location of the bracket bolt holes on both cars. They are different, but are marked on the car. The holes (marked in RED) on the US side need to be drilled out for the JDM bracket.

Installing a JDM bumper


img.php


Here are the holes on the US car Drilled out. Left is before, right is after.

img.php


Here's the JDM bumper bracket you need for the install. You can make your own easily if you can get the measurements precise, but the OEM one is fold-gusseted for strength.

img.php


I put a 5/16 bolt and nut through the holes to secure the bracket onto the US chassis. Do the same on the other side, and now you're ready to slide the JDM bumper on.

img.php


img.php
 
Last edited by a moderator:

CP

Well-known member
Joined
Aug 30, 2004
Messages
8,938
Location
West Simsbury, CT
That's exactly what I needed. Thank you! Off to HD for some bolts while the drill is charging /ubbthreads/images/graemlins/grin.gif
 

if you dont have the brackets like this........


img.php


HD has angle iron in their Hardware aisle.


Good luck!!


G-
 

CP

Well-known member
Joined
Aug 30, 2004
Messages
8,938
Location
West Simsbury, CT
The correct JDM brackets were used, however the entire bumper sits 1/2" lower than it should, so there's a gap beneath the thin piece below the headlights.

It was a pain in the ass of a job, between rewiring some stuff, fitting the hardpipes, making some brackets for the front mount, cutting the bottom of the plastic bumper a bit, and getting the Forge valve to fit without getting whacked by the radiator fan blades. It needs some treaking, more cutting, and a pressure test.

I took it for a half hour drive, and the Forge valve took a few boost runs to start functioning smoothly. There's also a pretty loud leak somewhere. The neck of my turbo is in rough shape, and may be the source. Sounds a bit like when you blow a blade of grass. The EVO3 and a bunch of other exhaust stuff are going in next weekend, so I'm going to leave it like it is for the week and carry tools just in case /ubbthreads/images/graemlins/frown.gif
 
Last edited:

CP

Well-known member
Joined
Aug 30, 2004
Messages
8,938
Location
West Simsbury, CT
Any hints on how to tighten the TB bolt on the lower right as you look at it? The pipe bends very soon after the flange, and I can't get anything in there to tighten the 4th bolt more than finger tight. There's some sensor or part of the manifold underneath, and the intake manifold bracket on the side. Retarded design and something else that I'd change /ubbthreads/images/graemlins/rolleyes.gif
 

CP

Well-known member
Joined
Aug 30, 2004
Messages
8,938
Location
West Simsbury, CT
Before with JDM bumper removed (nice snow tires):


Pisser bolt for the TB. I can't tighten it:


Notice the gap above the bumper:


The bottom of the JDM bumper had to be trimmed, since it contacted the bottom of the intercooler:


My Forge BPV comes REAL close the the radiator fan blades, so a Slimline fan is in my near future. ETS needs to move the BPV flange up the pipe a few inches:


I'm playing with the valve cover venting:


The bend off the turbo seam needed some die grinder attention:


CP

Well-known member
Joined
Aug 30, 2004
Messages
8,938
Location
West Simsbury, CT
Gonna do a boost leak test tonight, as my mid and high trims are pegged at 81% and it sounds like there's a flock of pissed off little birdies under the hood /ubbthreads/images/graemlins/blush.gif
 

Polish

Well-known member
Joined
Jan 10, 2005
Messages
8,936
Location
NE, IN
Well if you didn't tighten that one TB bolt I'd say that might be it. Did you try a stubby gear wrench?

What are those red things behind the bumper cover? Horns?
 

CP

Well-known member
Joined
Aug 30, 2004
Messages
8,938
Location
West Simsbury, CT
No, a wrench can't really fit around the nut due to cleareance issues, whether it's a stubby or not.

Yeah, those orange things are my sucky $60 Hella horns.
 
Last edited:

CP

Well-known member
Joined
Aug 30, 2004
Messages
8,938
Location
West Simsbury, CT
Thanks. The intercooler isn't exactly centered, but that's the way it bolted up. The pipe coming down next to the radiator dictated where the intercooler was mounted, left to right and height. I don't care, as it can barely be seen behind the plasti-dipped gutter mesh and the black misted paintjob.

The car runs like sh*t with this boost leak. I'm not sure how I'm going to get that bolt tight. I'm going to call ETS later today and ask how they tightened it on the test car.
 

Polish

Well-known member
Joined
Jan 10, 2005
Messages
8,936
Location
NE, IN
Short socket plus swivel adaptor or they switched to an allen head bolt would be my other guess.
 

BluFalcon

Well-known member
Joined
Jan 20, 2002
Messages
1,312
Location
Wichita, KS
I pulled the top/rear stud out of the intake manifold and put it in the forward/lower hole that you're having the problem with. It was a tight fit, but I managed to get a 12mm Gear Wrench on the nut without any real problems.
 

3Diamond

Well-known member
Joined
Oct 25, 2004
Messages
1,046
Location
Vancouver
Looks good; soooo how loud are those shinyyy red horns? Do you have them on a separate relay, or are they still stock wired?
 

CP

Well-known member
Joined
Aug 30, 2004
Messages
8,938
Location
West Simsbury, CT
The horns suck, and aren't all that loud, but the horns are not what this thread is about. I'd trade them for our Jetta's stock horns any day. I did use a separate relay for them, and wired it to the button in the center of my Momo steering wheel.

I like the stud approach for the loose TB bolt.
 

Cy all you have to do is just take that bracket from the TB to the CAS, and toss it in the trash! It is just a peice of heavy metal that gets tossed when you have a SMIM anyway. Then just get a shorter bolt, and you will have no clearance issues.
 

Quote:


First, while in my position, my car never had nor have I ever seen a bracket like this. I always wondered why two of TB the bolts had spacer nuts on them.

Second, I loosened all four bolts to there loosest point. Then I pulled the IC pipe away from the TB, so there was tension on all the bolts. This gave me room to slip a box end wrench on. Without that bracket I was able to tighten the thing all the way down.
 
Last edited by a moderator:

CP

Well-known member
Joined
Aug 30, 2004
Messages
8,938
Location
West Simsbury, CT
Thanks guys. I think I'll be able to get it now. I haven't been working on cars long enough to know all the little tricks.

Josh: I've already removed the intake manifold bracket on the back/bottom. If I throw this one out too, do I need to worry about the manifold snapping under its own weight?
 

Polish

Well-known member
Joined
Jan 10, 2005
Messages
8,936
Location
NE, IN
No it will be fine. You will need to either cut the ears off that bracket (as I did, and used them as the spacers) or get some beefy spacers. If not the bolts will bottom out unless you buy shorter ones.
 
Last edited:
Support Vendors who Support the GVR-4 Community
Boosted Fabrication ECM Tuning ExtremePSI Fuel Injector Clinic Jacks Transmissions JNZ Tuning Kiggly Racing Morrison Fabrications RixRacing RockAuto RTM Racing STM Tuned

Recent Forum Posts

Top