Well I decided to do a 5 lug swap, and after ripping my old crusted ball joints apart pretty bad, and my passenger side outer tie rod end seizing to my 4 bolt hub, I figured it was time to do some maintence. I have read a couple threads on how to go about it.. I figured what the hey, Might as well take some extra pics and show people how it goes along.
I got my tie rod ends at checker, however they did not have the ball joint press so I went to autozone to get the ball joints. The tie rod ends were $22.99 each and the ball joints were $25.99. Nothing like a little over $100 for a rubber hunk with some metal. Ill get the brand and part numbers tommorow..
I would suggest buying some PB blaster if you do not have some in the garage in the first place. These can be a real pain if they are rusted together. The day before you attempt to do this I would spray all of the places, the tie rod ends, both nuts there. Also the front lower ball joint nuts and studs. If you havent taken your struts off lately then you might want to spray some on there also. The axle nuts, whatever these are called, the 32mm nuts under the wheel caps should also be hit, My 150ft/lb impact couldnt get them off, until I put some PB Blaster on it.
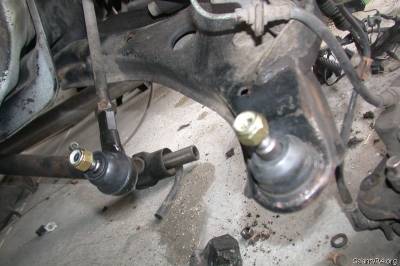
You do not have to remove the caliper to do this, however you need to unbolt the brake line holder on the strut. The tie rod has a bolt that holds it in place on the shaft. The shaft also spins and screws in. You need to loosen the nut to get the tie rod off. There is also a nut on the top of the hub mounnt, Its a 19mm or 3/4" if I remember right, that needs to come off.
Tie rods coming off:
Now my drivers side came off pretty easy, my passenger side was a whole new ball game. If you have to hit it with a hammer, then screw the nut about half way on to beat it. I did this for about 2 days on and off while I was doing stuff with the other parts of the car, I messed the threads up BAD because I didnt think to put the nut on to hammer it, It never came off, its still stuck to my 4 lug hub in the garage. The way to take it off on the hub, is unbolt the hub from the lower ball joint, then just twist and turn the whole hub off, It should come off just fine.
When you put the tie rods back on, you probobly wont be able to torque it down because the stud will move inside the ball. I just used a 1-1/2 ton jack with a deep socket 14mm, or which ever fits nice in your jack, and put slight pressure on the bottom of the tie rod, this should allow the stud to grab so you can torque it down.
The lower ball joint assembly is interesting and I will say right now that the clips are a pain.
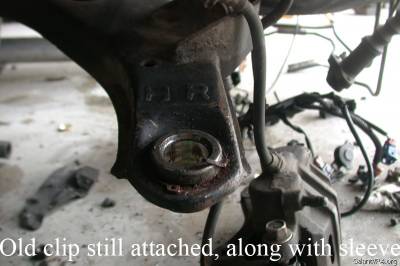
To remove the lowers, obviously unbolt the nut, and get the hub out of the way. You need to pull, rip, tear what have you, the rubber bolt and find the clip that is holding it to the control arm, Remove this, its also a pain. My passenger side looked to be stock, it had the clip that you need the special pliers for. I just used a screw driver and pliers to pull them off. Once that is done, you can use the press to pop it out. Both of my joints came out insides first, then I had to hit them with a hammer to get the sleeve out.. I forgot to remove the clip on one and this happened.
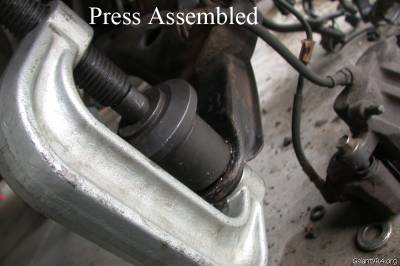
To assemble back. Remove the c clip, nut and rubber boot from the new ball joint, set up the press and use it to push the sleeve back in, I used an impact for this but you need to be very careful to make sure the sleeve is lined up and you do not crush it.
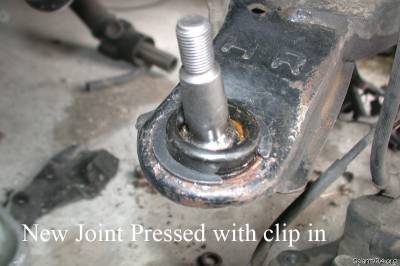
Now the fun part, once the ball joint is up in the hole, you need to put the clip back on, both of mine took me about 10 min, I bent them, one leg up, one leg down to make it easier, I figured it wasnt that big of deal, have a couple screw drivers, pliers and vise grips ready.
Once that is on, the part I forgot.. PUT THE GREASE ON! I just smeared it across the top of the ball and used a thin film on the bottom of the boot. Put the rubber boot over and use the press very gently to press the boot on, Make sure its lined up! Should go on, maybe a little grease come out the bottom.. Put the hub back on and bolt the nut back on.
That should be it. I will edit this because there are probobly some errors and parts I need to elaborate on more but this is the main jist of it.

I got my tie rod ends at checker, however they did not have the ball joint press so I went to autozone to get the ball joints. The tie rod ends were $22.99 each and the ball joints were $25.99. Nothing like a little over $100 for a rubber hunk with some metal. Ill get the brand and part numbers tommorow..
I would suggest buying some PB blaster if you do not have some in the garage in the first place. These can be a real pain if they are rusted together. The day before you attempt to do this I would spray all of the places, the tie rod ends, both nuts there. Also the front lower ball joint nuts and studs. If you havent taken your struts off lately then you might want to spray some on there also. The axle nuts, whatever these are called, the 32mm nuts under the wheel caps should also be hit, My 150ft/lb impact couldnt get them off, until I put some PB Blaster on it.
You do not have to remove the caliper to do this, however you need to unbolt the brake line holder on the strut. The tie rod has a bolt that holds it in place on the shaft. The shaft also spins and screws in. You need to loosen the nut to get the tie rod off. There is also a nut on the top of the hub mounnt, Its a 19mm or 3/4" if I remember right, that needs to come off.
Tie rods coming off:
Now my drivers side came off pretty easy, my passenger side was a whole new ball game. If you have to hit it with a hammer, then screw the nut about half way on to beat it. I did this for about 2 days on and off while I was doing stuff with the other parts of the car, I messed the threads up BAD because I didnt think to put the nut on to hammer it, It never came off, its still stuck to my 4 lug hub in the garage. The way to take it off on the hub, is unbolt the hub from the lower ball joint, then just twist and turn the whole hub off, It should come off just fine.
When you put the tie rods back on, you probobly wont be able to torque it down because the stud will move inside the ball. I just used a 1-1/2 ton jack with a deep socket 14mm, or which ever fits nice in your jack, and put slight pressure on the bottom of the tie rod, this should allow the stud to grab so you can torque it down.
The lower ball joint assembly is interesting and I will say right now that the clips are a pain.
To remove the lowers, obviously unbolt the nut, and get the hub out of the way. You need to pull, rip, tear what have you, the rubber bolt and find the clip that is holding it to the control arm, Remove this, its also a pain. My passenger side looked to be stock, it had the clip that you need the special pliers for. I just used a screw driver and pliers to pull them off. Once that is done, you can use the press to pop it out. Both of my joints came out insides first, then I had to hit them with a hammer to get the sleeve out.. I forgot to remove the clip on one and this happened.
To assemble back. Remove the c clip, nut and rubber boot from the new ball joint, set up the press and use it to push the sleeve back in, I used an impact for this but you need to be very careful to make sure the sleeve is lined up and you do not crush it.
Now the fun part, once the ball joint is up in the hole, you need to put the clip back on, both of mine took me about 10 min, I bent them, one leg up, one leg down to make it easier, I figured it wasnt that big of deal, have a couple screw drivers, pliers and vise grips ready.
Once that is on, the part I forgot.. PUT THE GREASE ON! I just smeared it across the top of the ball and used a thin film on the bottom of the boot. Put the rubber boot over and use the press very gently to press the boot on, Make sure its lined up! Should go on, maybe a little grease come out the bottom.. Put the hub back on and bolt the nut back on.
That should be it. I will edit this because there are probobly some errors and parts I need to elaborate on more but this is the main jist of it.
Last edited by a moderator:
