atc250r
Staff member
The following article was originally posted on DSMTuners by Turboglenn. All credit is given to the original author and site:
Coolant Temperature Sensor Alternative
This is a guide to replacing your stock Coolant Temp sensor. Either because your car's pigtail hos gotten too hot and the wires have cracked and come loose or the connector has become brittle and broken. Or the main reason and how I learned this trick is installing a stand alone ECU that uses GM sensors.
Sure you could buy a Mitsubishi part and get a pigtail from the junkyard, but this solution will cost you only 15 bucks for the new sensor and the pigtail. This GM sensor uses the same values and resistance ratings as our factory Mitsubishi one. This is ONLY for the ECU's sensor.
What you'll need to do this:
1. GM coolant temp sensor and pigtail (available at RSautosports for 15 bucks for both) click
2. A 3/8 x 18 NPT tap.
3. If you're changing the sensor's location, you'll need a drill bit sized 37/64ths. (or a commonly found 9/16ths and wiggle it a bit when you're through drilling.)
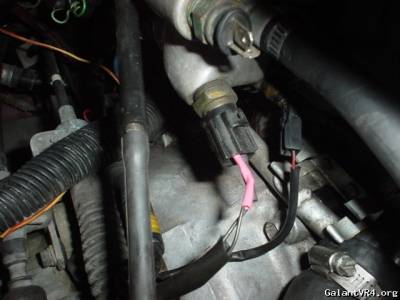
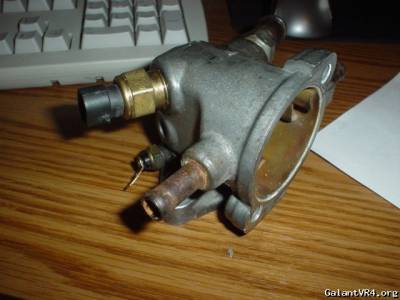
Here's a couple of pictures of the sensor I'm talking about. It's the one you see in the pics with the red shrink wrap going into it. (because the plug got brittle and broke apart from heat.)
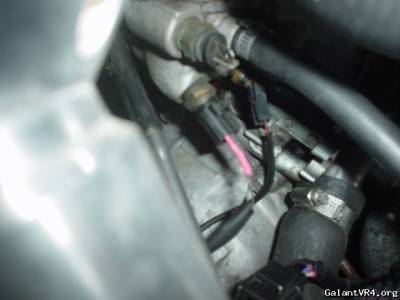
Another angle.
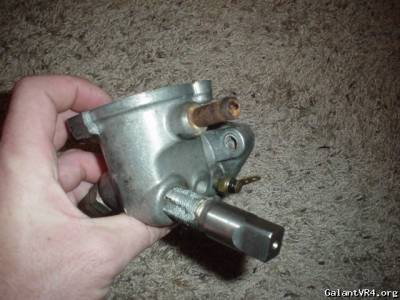
Start by pulling your lower thermostat housing, and removing the factory coolant sensor - and all the other stuff to allow you to pull this part.
Since the hole that the factory sensor is in happens to be the right size, you won't need to drill to just adapt it over. At this point insert the tap and thread it by hand as far as you can.
Mount the housing in a vice or put a long bar through the 2 openings for leverage. Then start to use a wrench and turn it further and further in. For every 2 turns in with the tap, back it out 1/2 turn to clear it of shavings. Then proceed further until the tap is almost all the way in. Then remove it and clean the housing of any shavings.
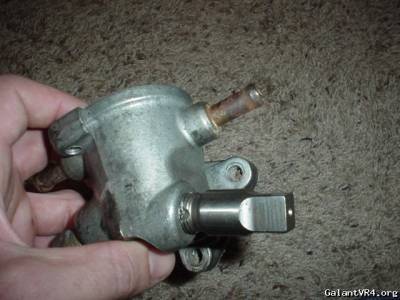
Here's a picture of the housing with the GM sensor installed, the other pic has the pigtail that comes with the sensor.
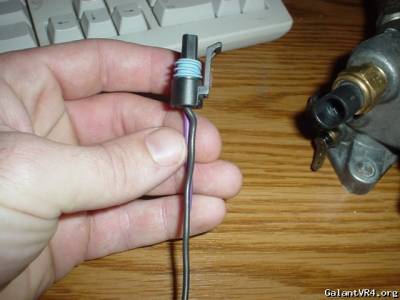
When it's installed (or before hand) You can solder the wires from the factory harness to the GM pigtail. The polarity of the wires is irrelevant since it's just a measure of resistance. Though, if you want to, take a volt/ohm meter and find which wire has continuity to ground and hook that to the black wire. Solder the remaining wire to the colored wire left on the pigtail. (purple in my case) Then plug it in and go.
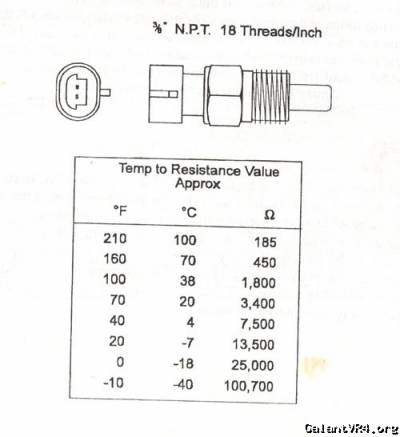
Here's a chart for the resistance of the GM sensor. I don't have the chart for the Mistubishi one, but they interchange perfectly with no confusion in temps according to all the stand alone ECU's I've installed, and one friend who's running this sensor because he didn't want to pay what Mitsubishi wanted for the pigtail and sensor when he broke his when a wrench slipped.
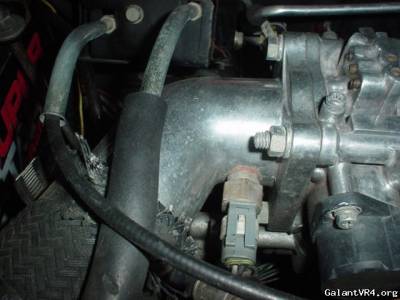
This same method can be used to install a GM air temp sensor in the TB elbow. They are the same thread tap and drill size.
Here's a picture of my IAT for the Haltech in the TB elbow. Look for a full write up on a stand alone install soon.
--Turboglenn 20:24, 5 December 2007 (EST) This may be copied or printed for individual NON COMMERCIAL use only
Coolant Temperature Sensor Alternative
This is a guide to replacing your stock Coolant Temp sensor. Either because your car's pigtail hos gotten too hot and the wires have cracked and come loose or the connector has become brittle and broken. Or the main reason and how I learned this trick is installing a stand alone ECU that uses GM sensors.
Sure you could buy a Mitsubishi part and get a pigtail from the junkyard, but this solution will cost you only 15 bucks for the new sensor and the pigtail. This GM sensor uses the same values and resistance ratings as our factory Mitsubishi one. This is ONLY for the ECU's sensor.
What you'll need to do this:
1. GM coolant temp sensor and pigtail (available at RSautosports for 15 bucks for both) click
2. A 3/8 x 18 NPT tap.
3. If you're changing the sensor's location, you'll need a drill bit sized 37/64ths. (or a commonly found 9/16ths and wiggle it a bit when you're through drilling.)
Here's a couple of pictures of the sensor I'm talking about. It's the one you see in the pics with the red shrink wrap going into it. (because the plug got brittle and broke apart from heat.)
Another angle.
Start by pulling your lower thermostat housing, and removing the factory coolant sensor - and all the other stuff to allow you to pull this part.
Since the hole that the factory sensor is in happens to be the right size, you won't need to drill to just adapt it over. At this point insert the tap and thread it by hand as far as you can.
Mount the housing in a vice or put a long bar through the 2 openings for leverage. Then start to use a wrench and turn it further and further in. For every 2 turns in with the tap, back it out 1/2 turn to clear it of shavings. Then proceed further until the tap is almost all the way in. Then remove it and clean the housing of any shavings.
Here's a picture of the housing with the GM sensor installed, the other pic has the pigtail that comes with the sensor.
When it's installed (or before hand) You can solder the wires from the factory harness to the GM pigtail. The polarity of the wires is irrelevant since it's just a measure of resistance. Though, if you want to, take a volt/ohm meter and find which wire has continuity to ground and hook that to the black wire. Solder the remaining wire to the colored wire left on the pigtail. (purple in my case) Then plug it in and go.
Here's a chart for the resistance of the GM sensor. I don't have the chart for the Mistubishi one, but they interchange perfectly with no confusion in temps according to all the stand alone ECU's I've installed, and one friend who's running this sensor because he didn't want to pay what Mitsubishi wanted for the pigtail and sensor when he broke his when a wrench slipped.
This same method can be used to install a GM air temp sensor in the TB elbow. They are the same thread tap and drill size.
Here's a picture of my IAT for the Haltech in the TB elbow. Look for a full write up on a stand alone install soon.
--Turboglenn 20:24, 5 December 2007 (EST) This may be copied or printed for individual NON COMMERCIAL use only
