Lofty
Well-known member
I figured I'd give it a shot by posting in here.
Delete it if you'd like, correct me if something is wrong, just wanted to contribute.
This should be exactly the same as a 1g, if it is not please let me know the difference, as there is no REAL write up on how to do a battery relocation, I figured I'd help some guys out!

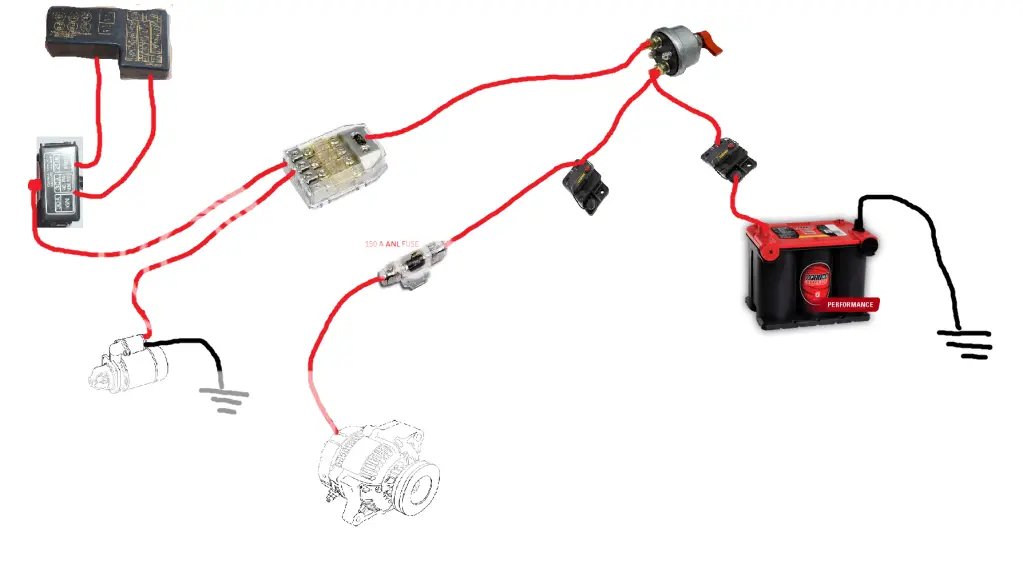
There is my diagram I made.
I don't mention Circuit breakers in this write up because I am not using them YET. You should use circuit breakers to protect the battery though, it's a VERY good idea.
You must buy as much wire as your car/tuck/needs so I will not give you any steady numbers, but it's a lot of wiring and a lot of money. It is NOT, repeat NOT cheap to do this, so if you're doing it for the cool factor, exit this page now or just go ahead and hack it together and start your harness on fire.

Overview:
This is the proper way to relocate your battery to avoid all of the following;
• Charging issues
• Death
• Being teched out of the track
This is the ONLY proper way to have a battery in your trunk, you MUST have a killswitch to remain NHRA legal.
Things to buy!
•ATLEAST 25 feet of 4AWG welding wire
•Assorted lugs
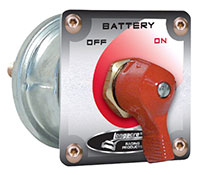
•Killswitch
https://www.pegasusautoracing.com/productdetails.asp?RecID=5727

•175A and 150 MIDI fuses
•Stinger Distribution block
SHD821
•16(?) feet of 2AWG?
I suggest going to VTE Warehouse
https://www.vtewarehouse.com/
•ANB740N7N14 ANL Fuse Holder, Black 5.86$
•ANF340150 ANL Fuse 150amp 3.17$
•405N2V14 405 Series Terminal Insulator 2.93$
•3517 Battery Terminal 1.51$
Minimum order here is 25$ I believe, money well worth it though.
Tools Recommended:
• Wire cutters
• Razor
• Lug Crimper (seen here)

• Electrical tape
• Drill
Proper Safety Precautions:
You're playing with razors to strip wire, and wire can also be sharp, razors are very sharp, so is most of everything else on your car, so be careful. Please do this with the battery out of the car...!
Here is a video I made for you guys.
click
It's a facebook link but will work even if you have no account.
Steps
•Mount power distribution block somewhere, as well as the ANL holder.

I chose to mount mine here, you may think it looks tacky so put it somewhere else then.
•Mount killswitch somewhere, it has to be on the rearmost of the car, a tailight or bumper works great. They also make slim push on/off switches, you may want to look into those as well.

Now you have all your things mounted, great!
•Pull loom off of interior wiring harness.

•Disconnect alternator wiring from alternator and fuse box

Alternator side, DO NOT WORRY ABOUT THE OTHER PLUG ON THE ALTERNATOR, JUST REMOVE THE ONE FROM THE NUT AND POST!


(This is what it looks like on the Main fusible links, 10 MM socket will take her right off.)
•Measure the amount of wire from the alternator to the singular ANL fuse holder you have, strip it with a razor blade, crimp a good lug onto it and run it to that with a terminal protector.


•Run a wire from the other post of the ANL holder to one post of the killswitch.
•Measure and run a wire from the 4 Main fusible links and run it to the 4 port dist block somewhere. I put all mine inside the cabin because I want my engine super clean.
•Run a main wire of 2AWG from the distribution block to the OTHER side of the kill switch (not the same one with the alternator)
•Run a starter wire to your power distribution block to give your starter power
•Run a positive terminal from the battery to the SAME SIDE AS THE ALTERNATOR WIRE ON THE KILLSWITCH POST.
•Run a ground wire to a strut tower bolt! Make sure you sand down some metal so it gets a good connection.
•It's pretty much this simple, I'm happy I shared this with you guys so you can understand how easy it is to do this.
Tips
• Be gentle stripping the wire with the razor blade
• Don't buy ebay wire, it sucks, you cant be cheap doing this stuff.
• I will be happy if you pm me with any questions about this.
• YOU MUST HAVE A METAL BATTERY BOX FOR THIS TO BE NHRA LEGAL
• Don't buy a cheap killswitch with an easily removable handle, it is not legal and you will get teched out for it.

Enjoy!!!!

--Scott
Delete it if you'd like, correct me if something is wrong, just wanted to contribute.
This should be exactly the same as a 1g, if it is not please let me know the difference, as there is no REAL write up on how to do a battery relocation, I figured I'd help some guys out!

There is my diagram I made.
I don't mention Circuit breakers in this write up because I am not using them YET. You should use circuit breakers to protect the battery though, it's a VERY good idea.
You must buy as much wire as your car/tuck/needs so I will not give you any steady numbers, but it's a lot of wiring and a lot of money. It is NOT, repeat NOT cheap to do this, so if you're doing it for the cool factor, exit this page now or just go ahead and hack it together and start your harness on fire.

Overview:
This is the proper way to relocate your battery to avoid all of the following;
• Charging issues
• Death
• Being teched out of the track
This is the ONLY proper way to have a battery in your trunk, you MUST have a killswitch to remain NHRA legal.
Things to buy!
•ATLEAST 25 feet of 4AWG welding wire
•Assorted lugs
•Killswitch
https://www.pegasusautoracing.com/productdetails.asp?RecID=5727
•175A and 150 MIDI fuses
•Stinger Distribution block
SHD821
•16(?) feet of 2AWG?
I suggest going to VTE Warehouse
https://www.vtewarehouse.com/
•ANB740N7N14 ANL Fuse Holder, Black 5.86$
•ANF340150 ANL Fuse 150amp 3.17$
•405N2V14 405 Series Terminal Insulator 2.93$
•3517 Battery Terminal 1.51$
Minimum order here is 25$ I believe, money well worth it though.
Tools Recommended:
• Wire cutters
• Razor
• Lug Crimper (seen here)

• Electrical tape
• Drill
Proper Safety Precautions:
You're playing with razors to strip wire, and wire can also be sharp, razors are very sharp, so is most of everything else on your car, so be careful. Please do this with the battery out of the car...!
Here is a video I made for you guys.
click
It's a facebook link but will work even if you have no account.
Steps
•Mount power distribution block somewhere, as well as the ANL holder.

I chose to mount mine here, you may think it looks tacky so put it somewhere else then.
•Mount killswitch somewhere, it has to be on the rearmost of the car, a tailight or bumper works great. They also make slim push on/off switches, you may want to look into those as well.

Now you have all your things mounted, great!
•Pull loom off of interior wiring harness.

•Disconnect alternator wiring from alternator and fuse box

Alternator side, DO NOT WORRY ABOUT THE OTHER PLUG ON THE ALTERNATOR, JUST REMOVE THE ONE FROM THE NUT AND POST!


(This is what it looks like on the Main fusible links, 10 MM socket will take her right off.)
•Measure the amount of wire from the alternator to the singular ANL fuse holder you have, strip it with a razor blade, crimp a good lug onto it and run it to that with a terminal protector.


•Run a wire from the other post of the ANL holder to one post of the killswitch.
•Measure and run a wire from the 4 Main fusible links and run it to the 4 port dist block somewhere. I put all mine inside the cabin because I want my engine super clean.
•Run a main wire of 2AWG from the distribution block to the OTHER side of the kill switch (not the same one with the alternator)
•Run a starter wire to your power distribution block to give your starter power
•Run a positive terminal from the battery to the SAME SIDE AS THE ALTERNATOR WIRE ON THE KILLSWITCH POST.
•Run a ground wire to a strut tower bolt! Make sure you sand down some metal so it gets a good connection.
•It's pretty much this simple, I'm happy I shared this with you guys so you can understand how easy it is to do this.
Tips
• Be gentle stripping the wire with the razor blade
• Don't buy ebay wire, it sucks, you cant be cheap doing this stuff.
• I will be happy if you pm me with any questions about this.
• YOU MUST HAVE A METAL BATTERY BOX FOR THIS TO BE NHRA LEGAL
• Don't buy a cheap killswitch with an easily removable handle, it is not legal and you will get teched out for it.

Enjoy!!!!

--Scott
Last edited:


