DR1665
Well-known member
Peeling the roof off 195/2000 to make life easier for Kent when he installs the cage here pretty soon. (Almost there, Kent. Promise!)
1. Snap roof trim out of drip rails.
2. Use two slotted screwdrivers to remove trim retainer clips.
3. Mark, center punch, cut spot welds along both sides of roof skin.
4. Carefully remove trim around windscreen.
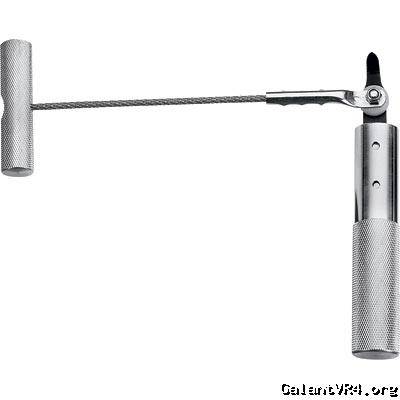
5. Use special tools to cut through the Window Weld sealing the glass in place.
6. Get to the last corner and crack the glass.
7. Switch to pry bars and forcibly remove fubared windscreen.
8. Mark, center punch, cut spot welds along front of roof skin.

More pictures, comments onTarmac & Gravel.
I still need to remove the rear glass - the back light. I've disconnected the defroster connections and removed all the trim. The little green clips that hold the trim in place seem to be glued in with the glass. This is original glass and I'd prefer not to f*ck it up removing it. With homologated seats running $300 and up, I'm already pissed that I'll have to drop $200 on new glass up front. Don't want to stick stock seats back in the car with a cage because I had to spend all my cash on replacement glass.
So, anyone have tips for removing the back window without breaking it? Any areas to be particularly careful of while doing this? I've got the one tool with the handle and pull bar, but it pretty much sucks.
We had some luck with a stainless steel cable saw slipped through... until the cable snapped. It's tricky to get a razor blade between things at that angle.
Just looking for some insight if anyone has experience with this project. Thanks.
1. Snap roof trim out of drip rails.
2. Use two slotted screwdrivers to remove trim retainer clips.
3. Mark, center punch, cut spot welds along both sides of roof skin.
4. Carefully remove trim around windscreen.
5. Use special tools to cut through the Window Weld sealing the glass in place.
6. Get to the last corner and crack the glass.
7. Switch to pry bars and forcibly remove fubared windscreen.
8. Mark, center punch, cut spot welds along front of roof skin.
More pictures, comments onTarmac & Gravel.
I still need to remove the rear glass - the back light. I've disconnected the defroster connections and removed all the trim. The little green clips that hold the trim in place seem to be glued in with the glass. This is original glass and I'd prefer not to f*ck it up removing it. With homologated seats running $300 and up, I'm already pissed that I'll have to drop $200 on new glass up front. Don't want to stick stock seats back in the car with a cage because I had to spend all my cash on replacement glass.
So, anyone have tips for removing the back window without breaking it? Any areas to be particularly careful of while doing this? I've got the one tool with the handle and pull bar, but it pretty much sucks.
We had some luck with a stainless steel cable saw slipped through... until the cable snapped. It's tricky to get a razor blade between things at that angle.
Just looking for some insight if anyone has experience with this project. Thanks.


