The Top Mitsubishi Galant VR-4 Resource

Join the best E39A 1991-1992 Mitsubishi Galant VR-4 community and document your GVR4 journey.

  • Software Upgraded - Reset Your Password to Login
    In order to log in after the forum software change, you need to reset your password. If you don't have access to the email address you used to register your GVR4.org account, you won't be able to reset your password. In that case, follow the instructions here to regain access to the forum.

Short shifter build - UPDATE w/ pics

Muskrat

Well-known member
Joined
Jun 13, 2004
Messages
2,107
Location
Lexington, KY
I have a 3000gt shifter in the car (came installed, I just refined it a bit. I always kinda wondered exactly what it took to do.) w/ solid bushings on the shifter base and the trans. I don't notice any substantial vibrations.
 

Whoodoo

Well-known member
Joined
Jul 11, 2009
Messages
927
Location
Binghamton, NY
If anyone has been interested in this thread, there will be an update within the next few days. I arrived back home today and despite it being below freezing and past midnight, I couldn't wait to get the shifter in. Like I said, there will be a formal update with pictures soon, but for now there are just a few small things that need to be sorted.

I forgot how much I love this car! Now the gear change matches it too... flick flick go go!
 
Last edited:

Whoodoo

Well-known member
Joined
Jul 11, 2009
Messages
927
Location
Binghamton, NY
Ok update time. The new shifter is amazing! The shorter height, shorter throw, and weighted shift knob give a really good feel. There was a few more modifications that needed to be done to make everything fit - it was tighter in the VR4 than in my buddy's 1g that I initially fit it in.

Here's the short shifter next to the stock VR4 piece. The new ratio looks to be around 1:1 as opposed to 2:1 for the stock one.


Sits a lot lower than stock. I like where it sits now


Shorter throw too! Here's the old one.


And the new one.


There were a few areas that were tight. The passenger side of the shift arm just barely hit, so I had to grind off a few millimeters of material to clear.


The very bottom of the shift arm hit the left/right shift stop on the base, so a couple millimeters had to be taken off that too.


The nut on the driver's side is a tight fit, but only just barely rubs the inside of the shift boot. Im not too worried about it. Note that this pic was taken before the right side was ground down.


I had to adjust the front/back cable in order to center everything up, but it was really pretty simple. I highly suggest this mod to anyone wanting a better shifter.
 

GVR-4

Well-known member
Joined
Apr 22, 2002
Messages
2,610
Location
Asheville, NC USA
I just got done machining some bushings for my shifter this past weekend, so I'll share my thoughts. I used brass and lots of teflon bicycle grease. I machined the upper-most bushings (oriented left to right) like you did, but left the plastic lower set (oriented front-to-back) in place. Instead I turned down a bolt (~.030 bigger OD than the one it replaced) to make sure there was no slop there. I also machined the one bushing on the "L" shaped arm that controls the cable on the left (best seen in your second-to-last photo). That was my real problem- that plastic bushing had disintegrated. I also machined the little piece that goes on the bottom of the lever that acts like ball and socket joint out of brass. I started with a Mofugas short throw shifter I bought when Mofugas was still around. I have the Symborski shift kit and I machined some polyurethane bushings for the transmission end of the cables. Overall, like you, I'm just trying to remove all the slop from the shifter linkage. I am satisfied with the results and the feel is much better. I still want to weld some brackets on the base to reinforce it so it doesn't flex and maybe put some stops in place to protect the shift forks. The car is my daily driver so I always have to have it buttoned up by Sunday night, so the shifter is back in the car and I took no photos. But the console is not back in place yet so I will try to snap a few pics in the next couple of days.

Also, check this out.
 

Whoodoo

Well-known member
Joined
Jul 11, 2009
Messages
927
Location
Binghamton, NY
Thanks for the link, however, I don't think there is much play coming from the rod ends that are already on the cables. His apparently were made of plastic, but I couldn't see any plastic on mine /ubbthreads/images/graemlins/dunno.gif. I think I followed what you were saying but pics would be a big help for those who haven't yet messed around inside the console.

As far as I can tell, the only play I have now is in the cables themselves, which is unavoidable. I heard good things about putting skateboard bearings in the trans-side of the cables but I am extremely happy with how this turned out. I find myself downshifting just because I like the way it feels /ubbthreads/images/graemlins/grin.gif
 

GVR-4

Well-known member
Joined
Apr 22, 2002
Messages
2,610
Location
Asheville, NC USA
I agree about the cable ends. Despite the center of the eye being plastic, I have no play there either and probably won't do anything like the heim joint mod. Like you, I am to the point where I have no play in the shifter either except the cables themselves.

I'll try and get some pics tomorrow evening, but we are supposed to get snow here so we'll see how it goes. If I get ambitious, I will remove the shifter and take some detailed photos of everything I've done.
 

GVR-4

Well-known member
Joined
Apr 22, 2002
Messages
2,610
Location
Asheville, NC USA
Ok, so I didn't remove the shifter assembly, but I did snap a few pics with it still mounted in the car. I will say mine is not as pretty as yours Whoodoo, but I am justifying it by saying nobody will see it rather than saying I'm lazy. /ubbthreads/images/graemlins/wink.gif

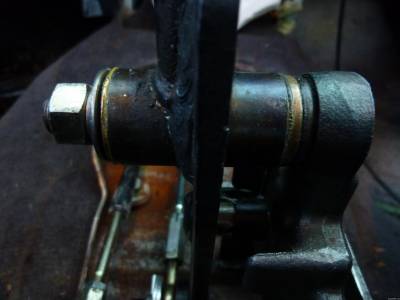
This is the upper-most set of bushings. I made the bushing on the right with a thicker flange to keep the shifter closer to the driver. On the left is a concave flat washer (curving away from the brass bushing) followed by a thick lock washer and a 14mm nut. I managed to get the clearance just right so that when the nut is fully tightened, it takes up all the space, but doesn't put the shifter in a bind.


This is the the lower set of bushings that are plastic that I left in place. Instead of machining some brass bushings, I bought a bolt and turned it down. The hole in the steel that the bolt passes through was just a few thousandths bigger than the plastic bushings, so I turned the bolt down so it fit tightly in the steel and forced it through the bushings. Since I turned the threads off the end of the bolt, I used an 8 x 1.25 (IIRC) die and threaded the end of the bolt to accept the same nut as the original bolt.


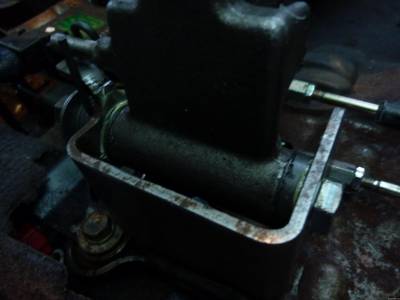
This is the end of the bolt I machined. You can see there is an aluminum spacer (I machined that a few years ago) for the spring and big flat washer. Those take the place of another plastic bushing that allows the spring to function properly. I used two nuts to set the end play on the bolt and, consequently, the friction of the bushings.


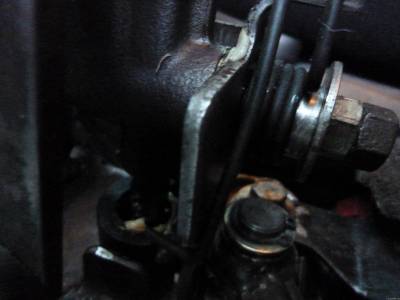
This is the bushing for the pivot point of the L-shaped arm that had disintegrated and was causing the most trouble. I originally machined it so the flange was at the bottom, but I realized I would get better action (that's what she said!) if the L-shaped arm was as low as possible. So I flipped the bushing over so the flange is at the top under the flat washer and snap ring. This put the L-shaped arm in contact with the shifter base, so I made sure I used plenty of grease to reduce the friction. You can't quite see the flange under the steel flat washer in this photo.


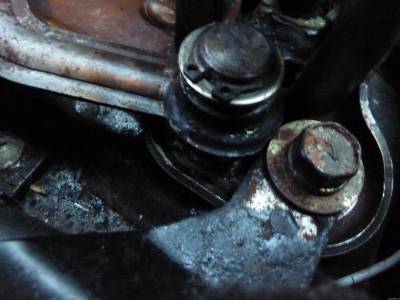
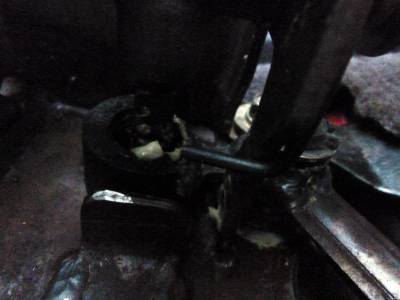
This is admittedly a crappy photo, but it is of the ball and socket-type joint at the very bottom of the shifter (with plenty of grease). This is where the shift lever acts on the L-shaped arm. There is a plastic piece from the factory that goes in there that I replaced with a brass piece. I machined this a few years ago too. I realize a photo would be very helpful here, but it would mean removing the shifter from the car (Ok, I am lazy!). It basically looks like the factory piece, but is brass. And greasy.


And that's about it. Hopefully interesting to someone. I think it took me longer to write this than to do all the machining. /ubbthreads/images/graemlins/grin.gif
 
Last edited:

Whoodoo

Well-known member
Joined
Jul 11, 2009
Messages
927
Location
Binghamton, NY
I appreciate you taking the time to get the pictures up and I agree that putting together a coherent write-up is more time consuming than one might think.

I think a good summary for getting slop taken out is as follows:
There are three main areas where play is introduced; the top (front/back) pivot bushings, the bottom pivot bushings and steel insert on which they rides, and the bushings for the bell crank driving the side/side cable.

In my case, the wave washer took out all the play in the top pivot, even with the old under-diameter bushings. Machining a new steel insert for the bottom pivot took out that slop for me as well. I didn't do anything to the bell crank, and as such can still wiggle it up and down a bit. However I think the majority of the side to side play is in the cable itself.

In the end, it obvious to see that there are a lot of ways to go about solving this problem. However, I did find that while simply replacing all of the bushings helped, it did not completely take out all of the play.

Oh, and mine only looks better because I painted it /ubbthreads/images/graemlins/cool.gif
 

GVR-4

Well-known member
Joined
Apr 22, 2002
Messages
2,610
Location
Asheville, NC USA
Back TTT...

I've been tweaking my shifter and thought I would see if there is any interest in what I've been up to by posting these two pics:


GVR-4

Well-known member
Joined
Apr 22, 2002
Messages
2,610
Location
Asheville, NC USA
The standoffs are to raise the whole shifter assembly. Then you can cut down the height of the shifter arm...


...and have even shorter throws. I thought about it when I realized race cars with sequential shifters have the base of the shifter mounted really high, but still have a long shifter arm to keep it close to the steering wheel.

The bracing I added because I saw the section that everything mounts to (the vertical sections that are welded to the base) flexing, and I tend to use the shifter to hold on when I (albeit infrequently) drive the car hard. The stops can also keep me from damaging the tranny when I use the shifter as a handle.
 

Andy_S

Well-known member
Joined
Jan 30, 2007
Messages
982
Location
Shithole Wisconsin
I put my shifter up on spacers like you did. The driving experience is much nicer when I don't feel like I'm grabbing towards the floor. Did your raised shifter base fit nicely under the plastic?
 

GVR-4

Well-known member
Joined
Apr 22, 2002
Messages
2,610
Location
Asheville, NC USA
Yeah, no problem with fitment so far. But I still have to install the console permanently, so hopefully I won't run into any "gotchas." I measured before I removed the console and as best I could tell it looks like the base can be raised a maximum of 1 7/8". I ended up using 1 3/4" steel spacers:


Whoodoo

Well-known member
Joined
Jul 11, 2009
Messages
927
Location
Binghamton, NY
When raised, does the front/back pivot still remain under the console plastic? My short shifter sits just under it and the nut barely clears.
 

GVR-4

Well-known member
Joined
Apr 22, 2002
Messages
2,610
Location
Asheville, NC USA
No, but with a leather boot, it's fine. The stock rubber boot probably won't work. I just got back from my first drive and it's definitely shorter. My only complaint is it's really clunky with the metal on metal stops. But the harder you shift it, the better it works. For drag racing this would be the hot setup. I've got some stock rubber bushings coming from JNZ to try. I'll decide whether to keep the Symborski kit or the stock rubber bushings once I've tried both.
 
Support Vendors who Support the GVR-4 Community
Boosted Fabrication ECM Tuning ExtremePSI Fuel Injector Clinic Jacks Transmissions JNZ Tuning Kiggly Racing Morrison Fabrications RixRacing RockAuto RTM Racing STM Tuned
Top