The Top Mitsubishi Galant VR-4 Resource

Join the best E39A 1991-1992 Mitsubishi Galant VR-4 community and document your GVR4 journey.

  • Software Upgraded - Reset Your Password to Login
    In order to log in after the forum software change, you need to reset your password. If you don't have access to the email address you used to register your GVR4.org account, you won't be able to reset your password. In that case, follow the instructions here to regain access to the forum.

#860/1000 diary

383mazda

Well-known member
Joined
Oct 10, 2015
Messages
61
Location
Gainesville, TEXAS
I need some catching up to do!

What was going to be a tranny swap (paid $350 for it - Shep built trans that had been sitting in a corner of a buddies garage), balance shaft delete and timing belt ($500 maybe??) turned into a $2000 bill... the further I dug the more I had to replace

Some off the new stuff

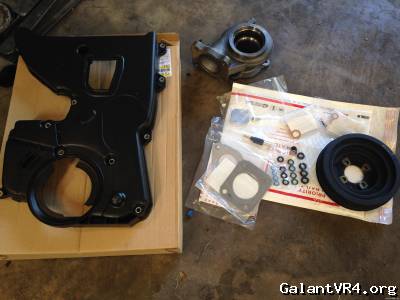
(Not shown is also a new crank timing belt gear, belts, top timing cover, exhaust mani studs and lots more I've forgotten already, lol)

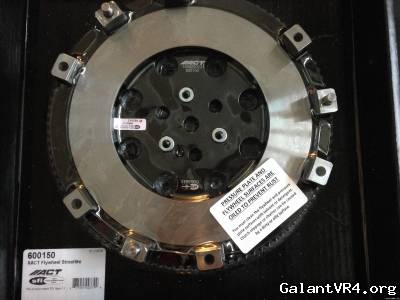
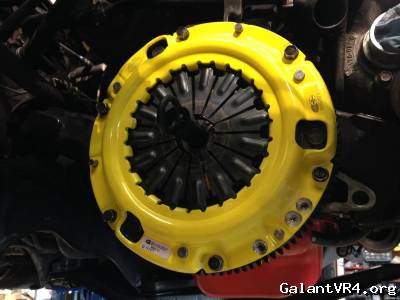
Decided to play it safe and replace entire clutch (ACT 2600 was rediculous on stock power, and 8lb flywheel didn't make sense either). Went with street light flywheel and 2100 pressure plate and disk:


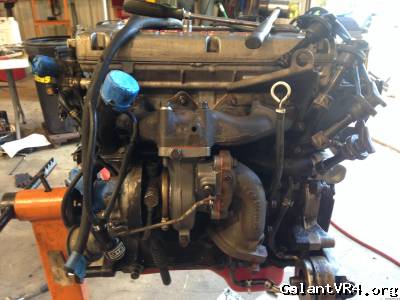
Check out exhaust housing!! Lol. Wastegate port looked the same way...


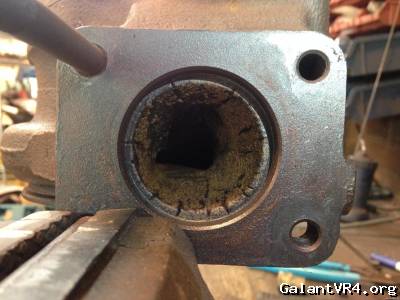
Replaced that with 7cm unit, ported to match 2g O2 housing and Evo3 manifold. Looks good


383mazda

Well-known member
Joined
Oct 10, 2015
Messages
61
Location
Gainesville, TEXAS
Swapping fork from old tranny to new one I found this pivot ball shim, which I think explained more of my shifting woes...
.

So, before motor went back in I swapped out ABS unit for non-assist brake lines and prop valve.


Taking this unit out was harder than putting the new lines in!


Looks cleaner IMO


I also swapped cruise control throttle cable for standard cable (more cleaner again)


383mazda

Well-known member
Joined
Oct 10, 2015
Messages
61
Location
Gainesville, TEXAS
What I thought was going to take two weekends was approaching 2 months. My dad's place has a lift, so car was over there and I couldn't get to it often. Plus every time I looked at it I found something to replace - heater core hoses, gaskets, etc, so I had to wait for shipping as well. Finally though the motor was ready to put back in. (See Galant hiding back there... we've got a waiting list of car projects, lol - it never ends)

Bottom end bolts were checked for torque and pan was bolted up.


I pulled intake mani off to replace its gasket to head and swap on the new / refurbished TB from Throttlebodies - Turns out the guy lives up the street from me in Ok about 90 min, and he's into Buick GN's as well, so I took him a TB's from our Grand National and VR4 and checked out his shop. He's right in the "405's territory" lol


I had him do the FAIV bypass. Ran into a snag putting IAC back on, I was tightening by hand and snapped one of the mounting tabs / ears off! No biggie, I'll JB weld it, let it sit for a day and try again - but it snapped in the same spot, with hardly any real torque!?! Turns out it would sit flush?? Maybe it had always been like that, I'm not sure., but o-ring was causing it to sit 1/16 too high, so I got a used one from performance partout, took out the o-ring and fit it on. (I'll have to get a new o-ring obviously)

I also broke the plastic t-stat mounted EGR controller (??), so I made a block off plate for the valve. I'll probably replace that piece and remove my blockoff plate eventually.


I also did the window weld "mod" to the front motor mount.

Since motor and tranny came out separately, that's how they went back in. Motor went in great, but trans was a PITA. I gave up on lifting / shoving from underneath and decided to pull from the top - MUCH EASIER, but I imagine dropping them together from the top would have been best.


Cherry picker tied to trans, hoisted to the right height and then just maneuvered it onto the dowels.
 

383mazda

Well-known member
Joined
Oct 10, 2015
Messages
61
Location
Gainesville, TEXAS
Well I'm glad to report that motor fired right up the first try, and with no leaks! I shut it off after a minute and went home for the evening.

Came back the next day and fired it up again to let it fully warm up and top off all fluids. After idling for a bit I started noticing a "grumbling" noise from the timing cover?!? It got louder if I revved it up a bit so I shut it down. Popped off timing cover and everything looked good. I went inside to research my new noise and most paths lead to a poorly tightened timing belt! Are you kidding me! /ubbthreads/images/graemlins/banghead.gif The whole reason I pulled the motor (other than BS delete) was to have easy access to the timing belt, now I've got to redo it in the car /ubbthreads/images/graemlins/bawling.gif

So I do the walk of shame back to the garage after a few hours of googling and lunch and start putting the car on the lift and I notice some drops of oil on the ground from timing belt side of motor!!! /ubbthreads/images/graemlins/mad.gif It was fine the day before... so I get the car on the lift, pop the splash guard off and find this:

/ubbthreads/images/graemlins/shocked.gif


I was at a loss of words, what was my stub shaft bolt doing poking outside of my timing cover?


Well at least that explained my noise and oil leak!

So I popped the (brand new) lower timing cover off and found this:


Maybe 5 minutes of idling had done this already - my old timing cover looked like this too on the inside (including belt wear marks on the outside as well?). All I can figure is something is bent out of whack, but I couldn't figure out what. But the timing cover was sittings close enough to the motor to wear on the belt and back the stub shaft bolt off...

I redid the timing belt tension procedure anyway since I was in there, and it came out dead nuts on /ubbthreads/images/graemlins/smile.gif. Funny cause I struggled with getting the hydroulic tensioner height in spec when motor was out of the car?? Oh well, doing the timing belt like this really wasn't bad at all - of course I was on a lift though...

I locktited the stub shaft bolt on this time, and reamed out its "new hole" so it wouldn't grab again. I put the timing belt cover on "not as tight" this time; looking down through the top timing cover there's maybe .030" clearance between the belt and cover - are they all this tight??

(Your looking down the intake cam side of the timing belt, as if you were leaning over from the front of the car. The "white streak" from the left of the pic is the timing belt gong down to the idler pulley - there you'll notice the small gap between the pulley and cover - I'd circle this in red but I'm on an iPad /ubbthreads/images/graemlins/crazy.gif)


Tossed it all back together and fired it back up, no noise and no leaks. I even drove it home that night (20 miles). And the next morning there were still no leaks /ubbthreads/images/graemlins/grin.gif
 

trevstuh86

Active member
Joined
Mar 5, 2015
Messages
32
Location
Mansfield, Tx
It's funny how more and more things pop up on these cars man. I'm in the same boat as you, my #3 cylinder is toast and I still have to do a little body work. I'm starting to save for a replacement motor for #1058/2000 and hopefully I can save the original block. Good job on bringing her back to life and figuring out the issue on your ride.
 

383mazda

Well-known member
Joined
Oct 10, 2015
Messages
61
Location
Gainesville, TEXAS
Yeah, it's been a... thorough learning experience /ubbthreads/images/graemlins/ooo.gif

When I felt confident enough I drove it home one night. Next morning I went out to drive it to work but the idle was ALL OVER THE PLACE; from 2000rpm to barely running - and my throttle input had little effect. Just as I though "vacuum leak" the car died. I pop the hood and sure though the recirc hose had popped off. I clamp it back on and go to start again and NOTHING! Completely dead when I try to start motor /ubbthreads/images/graemlins/banghead.gif

To make a long story short, I had battery and starter tested and both were good, and I was getting good continuity on the starter harness, to so I thought...


There was my culprit: the chassis ground under the fuse box. Apparently there was enough corrosion on the back side of this "bracket" that I wasn't getting a good chassis ground. All other terminals tested good on continuity, but I couldn't get anything from the back side of this bracket. Cleaned all connections up with some sandpaper till they were nice and shiny, put harness and starter back in and it fired right up /ubbthreads/images/graemlins/grin.gif

So one more thing crossed off the list that was never on the to-do list to begin with lol.

Two more of those items are:
1). Put 500 easy miles on clutch to break it in
2). Pull out welded center diff and replace it with stock open unit.
 

383mazda

Well-known member
Joined
Oct 10, 2015
Messages
61
Location
Gainesville, TEXAS
Few more updates. I've decided to keep the welded center diff (mostly because I tore into the old tranny and didn't have big enough sockets to bust the two shaft nuts off), and I like how it drives / steers - it almost has a self centering effect to it. Hard to describe, but in the corners you can feel a difference.

I've also tossed in a new fuel pump and wiring kit:
pump%20and%20kit_zpsicokbwje.jpg


I went with the Walbro 190 LPH so that I wouldn't have to worry about an adjustable AFR or any tuning
fuel%20pump_zpsvossvtcp.jpg


The sender access panel area is pretty clean - NO RUST!
Fuel%20sender_zpshdmjvkbe.jpg


I followed Tom's video of this install - he pretty much covers everything, including how tight this fuel line fitting will be!! After a few days of soaking with PB blaster it still fought me, but doubling up on line wrenches and the freeze spray worked
fuel%20line_zpsmlurzu2v.jpg


"modding" the sender unit was straight forward - just make sure when you cut the tube short you cut it far enough down to let your blade cut all the way through the tube without hitting the bracket:
fuel%20sender%20mod_zpskt1goinu.jpg


Ready to go back in - my kit didn't come with a pump insulator. From what I understand the insulator sleeve is for noise damping, and I've heard too many stories of these deteriorating and clogging up pumps / filters:
Fuel%20sender%20complete_zpsuan6qejc.jpg


Now for the wiring:
IMG_2179_zpsar6gwudv.jpg


Like Tom, I had to lengthen the main power wire - I ran it up the pass side until the rear seat, then cut across the floor under the main brace and then back out the driver's side:
The length of this brace is how much I lengthened the power wire...
At both "corners" I wrapped plenty of e-tape around the wire to fight any chaffing (although I left it pretty loose to combat chaffing as well)
Capture_zps1flxkef9.png


On the driver's side I ran it up the existing loom / raceway:
Capture2_zpsyegie6lv.png


Out back I spliced in the pig tail where the harness comes out from under the trunk latch cover:
IMG_2182_zpseirps4sa.jpg


And that's where I "hid" the relay switch - since there's a ground screw there already:
IMG_2184_zpsdch2dwbl.jpg


soldering pic /ubbthreads/images/graemlins/cool.gif
IMG_2183_zps1zunv6s3.jpg


And all buttoned back up - Car fired right up and drives fine /ubbthreads/images/graemlins/smile.gif
IMG_2185_zpsflb8obl9.jpg
 

383mazda

Well-known member
Joined
Oct 10, 2015
Messages
61
Location
Gainesville, TEXAS
Welp, I sold the car today. It was bitter sweet; that car was certainly a learning experience, lol! It's was sold to a member of this forum though, and he's got big plans for the car, I'm excited to follow along. I lost a lot of money on "restoring" #860 to DD status, but at least it lives on and will be a solid clean slate for future power mods!
 

FlyingEagle

Staff member
Joined
Mar 5, 2005
Messages
1,635
Location
THE Ottawa
Hey, if nobody restored the cars, there would be no special examples running around in reliable fashion.

Good on you for putting in what you did. It's not good business sense, but it makes sense when you value what the automobile represents and how clean an example you want to be driving in.

Every time you drove it, you knew what kind of parts were used and the kind of attention to details they received.

Always better safe, than sorry.

You will have tons of fun in that new car I bet!
 
Support Vendors who Support the GVR-4 Community
Boosted Fabrication ECM Tuning ExtremePSI Fuel Injector Clinic Jacks Transmissions JNZ Tuning Kiggly Racing Morrison Fabrications RixRacing RockAuto RTM Racing STM Tuned
Top