BluFalcon
Well-known member
I recently installed a ETS FMIC kit on my car, which placed the BOV in the stock location. I didn't want to use ETS's intake kit because I wanted to relocate the battery to where the MAS was originally located and I was planning on using a 2G MAS for my new setup.
I got everything installed, and ended up using a stock 2G intake pipe to get the car running. It worked, but I couldn't get the BOV return hose to mate up with the inlet fitting on top of the intake. With the BOV vented to atmosphere, the car would have a tendency to stall at stop lights and was generally being a bit of pain (idle surging) to drive on a daily basis. This along with the fact that the stock intake snorkel looked like complete and utter garbage with electrical tape closing off the BOV return tube, mandated that a more appealing and permanent solution be implemented.
Here's what I went through to get a 2G Intake pipe to fit in my car and allow the BOV to be recirculated back into the intake. I took a few crappy cell phone pics that'll hopefully help show what I tried to do.
I tried a FP intake tube, but the tube hit the stock rad fan even with the adapter coupler that allowed the 4 in dia tube to be used with the EVOIII 16G on the car. I had no desire to switch to a slimline fan, so I decided to try and find something else.
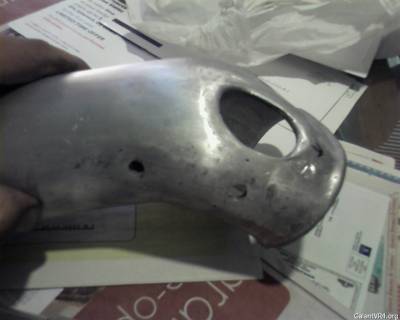
I made a few calls and managed to scrounge up a nasty, beat up, spray painted Injen 2G aluminum intake tube, that looked to be a perfect fit for my setup. First things first though, was a date with a parts washer and a bead blaster. Then it was time for a few mods.
The next thing that needed to be done was relocate the resistor on the passenger side fan. I really wanted to keep the stock fan in place, and the pipe was going to be fairly close to the resistor. I drilled a new hole in the fan support and installed it with a few washers in between the plastic to help strengthen mounting point. I also lengthened the wires to meet up at it's new location.
Now on to working on the pipe itself:
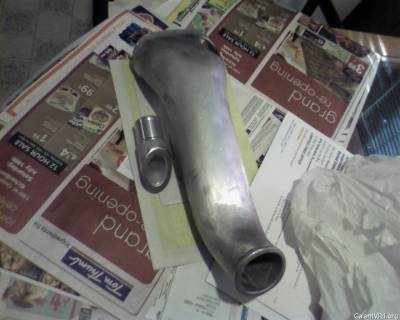
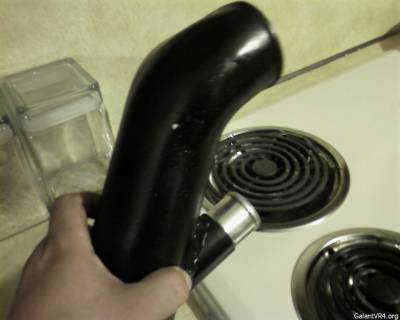
I went ahead and cut the original BOV return tube and the various nipples on the tube, since I wouldn't be using them. Here you can see the areas that were cut out and cleaned up with a die grinder and a blue Scotch Brite pad.
I went ahead and sourced a new BOV return tube from a local shop, that'll be placed on the underside of the intake pipe.
I placed the pipe in the car and made a rough estimate as to where I wanted the BOV return tube to be placed on the intake. The area was marked with a Sharpie and a hole drilled into the pipe with a hole saw.
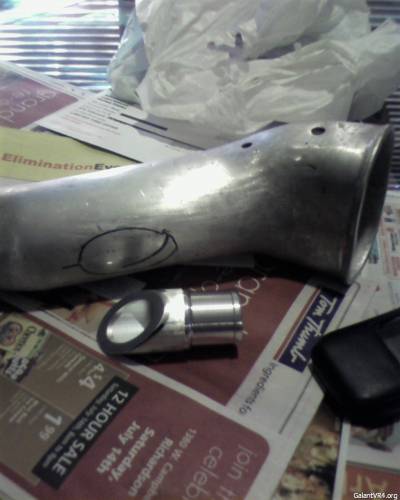
I cut out a piece of scrap aluminum to "plug" the large hole from the original BOV return tube on the top of the pipe and had it welded by a local shop, into place along with the new BOV return tube on the underside of the pipe. The two holes made when the nipples were cut off were plugged while welding and the smaller hole on the other side was plugged with some epoxy. I didn't clean the pipe as well as I should have, so there were a few spots where the grease and oil showed up while welding. Once it was off the welding table and cooled down a bit, I tried to clean it up with a die grinder, file and some sandpaper. After most of the high metal was knocked off, it went back into the bead blaster and got painted.

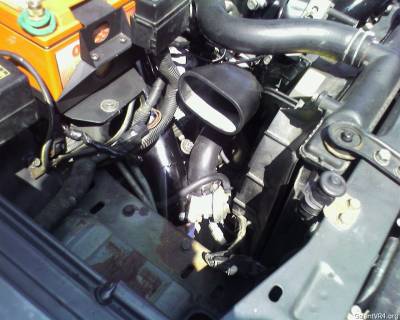
I used a radiator hose with a 90 degree bend cut to fit between the BOV and return tube. I got the hose from Autozone and tried to find the shortest piece with a 90 degree bend. The new return tube had the same diameter as a stock 2G BOV return tube, so I needed to adapt the outlet from the 1G BOV to allow the radiator hose to fit. I ended up using a small section of the original GVR4 rubber return tube as a spacer to fit over the BOV outlet and allow the radiator hose to be clamped down tightly.
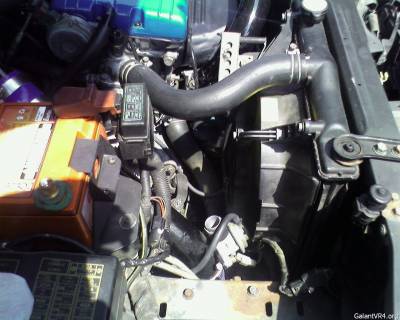
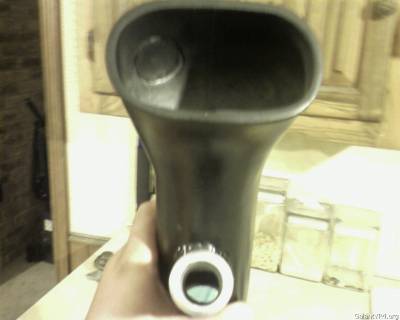
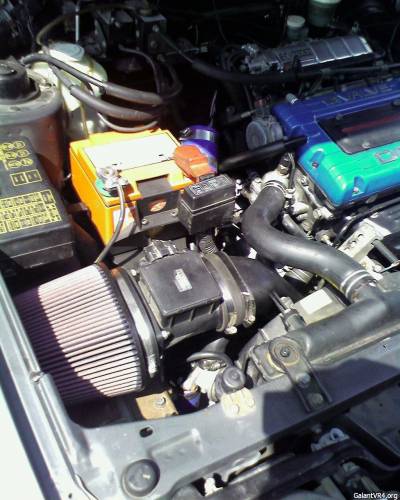
Installed the intake pipe, radiator hose and clamped it down nice and tight.
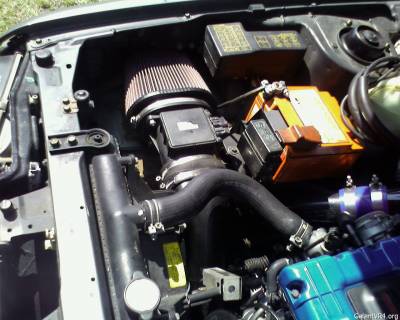
And here's a few shots of it with the 2G MAS and K&N FIPK installed and ready to go.
Anyway, I hope this'll help some of you guys that are looking to do something similar. Overall I'm very happy with the way it all turned out. It looks a lot better, and the car drives just like it used to. No surging, no stalling and no annoying BOV salutes when coming off the throttle.
I got everything installed, and ended up using a stock 2G intake pipe to get the car running. It worked, but I couldn't get the BOV return hose to mate up with the inlet fitting on top of the intake. With the BOV vented to atmosphere, the car would have a tendency to stall at stop lights and was generally being a bit of pain (idle surging) to drive on a daily basis. This along with the fact that the stock intake snorkel looked like complete and utter garbage with electrical tape closing off the BOV return tube, mandated that a more appealing and permanent solution be implemented.
Here's what I went through to get a 2G Intake pipe to fit in my car and allow the BOV to be recirculated back into the intake. I took a few crappy cell phone pics that'll hopefully help show what I tried to do.
I tried a FP intake tube, but the tube hit the stock rad fan even with the adapter coupler that allowed the 4 in dia tube to be used with the EVOIII 16G on the car. I had no desire to switch to a slimline fan, so I decided to try and find something else.
I made a few calls and managed to scrounge up a nasty, beat up, spray painted Injen 2G aluminum intake tube, that looked to be a perfect fit for my setup. First things first though, was a date with a parts washer and a bead blaster. Then it was time for a few mods.
The next thing that needed to be done was relocate the resistor on the passenger side fan. I really wanted to keep the stock fan in place, and the pipe was going to be fairly close to the resistor. I drilled a new hole in the fan support and installed it with a few washers in between the plastic to help strengthen mounting point. I also lengthened the wires to meet up at it's new location.
Now on to working on the pipe itself:
I went ahead and cut the original BOV return tube and the various nipples on the tube, since I wouldn't be using them. Here you can see the areas that were cut out and cleaned up with a die grinder and a blue Scotch Brite pad.
I went ahead and sourced a new BOV return tube from a local shop, that'll be placed on the underside of the intake pipe.
I placed the pipe in the car and made a rough estimate as to where I wanted the BOV return tube to be placed on the intake. The area was marked with a Sharpie and a hole drilled into the pipe with a hole saw.
I cut out a piece of scrap aluminum to "plug" the large hole from the original BOV return tube on the top of the pipe and had it welded by a local shop, into place along with the new BOV return tube on the underside of the pipe. The two holes made when the nipples were cut off were plugged while welding and the smaller hole on the other side was plugged with some epoxy. I didn't clean the pipe as well as I should have, so there were a few spots where the grease and oil showed up while welding. Once it was off the welding table and cooled down a bit, I tried to clean it up with a die grinder, file and some sandpaper. After most of the high metal was knocked off, it went back into the bead blaster and got painted.
I used a radiator hose with a 90 degree bend cut to fit between the BOV and return tube. I got the hose from Autozone and tried to find the shortest piece with a 90 degree bend. The new return tube had the same diameter as a stock 2G BOV return tube, so I needed to adapt the outlet from the 1G BOV to allow the radiator hose to fit. I ended up using a small section of the original GVR4 rubber return tube as a spacer to fit over the BOV outlet and allow the radiator hose to be clamped down tightly.
Installed the intake pipe, radiator hose and clamped it down nice and tight.
And here's a few shots of it with the 2G MAS and K&N FIPK installed and ready to go.
Anyway, I hope this'll help some of you guys that are looking to do something similar. Overall I'm very happy with the way it all turned out. It looks a lot better, and the car drives just like it used to. No surging, no stalling and no annoying BOV salutes when coming off the throttle.
