The Top Mitsubishi Galant VR-4 Resource

Join the best E39A 1991-1992 Mitsubishi Galant VR-4 community and document your GVR4 journey.

  • Software Upgraded - Reset Your Password to Login
    In order to log in after the forum software change, you need to reset your password. If you don't have access to the email address you used to register your GVR4.org account, you won't be able to reset your password. In that case, follow the instructions here to regain access to the forum.

Another successful Dave Brode IC installation

I finally tackled the Dave Brode complete installation this weekend, but I wasn't sure where to start, as the documentation is rather limited. So, I thought I'd take some pictures as I went, to help the next guy. My first question was WHERE/HOW to mount the IC?? /ubbthreads/images/graemlins/confused.gif It seems that Dave is confused himself, because he emailed me that he had maybe installed the one bracket wrong. It turned out that he had installed BOTH brackets BACKWARDS, and on the WRONG SIDE! /ubbthreads/images/graemlins/shocked.gif I know I took some pictures of the IC mounted, but they've disappeared from my camera! /ubbthreads/images/graemlins/mad.gif But, on this picture, you can sort of see that bracket through the hole in the bumper.

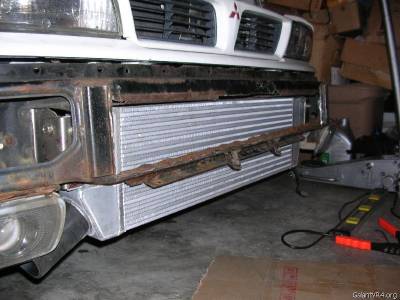
The brackets should face back, up, and out to the sides, so that they can be attached to the ends of the frame rails that protrude from the front of the radiator support. This is the same, rectangular protrusion that the stud sticks out of that the 14mm nuts go unto to hold the bumper on. I mounted the brackets about 1/4" below the top of that protrusion, as I didn't want the IC to be pushing down on the bottom of the bumper cover, as my RRE one does on #1886. However. I cut it REALLY close, as I could barely slide the bumper on later. I had to loosen all the bracket bolts, and drop it down as far as it would go, and it just fit. /ubbthreads/images/graemlins/blush.gif As you can see in the picture above, there is
 

atc250r

Staff member
Joined
Sep 11, 2003
Messages
13,235
Location
Orange County, NY
Looks good, Jeff! Let us know how it works when you start driving it.

John
 

I first made some marks with a magic marker by holding the bumper up to where it should be installed. A second person to help steady the bumper would REALLY help.

Then, using my handy-dandy Harbor Freight angle grinder, I started cutting off what had to be removed. I wanted to leave the complete, boxed section at the top for some strength, and I also wanted to leave the lower bumpercover-support strip, so that the cover doesn't sag down.

You also need to completely remove those metal dividers in the ends of the bumper, seen here:

But, missing here:
 

Very nice Jeff
Let us know how it feels in performcance gains
Nice shoes btw /ubbthreads/images/graemlins/grin.gif
 
Last edited by a moderator:

Actually, this is a better picture here, showing the missing divider you need to cut out, as well as the cut you need to make straight back from the front of the bumper underneath:

I also had to notch the top of the bumper to allow the IC brackets to slide through a gap:

Here is what it looks like when dropped back into the bumper cover:

As you can see, I actually removed alot more than I had to, but I was sort of working in the dark here. Depending upon how much you plan to open up the bumpercover grill, you may want to remove more or less material than I did.
I also could have left more depth to the front brace, which supports the bumper cover:

As you can see, there's a healthy 1" gap there between the brace and the IC. You could leave more material if you wanted it stronger structurally.Here's one last view from the righthand side of the installed bare bumper.
 
Last edited by a moderator:

iceman69510

Turn Right Racing
Staff member
Joined
Mar 5, 2001
Messages
10,964
Location
Michigan
Hah, I like the broken off bolts showing in the license plate mounting bracket tabs. Mine were like that too. I ground those tabs off when I modded my bumper (and repainted it). No more front plate for me.
 

Quote:
(and repainted it).


HEY! Are you making fun of #880's rusty bumper?? /ubbthreads/images/graemlins/mad.gif /ubbthreads/images/graemlins/devil.gif
It was originally a Maine car, so rust is in its blood I think. Actually though, I've snapped off alot less bolts than I expected. I only lost 2 or 3 nuts/studs removing the bumper cover. I soaked them with PB Blaster, and then used a battery-powered impact to spins them off.
The plate bolts were like that when I bought the car, so the PO must have done it. I just hope the next owner doesn't need a front plate! /ubbthreads/images/graemlins/blush.gif
 

iceman69510

Turn Right Racing
Staff member
Joined
Mar 5, 2001
Messages
10,964
Location
Michigan
Who, me? Ahh, no Jeff, I'd uh... never do that! Not to a nice guy like you. No sir.

I'll have to post pics sometime of how I modded my front. Not quite as extensive a removal. Just a Starquest IC though.
 
Last edited:

Nice. Glad to see it worked out. Now find those photos of the the bumper cover installed & post them.
 

Quote:
Looks good, Jeff! Let us know how it works when you start driving it.


I've always maintained that an upgraded intercooler is one of the FIRST upgrades any GVR-4 owner should do, and my impressions from driving #880 now just confirm that all the more. The car is MUCH more responsive to throttle input, AND REALLY gets up and goes now, even with stock boost! /ubbthreads/images/graemlins/shocked.gif Believe me, you will be MUCH happier with your car doing this mod than you would be with a bigger turbo, MAFT, injectors, etc. DO THIS FIRST! /ubbthreads/images/graemlins/grin.gif
Here's a picture under the hood. The pipes fit great, following the stock route with no issues. The only problem I could see is that its going to make replacing the alternator more difficult.

Talk about STEALTHY! /ubbthreads/images/graemlins/devil.gif

As you can see, the bumper cover still fits perfectly, no drooping, cutting, or reshaping of the cover at all.
 

Rausch

Well-known member
Joined
Dec 21, 2004
Messages
12,049
Location
Cleveland, OH
the finish on the piping is exactly what i want for mine. i've got to get your recipe!!! /ubbthreads/images/graemlins/worthy.gif
 

Its just Rustoleum "Metallic", I think it was called. I expected it to be shinier, more like chrome, like the cap was, but this nice aluminum look is probably better.
 
Support Vendors who Support the GVR-4 Community
Boosted Fabrication ECM Tuning ExtremePSI Fuel Injector Clinic Jacks Transmissions JNZ Tuning Kiggly Racing Morrison Fabrications RixRacing RockAuto RTM Racing STM Tuned
Top