While searching for a solution to high under-hood temperatures I stumbled across some pictures of the OEM hood vent from a 2010 Shelby GT500 and decided to install it in the Galant.
It matches up perfectly with the stock body lines and is surprising cheap at around $70.
Needed:
Hood vent: Ford Part Number AR3Z-16C630-AA
Painters tape
Paint for the exposed metal edges
Metal cutting device (I used a Dremel with the new metal cutting discs)
3M foam mounting tape
Measuring tape
Sharpie
Razor blade
Alcohol
I started by tracing the outline of the hood vent on the box it was shipped in. After tracing the outline, measure the distance from the edge to the raised area and transfer those dimensions to the traced outline. Cut out the template from the box. After the template is cut you can place the hood scoop in the opening you cut to check its accuracy. If it fits well then move on to the car.
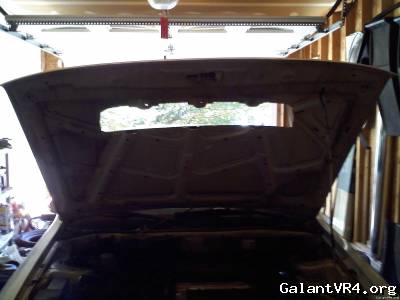
Decide where you want the scoop to be placed and apply painters tape to where the hood scoop will be. I'd recommend locating the center of the hood and template to ensure it will be centered. Trace the template onto the tape and begin cutting. This will take anywhere from 5 minutes to an hour depending on your tool of choice. Remember that you can always remove more material but can't add it back!
Here is what I cut out:
It may look like the structural rigidity would be severely impacted but I barely noticed a difference:
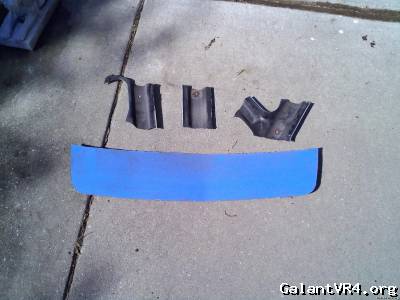
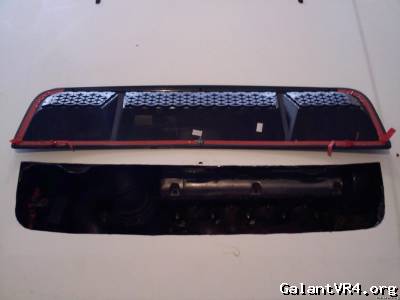
Test fit the hood vent in the hole and perform any additional cutting. The front of the hood vent will slip over the front sheetmetal edge and the rear is secured by 3M tape and a stud. The hood vent has two pieces in the rear on either side that fit into slots on the GT500 hood. I removed these and added some 3M tape over where they were. Mark the location of the stud in the rear and remove the vent and drill the hole.
Remove all the painters tape and cover any exposed edges with touch-up paint.
While that is drying, grab the 3M tape, hood vent, and razor and add tape to the sides for extra stiction.
Once the paint is dry, install the scoop in the hood and secure the stud underneath with a nut (you'll need to check the dimensions youself, I had a random nut that was the right size) ensuring you leave the red tape tags sticking out . Grab your tape measure and measure from the back of the hood to the top edge of the vent and get it centered and square in the hood. Once it's where you want it then grab the red tape tags and pull them out. Find something heavy to place on the scoop (I did it overnight) to get it stuck on there well.
Results:
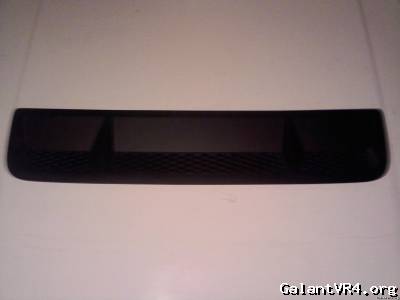


It matches up perfectly with the stock body lines and is surprising cheap at around $70.
Needed:
Hood vent: Ford Part Number AR3Z-16C630-AA
Painters tape
Paint for the exposed metal edges
Metal cutting device (I used a Dremel with the new metal cutting discs)
3M foam mounting tape
Measuring tape
Sharpie
Razor blade
Alcohol
I started by tracing the outline of the hood vent on the box it was shipped in. After tracing the outline, measure the distance from the edge to the raised area and transfer those dimensions to the traced outline. Cut out the template from the box. After the template is cut you can place the hood scoop in the opening you cut to check its accuracy. If it fits well then move on to the car.
Decide where you want the scoop to be placed and apply painters tape to where the hood scoop will be. I'd recommend locating the center of the hood and template to ensure it will be centered. Trace the template onto the tape and begin cutting. This will take anywhere from 5 minutes to an hour depending on your tool of choice. Remember that you can always remove more material but can't add it back!
Here is what I cut out:
It may look like the structural rigidity would be severely impacted but I barely noticed a difference:
Test fit the hood vent in the hole and perform any additional cutting. The front of the hood vent will slip over the front sheetmetal edge and the rear is secured by 3M tape and a stud. The hood vent has two pieces in the rear on either side that fit into slots on the GT500 hood. I removed these and added some 3M tape over where they were. Mark the location of the stud in the rear and remove the vent and drill the hole.
Remove all the painters tape and cover any exposed edges with touch-up paint.
While that is drying, grab the 3M tape, hood vent, and razor and add tape to the sides for extra stiction.
Once the paint is dry, install the scoop in the hood and secure the stud underneath with a nut (you'll need to check the dimensions youself, I had a random nut that was the right size) ensuring you leave the red tape tags sticking out . Grab your tape measure and measure from the back of the hood to the top edge of the vent and get it centered and square in the hood. Once it's where you want it then grab the red tape tags and pull them out. Find something heavy to place on the scoop (I did it overnight) to get it stuck on there well.
Results:
Last edited by a moderator: