holeshotmoe
Well-known member
Been hunting this for a while...Dalan 217326. GVR4/GGSX specific. Seems Dalan was bought out and the new Co. doesn't make it anymore. Last fall I had a hitch vendor contact Dalan and they said they would fabricate one with a 4-6 week lead time. I was too busy and never got around to having it done. So a month ago I get back in touch and now they say they won't. So, I start looking again and come across a guy that says he can get one out of Miami...N.O.S. Price is up by about $50 though. Still, I needed it...so that made it worth it. Final shipped price from Miami to MD was $225.
This is who I dealt with.
Tony Hart
www.hitch-web.com
800-300-4067 x706
Following is series of pics with comments on install. (Mods: this is an in-progress...will complete the article over next couple of days)
.
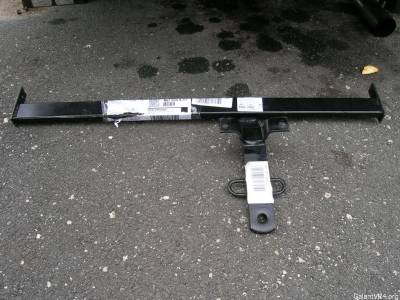
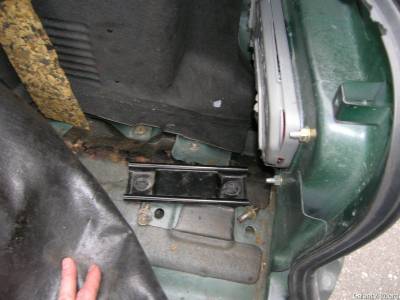
This is the setup. It bolts to the car's tow hooks, and to the inner steel rear bumber tube. Yes, you have to cut a 2.5" x 5" (approx) rectangle through the bottom of the bumper cover.
Basic steps were:
-Back the car up on ramps
-Remove the bumper assy
-Separate the plastic cover
-Drill a couple 1/2" holes in the inner steel bumper
-Cut an access hole through the steel bumper and insert the bolts/washers
-Cut an access through the cover
-Re-assemble and re-install the bumper
-Mount the hitch
Packaged with the hitch were the attaching hardware. One of the lock-washers was too small so I picked one up at the h/w store. Notice the small steel rod welded to the head of the bolts (instructions called these "J-bolts"). This is intended to prevent it from spinning inside the bumper while you tighten the nut.
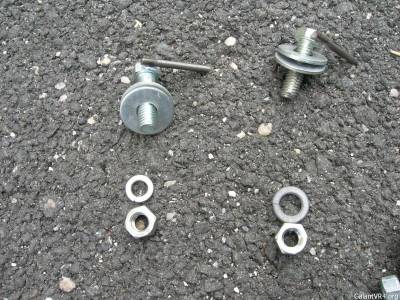
Here's the hardware for the ends to connect. Bolt with steel plate, oval spacer to prevent the bolt from flopping around inside the hook, and (not shown here) lockwasher and nut.
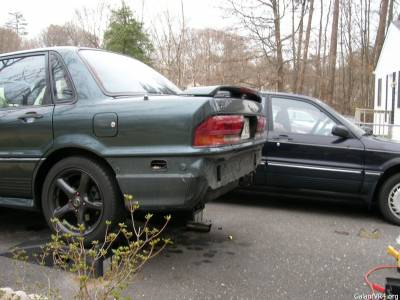
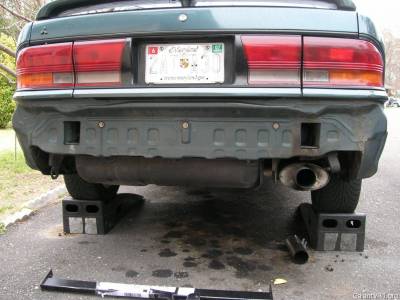
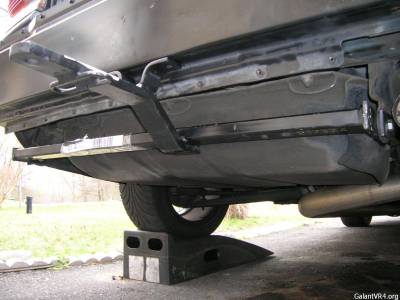
Here's the car with the bumper removed. Thinking it would look cool with a much smaller bumper on there.
Ok, so how do I get the bumper off (ps: I should have looked it up in the manual)? On each side remove:
-Two screws for the side markers
-Two 10mm bolts from inside the wheel well - top, front edge
-Two 10mm bolts at the bottom of each side
-One 10mm bolt from inside the trunk - on the side, near tail light assy
-Pull last: Two 17mm bolts in the through plates under the floor mat. Probably should be standing behind, and leaning against the bumper when you pull the last of these because even when backed up on the ramps, the assy wanted to slide out. The whole piece probably weighs 50-60 lbs or so.
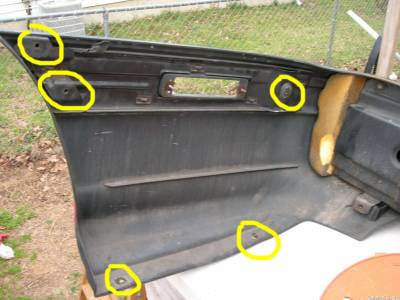
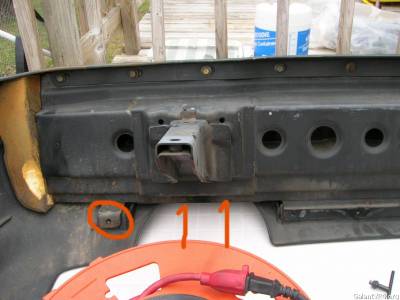
Okay, now you pull the cover off. There's a slew of small bolts, 13 on top, a dozen or so on the bottom, 10mm, that attach the cover to the inner steel bumper...marked in the pic. Recommend a reversible drill or you'll be there all day cranking a ratchet. On the passenger side there is one lone bolt, and directly above where the tailpipe passes through the bumper cutaway, there are two plastic plugs you'll need to remove. These appear as screws but they're just like those that hold the splash shields in the front wheel wells (...and maybe the trunk lining?) The center of these can be unscrewed or pryed out enough to grasp them with your hand or pliers...pull em, then remove the sleeves.
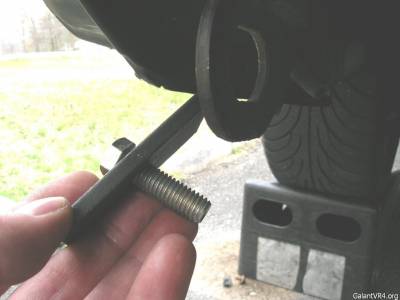
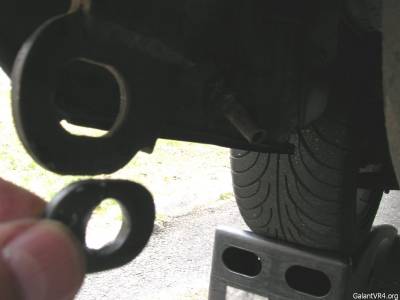
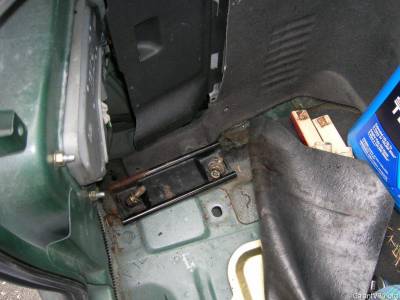
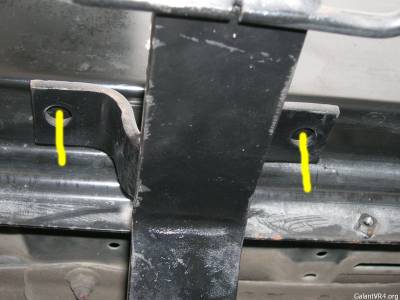
Carefully remove the cover and remount the inner steel bumper to the car. You'll need to leave the bolts a little loose to provide some slop for marking the holes to be drilled. The hitch-to-bumper mounting bracket was slightly off so I needed that extra 1/8" of movement. Attach the hitch to the tow-pulls and just snug the bolts tight. Swing the hitch up to meet the bumper and mark your holes. Swing the hitch back down. Drill your two 1/2" holes.
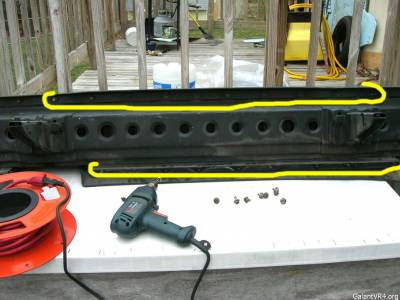
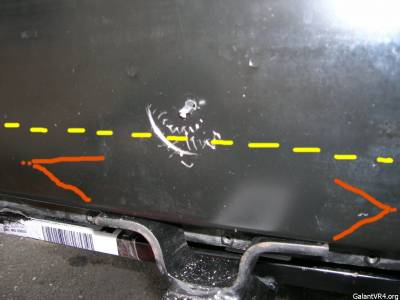
Now that the holes are drilled, need to get the J-bolts inside the bumper. This was sort of a pain. First I tried a hole saw. Though it was made for steel, it just couldn't hang. First the drill bit broke...then the teeth wore dull. Skip the hole saw. Drill a couple 1/4" access holes just above, and a few inches to the outside of the two 1/2" holes you drilled before. NOTE: There's a horizontal support beam inside the bumper (yellow line in pic) a few inches above where you drilled your holes. You must cut your access below this beam. Next, using a sawz-all or sabre-saw with a metal cutting blade, cut two 2-3" grooves that form the shape of a vee (V). Next, pry the narrow end out and bend back out of the way. This leaves a triangle hole to slip the bolts through. Put two flat washers on each j-bolt and tape them to the head of the bolt with scotch tape. Now you have to insert them inside the bumper and snake them over and through the 1/2" holes. After you get them fed through the 1/2" holes, put the nuts on the bolts to keep them there. Don't ask how I knew to do this /ubbthreads/images/graemlins/blush.gif
...mods: to be continued...
This is who I dealt with.
Tony Hart
www.hitch-web.com
800-300-4067 x706
Following is series of pics with comments on install. (Mods: this is an in-progress...will complete the article over next couple of days)
.
This is the setup. It bolts to the car's tow hooks, and to the inner steel rear bumber tube. Yes, you have to cut a 2.5" x 5" (approx) rectangle through the bottom of the bumper cover.
Basic steps were:
-Back the car up on ramps
-Remove the bumper assy
-Separate the plastic cover
-Drill a couple 1/2" holes in the inner steel bumper
-Cut an access hole through the steel bumper and insert the bolts/washers
-Cut an access through the cover
-Re-assemble and re-install the bumper
-Mount the hitch
Packaged with the hitch were the attaching hardware. One of the lock-washers was too small so I picked one up at the h/w store. Notice the small steel rod welded to the head of the bolts (instructions called these "J-bolts"). This is intended to prevent it from spinning inside the bumper while you tighten the nut.
Here's the hardware for the ends to connect. Bolt with steel plate, oval spacer to prevent the bolt from flopping around inside the hook, and (not shown here) lockwasher and nut.
Here's the car with the bumper removed. Thinking it would look cool with a much smaller bumper on there.
Ok, so how do I get the bumper off (ps: I should have looked it up in the manual)? On each side remove:
-Two screws for the side markers
-Two 10mm bolts from inside the wheel well - top, front edge
-Two 10mm bolts at the bottom of each side
-One 10mm bolt from inside the trunk - on the side, near tail light assy
-Pull last: Two 17mm bolts in the through plates under the floor mat. Probably should be standing behind, and leaning against the bumper when you pull the last of these because even when backed up on the ramps, the assy wanted to slide out. The whole piece probably weighs 50-60 lbs or so.
Okay, now you pull the cover off. There's a slew of small bolts, 13 on top, a dozen or so on the bottom, 10mm, that attach the cover to the inner steel bumper...marked in the pic. Recommend a reversible drill or you'll be there all day cranking a ratchet. On the passenger side there is one lone bolt, and directly above where the tailpipe passes through the bumper cutaway, there are two plastic plugs you'll need to remove. These appear as screws but they're just like those that hold the splash shields in the front wheel wells (...and maybe the trunk lining?) The center of these can be unscrewed or pryed out enough to grasp them with your hand or pliers...pull em, then remove the sleeves.
Carefully remove the cover and remount the inner steel bumper to the car. You'll need to leave the bolts a little loose to provide some slop for marking the holes to be drilled. The hitch-to-bumper mounting bracket was slightly off so I needed that extra 1/8" of movement. Attach the hitch to the tow-pulls and just snug the bolts tight. Swing the hitch up to meet the bumper and mark your holes. Swing the hitch back down. Drill your two 1/2" holes.
Now that the holes are drilled, need to get the J-bolts inside the bumper. This was sort of a pain. First I tried a hole saw. Though it was made for steel, it just couldn't hang. First the drill bit broke...then the teeth wore dull. Skip the hole saw. Drill a couple 1/4" access holes just above, and a few inches to the outside of the two 1/2" holes you drilled before. NOTE: There's a horizontal support beam inside the bumper (yellow line in pic) a few inches above where you drilled your holes. You must cut your access below this beam. Next, using a sawz-all or sabre-saw with a metal cutting blade, cut two 2-3" grooves that form the shape of a vee (V). Next, pry the narrow end out and bend back out of the way. This leaves a triangle hole to slip the bolts through. Put two flat washers on each j-bolt and tape them to the head of the bolt with scotch tape. Now you have to insert them inside the bumper and snake them over and through the 1/2" holes. After you get them fed through the 1/2" holes, put the nuts on the bolts to keep them there. Don't ask how I knew to do this /ubbthreads/images/graemlins/blush.gif
...mods: to be continued...
Last edited:
